Saturday, May 30, 2009

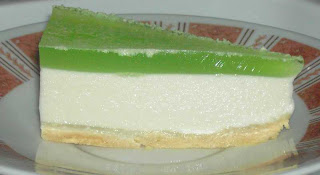
Mango Konnyaku Jelly


Another hot Saturday night... I was supposed to be catching up on my Korean TV drama (快刀洪吉童) on cable but I decided to make this since I'm planning to visit my parents tomorrow. I'm sure my Dad will like this.

This is my first attempt and I have no idea that it yields so much! I filled up 3 trays but was left with half portion in the pot. I got lazy and poured the balance into a bigger tray :P

Maybe because I used mango puree instead of fresh mangoes, the "pudding" is not very fragrant. The texture is nothing like puddings that you eat in restaurants because konnyaku powder is used in this recipe. But if you like Cocon's mango pudding, you'll like this too. Instead of calling it Mango Pudding, I call it Mango Konnyaku Jelly.

Recipe adapted from Table for 2... or more

Ingredients
10gm konnyaku powder
200gm sugar
1.5L water
100 gm creamer powder (coffeemate)
200ml mango concentrate (I just made do with Mango puree, unsweetened)
Nata de coco (as much as u want)

Method

  1. Mix sugar and konnyaku powder together
  2. Boil water, then add in creamer. Stir to dissolve.
  3. Slowly spoon in sugar mixture.
  4. Stir well, and let simmer for 10 minutes on low fire, stirring once in a while.
  5. Fill moulds with Nata de Coco with desired amount.
  6. Turn off fire and pour in mango concentrate. Stir.
  7. Pour jelly mixture into moulds. Chill well before serving.

Banana Bread - Quick Bread for Machines

This is a quick bread recipe using the bread machine but I usually bake this in a loaf pan in my convection oven. I was thinking I do not want to slice the bread so I baked them in small muffin tins today.

After reading through the reviews, I made some modifications to the recipe and here's my revised version. For the original recipe, pls check it out here.

Banana Bread Recipe
Ingredients
230 g all-purpose flour
1 tsp baking powder
1/2 tsp baking soda
120g white sugar
3 TBSP (45 ml) vegetable oil
2 eggs
3 bananas, peeled and cut into small sizes

Method
  1. Place ingredients in the pan of the bread machine.
  2. Select the Dough setting, and press Start. Mix the bread for 3 to 5 minutes until the bananas are mashed and all ingredients are thoroughly combined. If necessary, use a rubber spatula to push the dough from the sides of the bread pan. When 3 to 5 minutes have passed on the clock display, press Stop. Do not continue mixing. Smooth out the top of the loaf with the rubber spatula.
  3. Select the Bake setting, and press Start. The Bake cycle time may vary with machines, but should be about 50 minutes. To test the bread for doneness, insert a toothpick into the center top. Remove the toothpick. If the bread is done, the toothpick will come out clean. If there is dough on the toothpick, reset the machine on Bake and continue to bake an additional 10 to 15 minutes. Test again with the toothpick to assure the bread is completely baked. Remove the pan from the machine, but allow the bread to remain in the pan for 10 minutes. Remove the bread to cool completely on a wire rack.

Cream Cheese Bread - for bread machines

School holiday starts today and this is what I dread most. Imagine having all 3 kids at home, creating havoc! And we're not talking about 1 week affair, it's 1 solid month! Imagine lugging 3 children to the supermarket... I don't even want to think about it. The only consoling part is I do not need to rush to send/fetch both DD1 and DS2 to/fro school. Oh well, life goes on.

I always like to plan ahead as I don't like last minute "fire fighting", although sometimes we don't have a choice. I've been baking more breads lately, building up my freezer stash in case I do not have time for grocery shopping or due to bad weather, we can't go to the supermarket. I'm at least assumed my kids won't go hungry.

This Cream Cheese Bread was first shared by Pure Enjoyment in Kitchen Capers. The recipe yields a very soft bread without any bread softener/improver. I fell in love with it instantly and personally, I prefer this to the Hokkaido Milky Bread which used to be my favourite.

I made this again but this time round, instead of using the usual Philadelphia cream cheese (which was out of stock at the local supermarket near my place), I bought a house brand cream cheese from a bakeware shop. I must say the taste is somewhat "altered". The bread turned out to be slightly oily and has a slight aftertaste. So my advice is, if you want to make this bread, please use a good cream cheese.

Again, I doubled the portion and made more bread as stash.

Topped them up with grated cheddar cheese since my kids love them :)

Do give it a try and let me know if you prefer this bread too ;-)

Cream Cheese Bread
Ingredients ( 1 loaf )
160g water
250g bread flour
50g cream cheese
10g powder milk
15g sugar
3g salt
20g butter
2.5g dry yeast

Directions

  1. Put the ingredients in the bread machine on regular or fast loaf cycle.
  2. Slice and enjoy .

Apple & Celery Juice

I've been giving my family mixed fruit juice and ABC juice. When I stumbled upon Noobcook's blog and saw this, I knew I just have to try it as I love both green apples and celery.

DH grimaced as he drank this but my 2 elder kids enjoyed themselves very much ;-)

As for myself, I definitely love this drink!

Thursday, May 28, 2009

Multi-grain bread (basic white loaf recipe)

You can have different variations when you make this bread, it is just so versatile :)

Today, I baked it as a multi-grain bread by adding flaxseed, sunflower seeds, pumpkin seeds and white sesame seeds. Yum yum!
Ingredients
2 cups cold water
6 cups bread flour (you can vary the ratio 1 cup plain: 2 cups bread flour if you wish)
2 tbsp sugar
2 tsp salt (salt and sugar at opposite sides of the pan)
4 tbsp (60ml) olive oil/vegetable oil/melted butter
2 tsp yeast (make a hole in the centre & put in the middle of the flour)

Method
Place ingredients in the pan of the bread machine in the order recommended by the manufacturer. Select Basic Bread cycle; press Start.

Crispy Oven Baked Chicken Wings

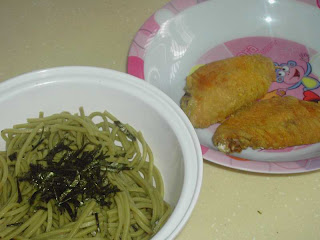
This is so yummy!! Absolutely the best crispy chicken wings MINUS the oil :) You can now say goodbye to deep fried wings!


We had these with cold soba and both DD1 and DS2 were given 2 wings each. While the 2 older kids were washing their hands, I found 1 chicken wing missing from DS2's plate. I was worried the dog may have chomped it down but he was sound asleep in his crate. Has the wing "flown" away? The very next moment, I saw my coming 15 months dd munching on it, smiling away. Hahaha!! I gave her that piece for dinner and she finished it all up ;-)

Recipe adapted from here but I've modified it to suit our taste buds.

Ingredients
(A)
10 - 15 mid joint chicken wings
1 tbsp light soy sauce
1/2 tsp sesame oil
some pepper

(B)
1/2 - 3/4 cup plain flour
1/2 - 3/4 cup rice flour
1 tbsp curry powder

Method

  1. Wash and drip dry chicken wings for at least 30 mins.
  2. Add soy sauce, sesame oil and pepper, season for 1 hour.
  3. Overlay the roasting rack with aluminium foil for easy cleaning (you may rub some vinegar on the aluminium foil to prevent the skin from sticking to the foil).
  4. Preheat oven at 200C.
  5. Mix the flour and curry powder together.
  6. Dredge the chicken wings till well coated. Shake off excess flour.
  7. Lined the floured wings on the roasting rack.
  8. Bake the wings for about 20-30 minutes and turn the wings over and bake another 20-30 minutes or until the wings are cooked.
  9. Serve immediately.

Earl Grey Chiffon II

I was out doing my grocery shopping and somehow ended up in the Beverages (coffee/tea) section. I don't usually hang out there unless I've received specific instructions from DH to get his regular coffee mix. While browsing through the shelves, I spotted the Earl Grey Tea and was remembered I need to replenish my supply.

After preparing lunch, I have some time and decided to bake the Earl Grey Chiffon cake again. Heeding HHB's advice, I made this with the tea leaves and I up the recipe to 4 eggs instead 3 to fit my 8" round. I think if I were to bake this again, I'll probably use a 4 egg yolks and 5 egg whites recipe to get a better height.


This cake didn't crack on me and it yields a beautiful top (eh... base when inverted).

When the cake is completely cooled, I managed to unmould it without much effort, looks like it's well baked and the baking pan is well seasoned now ^-^

If you like Earl Grey tea, I'll pretty sure you'll like this cake too :)

Below is the modified the recipe that I've made to suit my family's need but here's the original recipe if you want it.

Earl Grey Chiffon Cake
Ingredients
(A)
4 egg yolks
50g caster sugar
1/2 teaspoon salt
65ml vegetable oil
100ml water
4 satchels Earl Grey tea powder

(B)
130g cake flour
1 & 1/2 teaspoons baking powder
*Sifted

(C)
4 egg whites
40g caster sugar
1 tbsp lemon juice

Method
  1. In a bowl, using hand whisk, whisk yolks and sugar till sugar dissolves.
  2. Add oil and salt, whisk and add water. Stir well.
  3. Fold in sifted flour and baking powder, mix well.
  4. Add in the earl grey powder and mix well.
  5. In another bowl, using an electric mixer, beat till the whites are frothy. Add in lemon juice and beat till soft peaks.
  6. Add in sugar gradually and beat till stiff peaks.
  7. Fold in 1/3 of the whites into the yolk mixture using a rubber spatula till incorporated.
  8. Pour the mixture to the remaining egg whites and fold in gently till incorporated.
  9. Pour the batter into a 8" round pan/chiffon tube pan. Bang the pan on the table to get rid of bubbles.
  10. Oil a piece of aluminium foil and cover the pan loosely. Bake at 170 deg.C for 10mins.
  11. Turn down the temperature to 160 deg.C and bake for 20mins.
  12. Remove the foil and reduce the temperature to 150 deg.C and bake for a further 10 to 15mins to brown the surface.
  13. Remove from the oven and invert the pan. Remove the cake from pan when it's completely cooled.

金针菇芽菜瘦肉汤 & Sambal Mackerel

MIL gave me a bottle of sambal chilli and I have the perfect idea what to cook it with. However, the kiddos are still young so they can't quite take spicy stuff. DH can't consume anything spicy now so I pan-fried another portion of fish for them separately.

The original recipe came from our local DJ, Fenying but I only check out her cakes/kueh recipes as they do come with English translation. I saw this recipe in Irene's blog and she is really kind to help with the translation.

I like the slightly spicy taste of the ginger in this soup and I'm glad none of the kids protest. However, they don't like the ingredients in the soup except tomatoes.

金针菇芽菜瘦肉汤
材料1
大豆芽 : 150g (洗净

材料2
瘦肉 : 200g

材料3
金针菇 : 100g (切去根部, 洗净)
番茄 : 2个 (洗净, 切块)
粉丝 : 1扎 (用水泡软)
姜 : 4片

1) 把瘦肉洗净, 切片, 加入少许盐, 糖, 粟米粉拌匀, 待用
2) 把大豆芽放在白鑊炒香, 加水煮开
3) 下其他材料拌匀, 再滾10分鐘, 加盐调味即可

功能
健脾開胃, 去湿除煩, 更可消除疲勞, 暢通小便,可日常经常食用

Chilled Yakult Yogurt Cake

DH is down with a fever since Sunday and I've been pretty busy at home. He still helps out with doing his routine chores and even bathe the kids but I try to get him to rest more. Unfortunately he can't rest as he's rushing a report and had been working from home despite a high fever. Maybe that explains why he has not recovered and has extended another 2 more days MC :-(

I think my hands are itchy now... itching to bake something... hahahaha! Was surfing the net and found this recipe. I've done a marshmallow cake with jelly layer on top on a few occassions and the kids love it. However, I do not have enough marshmallows today so I decided to try this new recipe.

I don't know why but I just can't get this jelly portion correct. Everytime I make the jelly layer, the fillings will float all over the jelly, making it very messy. I've checked the fillings before spooning in the jelly and am very sure it's already set. Sigh.. I should have left it in the freezer for another 15 mins or so to harden it further. I must get it right the next time I make this (I always tell myself that!! Argh!!!!!)

Before slicing the cake, took a quite peek at the sides and was quite disappointed to see a thin layer of jelly.

But after slicing it, I see a reasonable height of the jelly layer. Think the next time I make this, I should make a thicker jelly layer.

I used marie biscuits instead of digestive biscuits as I don't like the taste of the latter.

Recipe adapted from here
Chilled Yakult Yogurt Cake
Ingredients for the base
80g marie biscuits
40g melted butter

Ingredients for the filling
1 tbsp gelatin
3 tbsp sugar
150ml water
100g plain yogurt
150ml yakult (I used 100ml apple flavour + 50ml original flavour)
1 tbsp lemon juice
150ml non-diary whipping cream

Jello Topping
1/2 pkt Jello
240ml water
2 tsp gelatin

Method
  1. Mix the biscuits crumbs with melted butter, and press firmly to the base of the cake pan. Chill for later use.
  2. Dissolve gelatin and sugar with water. Set aside to cool.
  3. Beat yogurt, yakult and lemon juice until well blended. Add cooled gelatin solution and mix well.
  4. Whip the non-diary whipping cream till mousse state.
  5. Add the yogurt mixture to the whipped cream and mix well.
  6. Pour the combined mixture onto the cake base.
  7. Chill in the fridge to set.
  8. Boil all Jello topping ingredients using very low heat until dissolved. (Not supposed to bring to boil.)
  9. When the cake is set, spoon the cooled Jello solution on the cake and refrigerate again.

ACT Juice


Apple, carrot and tomato juice
Improve skin complexion and bad breath.

Wednesday, May 27, 2009

Char Siew Butter Rice

Do you have a comfort food? I'm not sure if Char Siew is our comfort food but I cook this pretty often and no, the family's not complaining :)

We had Char Siew Rice for dinner last night and everytime I cook this, I cook enough for 2 meals so that I can keep a portion for cooking fried rice the next day.

I used "Wu Hua" meat for my char siew and no oil added but check out the amount of oil from the meat!

Today, I don't feel like having fried rice as I don't like the finished dish. I just feel that it lacks the "omph" in it. I usually try not to cook fried rice, unless I have no other options. Cracking my head and draining my brain cells, I decided to cook butter rice.


I don't usually add meat into my butter rice but there's no harm having a new flavour. Now, that's the beauty of cooking as you can add any ingredients to your likings ;-)

And for sides, I was too lazy to whip up anything else so we just had salad with Italian Dressing.

Monday, May 25, 2009

Tau Pok with fillings

Tau pok, tau kwa, tau hoo, tau kee, tau huay etc.... All these are in dialects but what do you call them in English? Bean curd?? I'm always very confused when it comes to naming food. Is there a proper way to address them? Oh bother...

I've always love them, regardless of the texture and shape. I usually add some minced meat, fish paste, water chestnut and some fresh mushroom. I don't add any other seasonings as I find the fish paste already salty enough.


I've always prepared this dish without flipping the tau pok inside out but after seeing The Little Teochew's blog, I decided to try her method. Alas, it was a mistake. The tau pok got stucked to my AMC pan as I did not add any oil. I never need to add any oil when I roast it with the skin outside. Alright, I admit it's my negligence this time round. Lucky thing is, only a small portion of it got stucked.

DH doesn't usually eat bean curd stuff but he stole a piece of this as he likes the juicy fillings and the crunchy water chestnuts :)


Kueh Kosui

I made this 2 weeks ago and brought it for a mini-family gathering. The intention was to meet up with Sister E's family at Hort Park, then pack dinner back for our parents. However, Dad wanted to eat out at his favourite coffeeshop @ Alexandra Village so we arranged to meet there for dinner instead. While waiting for our food to be served, we had Kueh Kosui as appetiser. This is the first time my parents try this kueh and I'm glad they like it :)


Pic extracted from wikipedia

I've made this several times and everytime, I use grated coconut (pre-packed) from a local supermarket. Sister E commented that the coconut is too coarse. I deliberately got DH to buy the grated coconut from a dry market. However, it was grated with the testa/endocarp and Sister E asked why can't I buy grated coconuts without it?? Eh, but that's how it's being sold, and I'm not like buying 1 whole coconut. It's so difficult to please this sister of mine :P

The thing I like about this recipe is, it is still soft straight from the fridge, no thawing required. And credit goes to Aunty A for sharing this recipe with me ^-^

Last evening, I decided we should go back to my parents today and I did a quick check on my ingredients, I've got everything minus the grated coconut. Sister E did this with toasted oats before and since the dry market is already closed, I decided to try out her method. The taste is not as fragrant as grated coconut but I do like the taste of it. What's more, this makes the kueh a healthier option now. However, Dad only took 1 piece today and kept the balance in the fridge :-(

Sunday, May 24, 2009

Chrysanthemum Agar Agar


HOT is the only word I can describe the weather now. I wanted to make jelly for the family but with DD1 and myself still coughing away, I decided on agar agar instead since it can set at room temperature and need not be eaten cold.

Instead of just making the plain agar agar, I decided on chrysanthemum agar as it's refreshing for a hot day. I just prepare the agar as per instructions on the packet but used chrysanthemum tea instead of water. A point to note is, when you are preparing the chrysanthemum tea, you need to add a little bit more sugar than required, else you will end up with a bland agar agar.

The next time I make this, I may want to replace the agar agar powder with water chestnut powder.

Ingredients
A handful of chrysanthemum flowers
A handful of wolfberries
1300ml water
A packet of agar agar powder
Rock sugar to taste

Method
  1. Wash the chrysanthemum flowers and wolfberries.
  2. Bring water to boil.
  3. Put in the chrysanthemum flowers and let it boil for 5 - 10 mins. Remove from heat. Steep for 20 mins, covered.
  4. Sieve the tea into another pot.
  5. Add agar agar powder and rock sugar. Stir constantly and bring to a boil. Make sure that the powder and sugar have dissolved.
  6. Add in the wolfberries and let it brew in low fire for another 10-15 mins.
  7. Pour into moulds to set and let it cool. Chill before serving.

Saturday, May 23, 2009

ABC Juice


This looks very much like watermelon melon juice but with a few of us still coughing away, watermelon is a no-no for now. I decided to make ABC juice for the kids since I've still got a beetroot in my fridge.

Beetroot is known to be good for helping to treat anaemia and is good for the immune system. If you have pink urine after consuming beetroot, there is no cause for concern as this is perfectly normal ;-)

Friday, May 22, 2009

Cream Cheese Chiffon

This recipe was shared by Connie in Kitchen Capers and there are so much raves about it. I later found out that the recipe was adapted from Alex Goh's book.

My good friend SL tried a Cheese Chiffon cake using sliced cheddar cheese and the result was disappointing. I shared this recipe with her and they like this version better. Although I've got this recipe on hand for the longest time, I end up not baking it again. But after Aunty A passed me some to try, I was reminded that I need to at least bake this once. I don't know if it's just me but I just have to try baking it once, at least I can say I've tried.

While baking in the oven, this cake didn't crack on me at all :)

As I was sliding my knife round the sides of the cake, I immediately felt something quite different. When I overturned the cake, it just slide out of the cake pan very easily and there I have it, a big hollow cake at the base! According to Rei's blog, having a sunken cake means the oven temperature is too high. But I wonder why because I've been using the same temperature throughout my previous chiffon cake making and I do not have such a problem.

It is definitely a disappointing sight but the consoling part is the cake is yummy. I will definitely make this again.

Ingredients
(A)
60g milk
40g cream cheese
25g butter

(B)
65g Cake/Top flour (sifted)

(C)
4 large egg yolks

(D)
4 large egg whites
100g sugar (I used 70g)
pinch of salt
1/8 tsp cream of tartar

Method
  1. Preheat oven 170˚C.
  2. Cook (A) over double-boiler until well blended and thickens. Remove from double-boiler and let it cool down.
  3. Add (C) into cooled down cheese mixture and mix until well combined.
  4. Fold in (B) and mix until smooth.
  5. Beat egg whites until frothy, add cream of tartar and beat till soft peaks. Add salt and sugar gradually and beat till stiff peaks.
  6. Fold 1/2 of the egg whites into cheese mixture, gently with a rubber spatula until just blended.
  7. Pour cheese mixture (step 6) into the rest of egg whites, fold it gently with rubber spatula until blended.
  8. Pour batter into a 9-inch (22cm) chiffon cake pan, bang the pan on a hard surface to release the bubbles and bake for 35 - 40 minutes.
  9. When the cake is cooked, invert the cake to cool. Remove the cake from the cake pan when it is completely cool.

Fa Gao II


Sister E deliberately took measurements for me when she made Fa Gao last Saturday since my Fa Gao making hasn't been very successful. I decided to give it another try and I must say it's so much better than my previous attempts. However, the texture is still quite dense. Is Fa Gao supposed to be dense? I have no idea as I don't like Fa Gao and I've not eaten this for a long time.

I was supposed to make a cross on the batter before putting them into the steamer but I was way too excited and forgot this step. Nevertheless, the Fa Gao did bloom :)

Recipe
Method
330g Self Raising Flour
180g sugar
1 egg
380ml

Method
  1. Mix Self Raising Flour & Brown sugar into a mixing bowl.
  2. Add in water and egg, mix until well-combined.
  3. Pour batter into cups till 90% full, steam on high heat for 30 minutes or till cooked.

Thursday, May 21, 2009

Pumpkin Rice II

While I was preparing breakfast in the kitchen, DS2 shouted out for me, "Mommy, come, quick!" I got a shock and dashed towards the bedroom. A "surprise" was waiting for me... DD3 climbed up the bed all by herself! Alright, today marks her milestone of climbing beds, hahaha! Instead of telling her not to climb, I taught her how to come down the bed the correct way ie legs go down first. I hope she gets the message fast as I do not have time to watch over her all the time especially if I'm busy in the kitchen.

Now, that's another good reason why I should continue to cook 1 dish meals:P


I've always cooked my pumpkin rice simple until I saw NoobCook's blog. She added mushrooms and wolfberries. I'm very curious to find out how it'll turn out as I've grown up eating pumpkin rice cooked by my mom. I didn't follow her recipe but simply added fresh mushrooms and wolfberries to my rice.

I bought an over 700g pumpkin and was thinking of keeping a portion to make pumpkin buns. But this bun recipe requires over 300g of pumpkin puree, that means I'm only left with less than 300g of pumpkin for my rice. As I prefer a more flavoured savoury rice, I just dumped the whole lot of pumpkins into the pot and cook it anyway. A bit overdosed on pumpkin here but I just love pumpkins so I'm not complaining ;)

DH is not a fan of pumpkin, in fact, he's not a fan of healthy food. Everytime I cook this, he will go "Not pumpkin rice again!?" He made the same remark (as usual) but he finished up every single grain on the plate I served him. I like this version better so I'll be cooking this more often ^-^

Wednesday, May 20, 2009

Bread again...


Not bread again?? Yes, if you have been reading my blog, you'll know I bake bread almost every other day.

Using my basic white bread recipe (I just love this recipe!), I made walnuts and raisins bread again. The last time I baked bread, I added the nuts and fruits 10 mins before the cycle ends. This time round, I added them towards the last 5 mins but the fruits and nuts seemed to have "dissolved" into the bread dough again. I suspect it's because I've chopped the fruits and nuts too finely (DD3 is eating this so I don't want any choking hazard ingredients in the bread).

Before I bought the bread machine, I hand-kneaded my bread dough and I don't have such a problem. That's because after rolling out the dough, I added the nuts and fruits and folded the dough. But with a bread machine on hand, I'm too lazy to bring out the dough and do it the manual way. In addition, I have "better" things to do (ie to coax dd3 to nap/to remind dd1 to do her homework!).

I'm getting lazy lately, always not bothering myself to do the egg wash, thus that explains the dull looking bread.

This pic was taken on the day the bread is baked. The bread is soft and fluffy.

This bread was kept in the freezer and left to thaw overnight. The texture is almost as good as freshly baked :)

Interestingly, the nuts and fruits are more visible in the loaf bread.

Makes me wonder why...??


Ingredients
1 cup cold water
3 cups bread flour (you can vary the ratio 1 cup plain: 2 cups bread flour if you wish)
1 tbsp sugar
1 tsp salt (salt and sugar at opposite sides of the pan)
2 tbsp olive oil
1 tsp yeast (make a hole in the centre & put in the middle of the flour)

Method
Place ingredients in the pan of the bread machine in the order recommended by the manufacturer. Select Basic Bread cycle; press Start.