A few years ago, I received this email circulation.
"I cdn'uolt blveiee taht I cluod aulaclty uesdnatnrd waht I was rdanieg: the phaonmneel pweor of the hmuan mnid. Aoccdrnig to a rseearch taem at Cmabrigde Uinervtisy, it deosn't mttaer in waht oredr the ltteers in a wrod are, the olny iprmoatnt tihng is taht the frist and lsat ltteer be in the rghit pclae. The rset can be a taotl mses and you can sitll raed it wouthit a porbelm. Tihs is bcuseae the huamn mnid deos not raed ervey lteter by istlef, but the wrod as a wlohe. Such a cdonition is arppoiatrely cllaed Typoglycemia :)- "
http://en.wikipedia.org/wiki/Typoglycemia
Amazing right? And we were told spelling is important...
Monday, August 31, 2009
Sunday, August 30, 2009
DS2 is 4 today!
I know I've already baked a cake for DS2 on Friday but today is his actual birthday. I had initially planned to bake a small cake for a cake cutting session at home but since we have plans to visit my parents today, I decided to bake a bigger cake instead. Using the same chiffon cake base, I modified it into a 3 eggs recipe.
 This is one of the rare cases where I get a nice cake without tearing/breaking the cake base ^-^
 My frosting sucks, as usual, and the easiest way out is to cover them up. This cake wasn't exactly planned for and I do not wish to use candies again. Thank goodness I went grocery shopping yesterday and bought some organic golden kiwis and seedless grapes. So to save my embarrassment, my best bet now is to slice them up to cover the frosting.
 Interestingly, some of my family members thought that this was a store-bought cake! I'm so flattered!
 Nephew D frowned upon seeing this cake as he proclaimed he's not a fruit person. Since this is a home-baked cake by his ferocious auntie, he ate a slice I gave him :P
DS2 asked for fruit cocktail in this cake but the silly mother of his bought a TROPICAL fruit cocktail instead. I've never been a fan of fruit cocktail so when I saw the word "Fruit Cocktail" on the can, I just grabbed one at the supermarket. I only realised that fruit cocktail comes in 2 form, one "original" and one TROPICAL. The cake collapsed as I was slicing it. I think it's because I've overloaded the layers with too much canned fruits. I should go easy on the fillings and not be too generous.
Mixed Fruits Cake
Ingredients
(A)
3 egg yolks
Pinch of salt
20g castor sugar
(B)
50ml corn oil
85ml milk
(C)
110g cake flour
1/2 tsp baking powder
*sifted together
(D)
3 egg whites
1/4 tsp cream of tartar
20g sugar
Cream Filling
Ingredients
400ml dairy whipping cream
2 - 3 tbsp icing sugar
Method
- Mix ingredients (A) well with a hand whisk.
- Add (B) into yolk mixture.
- Stir (C) into yolk mixture.
- Whip egg whites in a clean mixing bowl until big bubbles are formed. Add in the cream of tartar and whip until white in colour. Add in sugar over 3 times and whip until egg whites is stiff.
- Fold in 1/3 of the whites into the yolk mixture using a rubber spatula till incorporated.
- Pour the mixture to the remaining egg whites and fold in gently till incorporated.
- Pour batter into a 8" round and bake at 170C for 15 minutes.
- Reduce temperature to 160C and bake for another 25- 30 mins or until cooked.
- Invert cake and leave to cool.
- Cut cooled cake into 3 layers.
- Whip the cream with icing sugar until stiff.
- Sandwich the cake with cream and canned fruits. Repeat with another layer of cake.
- Frost the final layer with the remaining whipped cream and decorate as appropriate.
Saturday, August 29, 2009
Gummy Bear Cake
 This is a follow up post on DS2's birthday.
We had visitors at my inlaws and I'm not sure if the texture of the cake is alright. I remember the first time I baked a layered cake, I overbaked the sponge cake and the cake was too dry. I hope I won't embarrass myself today (kept my fingers crossed throughout).
 This is a 2 layer cake, sandwiched with canned peaches. The cake is light and fluffy. I'm glad I didn't cause any discomfort to anyone, and that's a great relief. Phew!
 The fresh cream tasted quite alright and I'm happy with the end result. Whipping of dairy cream is not that scary after all. I used to buy this non dairy whipping cream (house brand) from a local bakeware shop but I find that it has a very strong taste of palm oil which I detest. I'm now more confident to use dairy cream and this means I have more options when I bake layered cakes, yippy! :)
 Friday, August 28, 2009
DS2 turning 4 (^-^)
When it comes to birthdays, my brain cells will go into a devastated mood as there are simply too many choices and I always cannot make up my mind on the selections. Yes, call me flicker minded :P
I've always wanted to make a matcha tiramisu cake but DS2 wanted a clown cake after flipping through my Wilton Cake Decorating Beginner's Guide. When he saw the fish cake was decorated with lots of candies, he changed his mind. I was surfing on the internet for more ideas (actually, I was looking for the easiest cake decoration) and saw a dinosaur cake which look really simple but it's a huge cake. With a child (and his mother) that's constantly changing his mind, I decided to give him a "suprise" cake. I had the intention to make a smiley cake for him, for I thought it looked simple enough for me to try out. Just 2 days ago, I casually mentioned about it but he doesn't seem excited and gave me a "HUH, smiley face cake?" look. Looks like I'm back to the starting point again.
His birthday is this coming Sunday but since we'll be going over to my inlaws for dinner tonight, I decided to have the celebration there (with 3 more adults and 2 children to finish up the cake :P).
Anyway, I have decided to try using dairy whipping cream this time round instead of the usual non dairy. I thought it's "healthier" since there are no chemicals added. At this point in time, I'm still clueless on the design for the cake.
Baked the cake yesterday and after ransacking my fridge, found a pack of gummy bears sitting in the fridge for the longest time but still within expiry date. I decided to make do with whatever junks I can find in my fridge (good time to clear them out :P)
The dairy cream didn't whip up as much as non dairy cream. I didn't measure how much I used but simply poured out 1/3 portion from the carton. Added some icing sugar to taste and whipped till stiff.
 There are other brands of dairy whipping cream but I bought this with 38% fat to try out. A bit creamy for me but will see how it goes with the cake.
Using the same chiffon cake base, I baked them in 2 pans, one for DS2 cake cutting tonight and another for his form teacher (for Teachers Day).
I've always wanted to make a matcha tiramisu cake but DS2 wanted a clown cake after flipping through my Wilton Cake Decorating Beginner's Guide. When he saw the fish cake was decorated with lots of candies, he changed his mind. I was surfing on the internet for more ideas (actually, I was looking for the easiest cake decoration) and saw a dinosaur cake which look really simple but it's a huge cake. With a child (and his mother) that's constantly changing his mind, I decided to give him a "suprise" cake. I had the intention to make a smiley cake for him, for I thought it looked simple enough for me to try out. Just 2 days ago, I casually mentioned about it but he doesn't seem excited and gave me a "HUH, smiley face cake?" look. Looks like I'm back to the starting point again.
His birthday is this coming Sunday but since we'll be going over to my inlaws for dinner tonight, I decided to have the celebration there (with 3 more adults and 2 children to finish up the cake :P).
Anyway, I have decided to try using dairy whipping cream this time round instead of the usual non dairy. I thought it's "healthier" since there are no chemicals added. At this point in time, I'm still clueless on the design for the cake.
Baked the cake yesterday and after ransacking my fridge, found a pack of gummy bears sitting in the fridge for the longest time but still within expiry date. I decided to make do with whatever junks I can find in my fridge (good time to clear them out :P)
The dairy cream didn't whip up as much as non dairy cream. I didn't measure how much I used but simply poured out 1/3 portion from the carton. Added some icing sugar to taste and whipped till stiff.
There are other brands of dairy whipping cream but I bought this with 38% fat to try out. A bit creamy for me but will see how it goes with the cake.Using the same chiffon cake base, I baked them in 2 pans, one for DS2 cake cutting tonight and another for his form teacher (for Teachers Day).
 Since this is going to be a kiddie cake, I got the kids to help decorate it. They were thrilled! However, there were some argument among the siblings and things turned sour. But of course, they make peace within seconds and were busy decorating the cake again. This is their masterpiece, though there is nothing to shout about, the kids are happy with their creation.
 This cake is for DS2's form teacher. I do not have enough whipped cream so I poured out a small portion of it and started whipping. When I was almost ready to turn off the mixer, the whipped cream curdled! I've over-whipped the cream within a few seconds! Argh!! Really mad with myself. I thought of swapping the cake, ie the round cake for the teacher but DS2 doesn't want a heart shaped cake as he thought it was girlish. I have no choice but to be thick-skinned and give his teacher this cake, I hope she doesn't mind the ugly cake :P
It's time to decorate the cake for his teacher. DS2 helped to layer the sliced canned peaches (he did this all by himself, with minimal help from me) in between the cake layers. He wanted to decorate the gummies within a heart so I took out my biggest cookie cutter and did a stamp chop on the cake to assist him. After that, he added a border all around. When he's done, he looked very pleased with himself but sulked for a moment. He said his teacher's cake looks better than his birthday cake. My guess is this cake is loaded with more gummy bears. After sending off DS2 to school this morning, I touched up his cake a little by adding more gummies and chocolates. Found a pack of marshmallows sitting right at the back of the fridge and decided to use them too. When DS2 saw his cake this afternoon, he looked satisfied and commented that his cake is better than his teacher's now. Oh, kids....
 I'll be back to update on the cake after slicing it tonight.
Gummy Bear Cake
Ingredients
(A)
4 egg yolks
Pinch of salt
30g castor sugar
(B)
60ml corn oil
125ml milk
(C)
150g cake flour
1/2 tsp baking powder
*sifted together
(D)
4 egg whites
1/4 tsp cream of tartar
30g sugar
Method
- Mix ingredients (A) well with a hand whisk.
- Add (B) into yolk mixture.
- Stir (C) into yolk mixture.
- Whip egg whites in a clean mixing bowl until big bubbles are formed. Add in the cream of tartar and whip until white in colour. Add in sugar over 3 times and whip until egg whites is stiff.
- Fold in 1/3 of the whites into the yolk mixture using a rubber spatula till incorporated.
- Pour the mixture to the remaining egg whites and fold in gently till incorporated.
- Pour 1/2 batter into a 8" round and the balance half into a heartshaped baking pan and bake at 170C for 15 minutes.
- Reduce temperature to 160C and bake for another 15- 20 mins or until cooked.
- Invert cake and leave to cool.
- Cut cooled cake into 2 layers.
- Decorate as desire.
Thursday, August 27, 2009
Hotdog/Sausage bread
 Using the 65°C tang zhong (湯種) bread that I've made yesterday, I bought some hotdogs/sausages and this was what the kids had for lunch today. Should have added more greens but I'm only left with tomatoes and didn't have time to go to the supermarket today.
Wednesday, August 26, 2009
65°C tang zhong (湯種) bread
I first saw this in Angie's Recipes and later in Florence's blog and many bloggers gave good reviews for the bread using this water roux starter/tang zhong starter. I've always wanted to give it a try after reading the positive reviews. What deters me was the cooking of the water roux starter as I do not have a cooking thermometer. After procrastinating for over a year, I finally made an effort and gave it a go today.
 Here's my tang zhong/water roux starter, I'm not sure if I've obtained 65°C but the texture looks quite similar to what Florence has posted so I assume I'm almost there.
 I doubled the recipe again and managed to get 100g x 9 buns.

 I've initially wanted to add some black sesame seeds to make a loaf of sesame bread but I forgot to add it in at the last stage. These were already washed and drained, had to discard it since I do not know if they keep well. I just hate to waste ingredients or whatsoever food, it is just too sinful. Everytime I dumped leftovers into the bin, I always feel a great sense of guilt, thinking of the poor folks in developing countries dying of poverty. This leads me to recall Kevin Carter's Pulitzer Prize winning photograph, featuring a vulture waiting for a famine striken child to die. We should be constantly reminded never to waste food and not to take things for granted.
Alright, back to the bread, I'm not exactly satisfied with the texture of this bread. To me, the Matcha bread and the Anpan bread yield the same softness. Also, the bread is somewhat chewy and DH doesn't quite like it. I'm not sure if it's because I've replaced water and milk powder with milk (which I doubt) or I've not achieved the correct roux starter temperature. I'm sure I'll give this roux starter another try (not so soon though).
Water Roux/Tang Zhong starter
Ingredients
50 g Bread flour
250 ml Water
Method
65°C tang zhong (湯種) bread
Ingredients
500g bread flour
160g TangZhong/Water Roux Starter
200ml milk
1/2 salt
50g sugar
2 tsp dry yeast
50g butter
Method
Here's my tang zhong/water roux starter, I'm not sure if I've obtained 65°C but the texture looks quite similar to what Florence has posted so I assume I'm almost there. I doubled the recipe again and managed to get 100g x 9 buns.
At this point in time, how I wished I've got a pullman loaf pan or in French, a Pain de mie. Though the desire is great, I have no additional counter space for this unless I start clearing out my old pans.
I've initially wanted to add some black sesame seeds to make a loaf of sesame bread but I forgot to add it in at the last stage. These were already washed and drained, had to discard it since I do not know if they keep well. I just hate to waste ingredients or whatsoever food, it is just too sinful. Everytime I dumped leftovers into the bin, I always feel a great sense of guilt, thinking of the poor folks in developing countries dying of poverty. This leads me to recall Kevin Carter's Pulitzer Prize winning photograph, featuring a vulture waiting for a famine striken child to die. We should be constantly reminded never to waste food and not to take things for granted.Alright, back to the bread, I'm not exactly satisfied with the texture of this bread. To me, the Matcha bread and the Anpan bread yield the same softness. Also, the bread is somewhat chewy and DH doesn't quite like it. I'm not sure if it's because I've replaced water and milk powder with milk (which I doubt) or I've not achieved the correct roux starter temperature. I'm sure I'll give this roux starter another try (not so soon though).
Water Roux/Tang Zhong starter
Ingredients
50 g Bread flour
250 ml Water
Method
- Mix flour and water till it is smooth in a small saucepan.
- Cook over medium heat and stirring constantly with a hand whisk to prevent burning. You will see lots of small bubbles forming on the top. Keep stirring and when the bubbles disappear, you will see streaks in the mixture for every stir you make with your whisk. Stop at this stage and you will have the 65°C TangZhong.
- Pour the hot TangZhong into a bowl and cover it with a piece of glad wrap with the wrap touching the surface of the mixture. This is to prevent a film from forming on the TangZhong.
- Leave the 65°C TangZhong to cool till room temperature before using it. Leftover TangZhong can be kept refrigerated and should be used within 3 days. All chilled TangZhong must return to room temperature before using. If your chilled TangZhong has turned greyish in colour, you should discard it.
65°C tang zhong (湯種) bread
Ingredients
500g bread flour
160g TangZhong/Water Roux Starter
200ml milk
1/2 salt
50g sugar
2 tsp dry yeast
50g butter
Method
- Place ingredients in the pan of the bread machine in the order recommended by the manufacturer. Let the machine knead for 15mins, stop the cycle and re-start the machine and let the dough knead for another cycle.
- Let it proof in machine for 30 - 45 mins or till double in size.
- When proofing is completed, punch down the bread dough to release the air.
- Roll out dough and shape into small balls. Let the dough rest for 15 mins.
- Shape as required and let it proof on lined or greased baking tray for another 45-60 mins or until dough is double in size.
- Bake at pre-heated oven at 170C - 180C for 25 to 30mins.
- Remove bread to cool on rack completely.
Sunday, August 23, 2009
Pork Floss Buns (Milk bread recipe)
When Breadtalk first started selling their signature pork floss buns, I never fail to get one of these. It was so popular then that many of the local bakeries try to introduce a simliar version.
 Today, I decided to make some pork floss buns since I've got 2 packets of meat floss sitting in the fridge. Using the same milk loaf recipe , I shaped them into oblong buns. This recipe yields 9 buns and a small loaf.
 Make a slit in the centre and spread with some mayonnaise.
 This is my version of the pork floss bun, nothing like Breadtalk's but good enough for us :)
Pork Floss Buns
Today, I decided to make some pork floss buns since I've got 2 packets of meat floss sitting in the fridge. Using the same milk loaf recipe , I shaped them into oblong buns. This recipe yields 9 buns and a small loaf. Make a slit in the centre and spread with some mayonnaise.
 This is my version of the pork floss bun, nothing like Breadtalk's but good enough for us :)
 Pork Floss Buns
Ingredients
260g fresh/UHT milk
1 egg
50g caster sugar
1/4 tsp salt
500g bread flour
2tsp Instant yeast
70g butter (unsalted)
Mayonnaise (I use Japanese mayo)
Pork Floss
Method
1 egg
50g caster sugar
1/4 tsp salt
500g bread flour
2tsp Instant yeast
70g butter (unsalted)
Mayonnaise (I use Japanese mayo)
Pork Floss
Method
- Place ingredients in the pan of the bread machine in the order recommended by the manufacturer. Let the machine knead for 15mins, stop the cycle and re-start the machine and let the dough knead for another cycle.
- Let it proof in machine for 30 - 45 mins or till double in size.
- When proofing is completed, punch down the bread dough to release the air.
- Roll out dough and shape into small balls of 60g each. Let the doughs rest for 10 mins.
- Shape the dough into oblong shape and let it proof on lined or greased baking tray for another 45-60 mins or until dough is double in size.
- Bake at pre-heated oven at 180C for 30 to 35mins.
- Remove bread to cool on rack completely.
- Spread a thin layer of mayonnaise on top of the buns and coat generously with pork floss.
Friday, August 21, 2009
Chicken Broth
Before the arrival of DD3, I never believe in freezing. To me, fresh is best and I had been diligently cooking fresh food for the family. But being a SAHM now, I really appreciate freezing stocks.

Here's a chicken broth I made a few days ago, chicken carcass with onions, carrots and soy beans.
 All ready to be frozen.
Here's a chicken broth I made a few days ago, chicken carcass with onions, carrots and soy beans.
 All ready to be frozen.
Iced Earl Grey Tea
 During our dating days, DH and I used to hangout at this coffee cafe in Clarke Quay with his friends. As a non coffee drinker, I always end up having tea. One of my favourite tea is Iced Earl Vanilla. It's basically earl grey tea with ice and a scoop of vanilla ice cream. Delish! With the terribly hot weather, how nice to chill down a glass of ice earl grey tea (ran out of ice cream :P).
Thursday, August 20, 2009
Steamed chicken with wolfberries and red dates
 Another lazy day so I steamed some chicken leg quarters with red dates and wolfberries. I forgot to marinate the chicken in advance and only managed to do it 15 mins before cooking. Thank goodness DH is not a fussy eater and kids are used to eating my bland cooking :P
Steamed chicken with wolfberries and red dates
Ingredients
(A)
3 chicken leg quarters (I removed the skin)
1 tsp oyster sauce
1 tsp light soy sauce
1/2 tsp sesame oil
*marinated together for at least 1 hour
*you may adjust the marinate accordingly
(B)
(B)
A handful of wolfberries, washed
8 - 12 pitted red dates, washed
Method
Method
- Wash and pat dry the chicken leg quarters, marinate with seasonings for at least 1 hour
- Place in a deep plate/bowl, add wolfberries and red dates.
- Steam on high heat for 15-20 mins or until the chicken is cooked.
- Serve immediately.
Wednesday, August 19, 2009
Sausage bread
A few days ago, I brought the kids to the supermarket for grocery shopping. DD1 chose a sausage bread for her breakfast. The buns don't look fresh so I promised her I'll bake her some one day. As I don't usually stock up on sausages, I bought a pack that day.
With that promise, I made some sausage bread yesterday for our breakfast today. As usual, I used the machine to knead the dough and let it proof inside. I made 9 buns instead of the recommended 12 as I do not have enough space in my baking pan to accommodate so many and I prefer not to bake on 2 racks.
 Shaping the bread is relatively easy as the dough is easy to handle (I used slightly lesser liquid).
 I did 9 buns though I'll prefer to make 10 since it comes in a pack of 10s. Now I've got 1 sausage sitting in my freezer.
 Freshly baked buns, looks yummy and kids are thrilled!
 DH is not a fan of sausages but still, he ate one for his breakfast this morning. Thanks dear!

Do check out dailydelicious's blog for step-by-step hand kneading instructions and pics.
Sausage Bread
With that promise, I made some sausage bread yesterday for our breakfast today. As usual, I used the machine to knead the dough and let it proof inside. I made 9 buns instead of the recommended 12 as I do not have enough space in my baking pan to accommodate so many and I prefer not to bake on 2 racks.
 Shaping the bread is relatively easy as the dough is easy to handle (I used slightly lesser liquid).
 I did 9 buns though I'll prefer to make 10 since it comes in a pack of 10s. Now I've got 1 sausage sitting in my freezer.
 Freshly baked buns, looks yummy and kids are thrilled!
 DH is not a fan of sausages but still, he ate one for his breakfast this morning. Thanks dear!
Do check out dailydelicious's blog for step-by-step hand kneading instructions and pics.
Sausage Bread
(Makes 8 - 12 pieces)
Ingredients
300g Bread Flour
1 tsp Instant dried yeast
10g Sugar
1/4 tsp Salt
30g Unsalted butter (soften)
200ml One egg plus whole milk
8 - 12 Sausages
Method
300g Bread Flour
1 tsp Instant dried yeast
10g Sugar
1/4 tsp Salt
30g Unsalted butter (soften)
200ml One egg plus whole milk
8 - 12 Sausages
Method
- Place ingredients in the pan of the bread machine in the order recommended by the manufacturer. Let the machine knead for 15mins, stop the cycle and re-start the machine and let the dough knead for another cycle.
- Let it proof in machine for 30 - 45 mins or till double in size.
- When proofing is completed, punch down the bread dough to release the air.
- Cut the dough into 9 pieces (approx 60g each), roll into a ball and let them rest for 10 - 15 minutes.
- Using a rolling pin to roll the dough into an oval shape, place the sausage in the middle and cut both side of the dough into 7 - 8 strips. Fold the strips alternating the left and right over the sausage.
- Let it proof on lined or greased baking tray for another 50-60 mins or until dough is double in size.
- Bake at pre-heated oven at 200C for 10 minutes then reduce the temperature to 180°C and bake for 10 - 15 minutes or until the rolls are golden brown.
Sunday, August 16, 2009
Blueberry Cheddar Cheese Pancakes

I love Kevin's blog and I've got so many of his recipes stored under Favorites. There are simply too many recipes for me to try but my time is limited. How I wish I have 48 hours in a day... After procrastinating for 1 over week (which is relatively short as some recipes I have took me months or even years to attempt :P), I finally made these for our Sunday breakfast.
His recipe originally calls for cottage cheese but I substituted with cheddar cheese instead. I had to use more milk as I was left with only 2 eggs in my fridge.
 I used 1/2 cup milk initially but the batter wasn't runny so I had to add more milk to get this consistency.
 It's time to flip over when you see bubbles like this.
 This recipe yields a very light and fluffy pancake. My fussy eater, dd3, actually ate 1/4 piece for breakfast! Now, that's a great achievement!
I didn't manage to get 8 pancakes but only 6 in the size of 6" - 7" pancakes. Please refer to Kevin's blog for original recipe as I've modified the recipe here to suit my needs.
(makes 8 good sized pancakes)
Ingredients
1 cup flour
1 teaspoon baking powder
1/2 teaspoon baking soda
1/4 teaspoon salt
1/4 teaspoon cinnamon
1/4 cup sugar
1 cup cheddar cheese
3/4 cup milk
2 eggs (lightly beaten)
2 tablespoons butter (melted, or oil)
1/2 cup blueberries (I used frozen)
Method
Method
- Mix the flour, baking soda, baking powder, salt, cinnamon, and sugar in a large bowl.
- Mix the cheese, milk, eggs and butter in another large bowl.
- Mix the dry ingredients into the wet.
- Mix in the blueberries.
- Heat a pan and melt a touch of butter in it.
- Pour 1/4 cup of the mixture into the pan and cook until the surface starts to bubble and the bottom is golden brown, about 2-3 minutes.
- Flip the pancake and cook the other side until the bottom is golden brown, about 1-2 minutes.
Friday, August 14, 2009
Anpan Bread (Milk bread recipe)
 Now that I've found this milk loaf recipe, and falling in love with it, I'm sticking to this recipe for now. With a few really good recipes on hand, I can have some variations in my bread making :-)
I made some buns with the frozen red bean paste that had been sitting in my freezer since April :P I've always wanted to make Anpan Bread but kept forgetting to thaw the red bean paste.
When I did the Matcha bread, I used only 1 egg. Original recipe calls for eggs in weight but I was lazy to measure out the egg, thus I just throw in the whole egg. Today, I decided to use 1.5 eggs and reduce milk slightly but the dough turned out very sticky, almost impossible to shape. I had to keep oiling my hands and dust the counter top with flour. I weighed the salt (I didn't the last time) but it turned out too salty. The next time I make this, I'm definitely going to reduce the salt content.
 I started off being very generous with the paste and realised that I don't have enough fillings for the buns. Those without sesame seeds are just plain milk bread without fillings.
 And I did something fanciful, flower buns :) And the 3 that looks like caterpillar, I filled them up with nutella spread. DD1 likes the look of the flower buns but prefer eating the nutella bread.
I don't usually egg wash my bread but since I've got 1/2 egg balance, I use it to stick the sesame seeds and did the glazing.

This bread stays soft even on the 3rd day, kept at the counter in transparent plastic bag ^-^
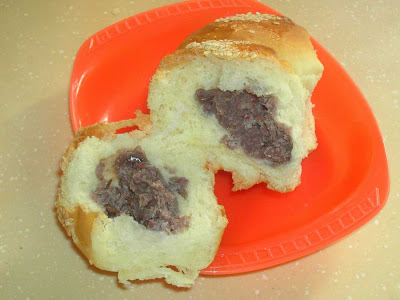 The paste is slightly too dry, must remember not to over dry it next time.
Anpan Bread (milk bread recipe)
Ingredients
240g fresh/UHT milk
1.5 eggs
50g caster sugar
10g salt
500g bread flour
2tsp Instant yeast
70g butter (unsalted)
Method
- Place ingredients in the pan of the bread machine in the order recommended by the manufacturer. Let the machine knead for 15mins, stop the cycle and re-start the machine and let the dough knead for another cycle.
- Let it proof in machine for 30 - 45 mins or till double in size.
- When proofing is completed, punch down the bread dough to release the air.
- Shape into small balls and let the dough rest for 10 -15 mins.
- Roll out dough and wrap with red bean paste. Shape as required and let it proof on lined or greased baking tray for another 50-60 mins or until dough is double in size.
- Bake at pre-heated oven at 180C for 30 to 35mins.
- Remove bread to cool on rack completely.
Thursday, August 13, 2009
Matcha Bread (milk bread recipe)
When you have more than an option, you tend to be picky. It's just like driving, when you drive into a carpark, there are hardly any carpark lots and you will just park at whichever available, regardless of whether it's shaded/unshaded, far/near to destination. But if you drive into an almost empty carpark, you will drive round and round to find the "best" parking lot.
I have so many new recipes on hand to try out but I always stick to my regular white bread recipe which is just so quick and easy. To me, that's convenience. However, today I decided to go for a "recipe hunt" and shortlisted HHB's milk loaf.
 I let the machine do the kneading and after 15 mins, I stopped the machine and let it knead for another cycle. This is because 1 cycle kneading always fail the pane test.
 If you poke your finger into the dough and the indent stays, this means your dough has risen enough and it's time for you to give it a punch down.
 After releasing the air in the dough, I shaped them into small balls and let it proof for another 10 mins. Then shape accordingly and place them into the baking pans and let it proof for another 45 mins or till double in size.
 I shaped these with DD3 in my arms as she was really clingy and cranky. While proving for the 2nd time, the skin of 2 buns (on the right) tore and went out of shape. Moral of the story is, do shape your buns with two free hands.
 I had wanted to add some red bean paste into it but I forgot to thaw the frozen paste thus decide to make it plain. My kids love this bread. I doubled the recipe but adjusted the liquid and I didn't follow the step on adding butter last. Please refer to the link if you prefer to use the original recipe.
Matcha Milk Loaf
Ingredient(original recipe from here)
260g fresh/UHT milk
1 egg
50g caster sugar
1/4 tsp salt
500g bread flour
2tsp Instant yeast
70g butter (unsalted)
4 tsp matcha (green tea powder)
Method
Method
- Place ingredients in the pan of the bread machine in the order recommended by the manufacturer. Let the machine knead for 15mins, stop the cycle and re-start the machine and let the dough knead for another cycle.
- Let it proof in machine for 30 - 45 mins or till double in size.
- When proofing is completed, punch down the bread dough to release the air.
- Roll out dough and shape into small balls. Let the doughs rest and relax for 10 mins.
- Shape as required and let it proof on lined or greased baking tray for another 45-60 mins or until dough is double in size.
- Bake at pre-heated oven at 180C for 30 to 35mins.
- Remove bread to cool on rack completely.
Mixed Berries Chiffon Cake

This was on offer and since DH asked for it upon seeing it on TV commercial, I bought 2 packs from the store. With some frozen blueberries, I attempted a mixed berries chiffon cake with this juice.
I reduced the sugar slightly since the juice is already sweentened. While whisking the egg whites, I got distracted and the whites were slightly over-whipped as they had somehow curdled but there was another 1/3 portion of sugar not added in yet. Turned my mixer to the lowest speed to incorporate the balance sugar. When I folded in the flour mixture, they don't mix well due to the curdled egg whites. I just had to keep my fingers crossed that the cake will turn out fine.

Upon unmoulding, this is what I get. Such a disappointing sight. The berries had all sunken to the bottom. Could it be due to the fact that I've used frozen berries instead of fresh ones? My cheese chiffon cake wth fresh blueberries turned out well using fresh berries.
I still remember Sister E commenting on my fried fish at my parents. She said given her, she'll probably throw the fish away but I still had the cheek to post in my blog. Told her this blog is not about my success stories but also to share my failures. Maybe some experts out there after reading my blog may give me some advices on how to fry the perfert fish ;-)
Back to this chiffon cake, although the egg whites were over whipped, the cake still turned out soft and fluffy, just slightly shorter.

If you are game enough to try this, I suggest you use fresh berries instead of frozen ones.
Mixed Berries Chiffon Cake
Ingredients
(A)
4 egg yolks
30g castor sugar
1/4 tsp salt
50g corn oil
150ml mixed berries juice
80g blueberries, coated with flour
(B)
120g Cake flour
1/2 tbsp Baking powder
*Sifted
(C)
5 egg whites
30g castor sugar
1/2 tsp Cream of Tartar
Method
- In a bowl, using hand whisk, whisk yolks and sugar till sugar dissolves.
- Add oil and salt, whisk and add juice. Stir well.
- Fold in sifted flour and mix well. Add blueberries and mix well.
- In another bowl, using an electric mixer, beat till the whites are frothy. Add in Cream of Tartar and beat till soft peaks.
- Add in sugar gradually and beat till stiff peaks.
- Fold in 1/3 of the whites into the yolk mixture using a rubber spatula till incorporated.
- Pour the mixture to the remaining egg whites and fold in gently till incorporated.
- Pour the batter into a 21cm chiffon tube pan. Bang the pan on the table to get rid of bubbles.
- Bake at 170 deg.C for 15mins.
- Turn down the temperature to 160 deg.C and bake for another 30 mins.
- Reduce the temperature to 150 deg.C and bake for a further 5 to 10mins to brown the surface.
- Remove from the oven and invert the pan. Remove the cake from pan when it's completely cooled.
Strawberry Chiffon Cake
S tried to bake chiffon cakes on 2 occassion but failed. I told her I'll drop by her place one day to return her the exersaucer and to teach her how to bake a chiffon. Alright, I must admit I'm no expert here but since I've been pretty lucky with my chiffon baking, I thought I could show her how to whisk the egg whites. Instead of getting S to watch me, it's better for her to have a hands-on while I watched.
 This was made by S, with some hiccups and "yelling" from me but overall, she did well :)
Again, we used the trusted banana chiffon cake recipe and modified it using strawberry puree instead. We didn't add any strawberry emulco as we don't like adding additional chemicals into our bakes. The cake is mildly pink but it's good enough for us.
As S was using a 23cm chiffon cake pan, we increased the recipe to 6 egg yolks and 7 egg whites instead.
Strawberry Chiffon Cake
Ingredients
(A)
4 egg yolks
40g castor sugar
1/4 tsp salt
50g corn oil
150g strawberry puree
(B)
120g Cake flour
1/2 tbsp Baking powder
1/8 tsp Baking soda
*Sifted
(C)
5 egg whites
40g castor sugar
1/2 tsp Cream of Tartar
Method
- In a bowl, using hand whisk, whisk yolks and sugar till sugar dissolves.
- Add oil and salt, whisk and add strawberry puree. Stir well.
- Fold in sifted flour and mix well.
- In another bowl, using an electric mixer, beat till the whites are frothy. Add in Cream of Tartar and beat till soft peaks.
- Add in sugar gradually and beat till stiff peaks.
- Fold in 1/3 of the whites into the yolk mixture using a rubber spatula till incorporated.
- Pour the mixture to the remaining egg whites and fold in gently till incorporated.
- Pour the batter into a 21cm chiffon tube pan. Bang the pan on the table to get rid of bubbles.
- Bake at 170 deg.C for 15mins.
- Turn down the temperature to 160 deg.C and bake for another 30 mins.
- Reduce the temperature to 150 deg.C and bake for a further 5 to 10mins to brown the surface.
- Remove from the oven and invert the pan. Remove the cake from pan when it's completely cooled.
Subscribe to:
Posts (Atom)