Friday, October 12, 2012

Blue Pea Flower Konnyaku Jelly


Extremely hot weather these days so I prepared some jellies for the kids.  I don't like the idea of using artificial colours so I used Blue Pea Flowers(Butterfly Pea/Clitoria ternatea/Bunga Telang) freshly harvested by Aunty A.
 
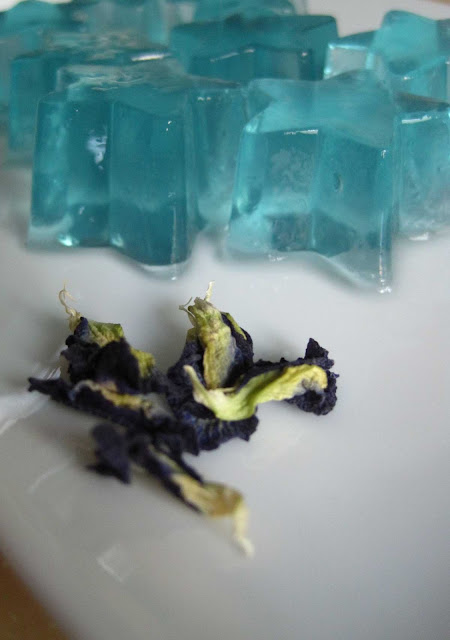
Check out the lovely blue!
 
Perfect dessert for a hot weather!
 
  
Blue Pea Flower Konnyaku Jelly
Ingredients
200 ml hot water
1 tbsp dried blue pea flowers
1 packet of konnakyu jelly powder (you may use agar agar powder too)
180g sugar (add more if you have sweet tooth)
900 ml water (we prefer a softer texture)
Some pandan/screw pine leaves, washed and tie into knots
 
Method
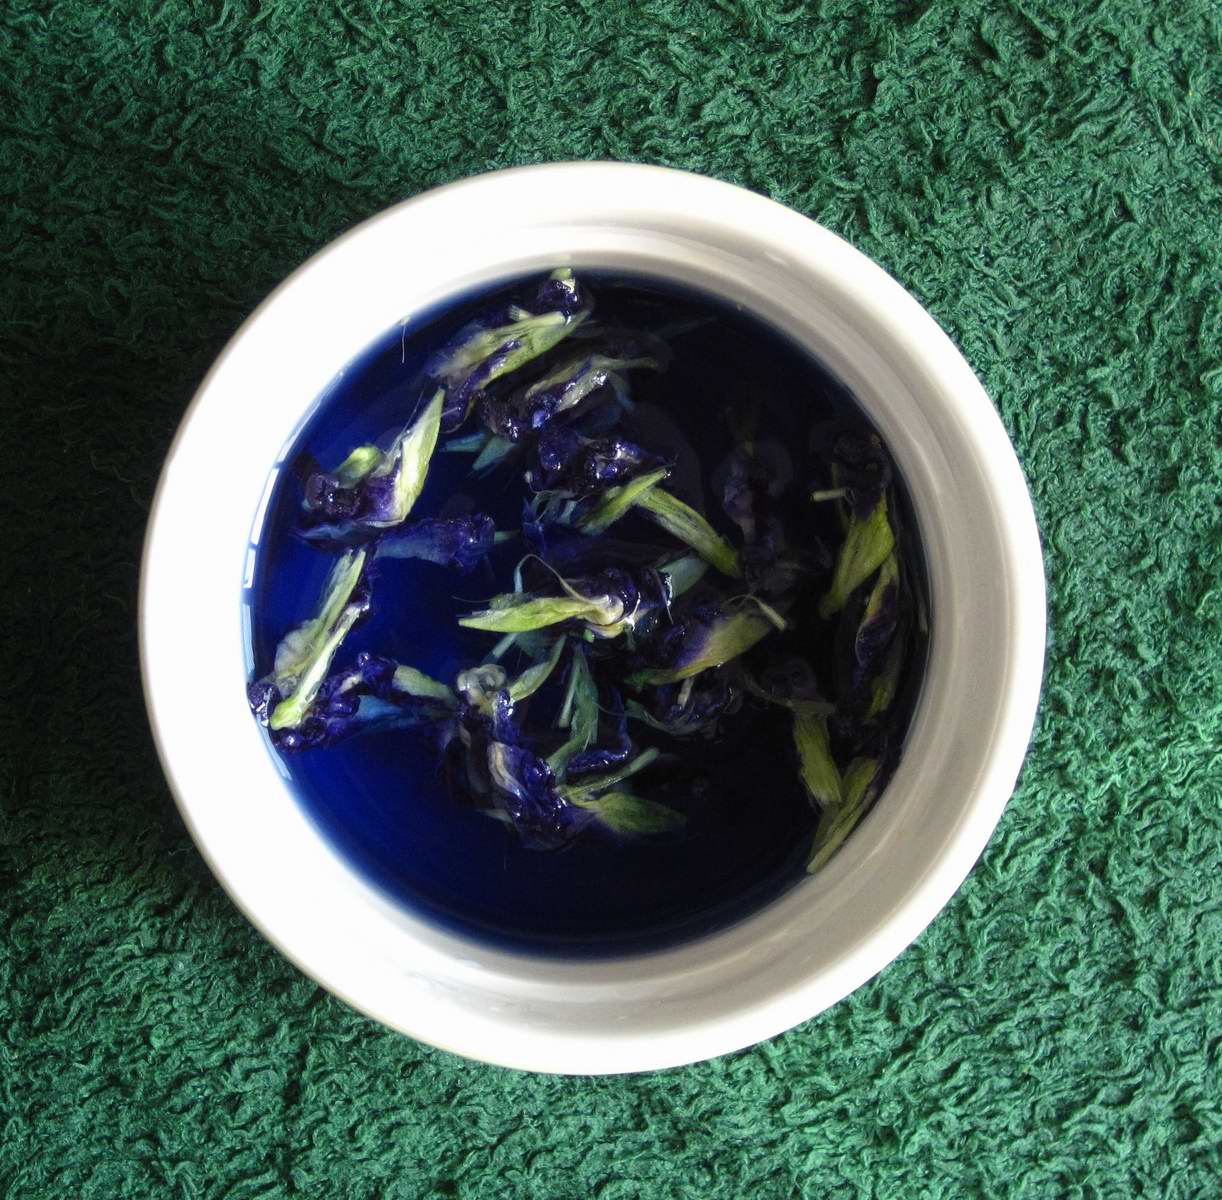
  • In a small bowl, soak the blue pea flowers with hot water. 
  • Leave it for 30 minutes or more (I poured out the water and reheat in the microwave and pour it back into the flower). Sieve it and retain the blue liquid.
  • Mix konnyaku jelly with sugar in a small bowl, set aside.
  • In a medium pot, add the remaining 900ml of water and bring to boil over medium fire.
  • Add in pandan leaves and blue liquid.  Simmer for 10 mins.
  • Sprinkle the konnyaku mixture into water gradually and stir till sugar dissolved. Remove pandan leaves.
  • Pour into prepared jelly moulds and leave to cool. Refrigerate for a few hours before serving.

Tuesday, October 9, 2012

Easy Peasy Nutella Brownie Muffins

Are you looking for a simple recipe for your little ones to try out at home?  I found one and this was made by my child.  She was 3 yrs 8 months when she did this.

Nutella Browne Muffins
Ingredients
1 cup Nutella
3 eggs
10 tbsp self raising flour
Some Choc Chips

Method
Preheat oven to 180degrees Celcius.


Add Nutella into a mixing bowl.  Crack in eggs.

 Still cracking...

 Whisk Nutella & eggs till well combined.

Add in flour a tablespoon at a time.  At this time, you may ask Mommy to make herself a cup of coffee or tea while waiting.  When all flour are added, whisk till smooth.

Scoop into muffin paper cups* (1/2 full) with the help of an adult.  Then sprinkle choc chips on top.  Count to ensure all muffins have equal amount of choc chips.

Ask an adult to help you bake the muffins for 20mins or till wooden skewer comes out clean.


Remove from oven and place them onto rack to cool down.

If you can't wait too long... do the following...

Blow....


*Note:
If you are using muffin tins, you will need to oil/ butter them 1st for easy removal after baking.
You can also combine choc chips into the batter instead of sprinkling them on top.

Wednesday, September 12, 2012

Sweet Potato Mantou

Made these in March 2012


I've bookmarked this recipe from Wendy's blog for the longest time but just couldn't find a chance to make it.  The body engine just refuse to ignite.  Along the way, this recipe was forgotten until I saw Wendy's Rose Mantou, so pretty!!

I tried my hands on rose shaping but see how they turned out, pathetic looking roses.  After the 2nd proof, the dough look nothing like roses, just a pile of mess :-(

Googled and found this easy to make rose method by Kristy. With some leftover lotus paste from last year's mooncake making, I used them as fillings here.


Though not perfect, these definitely look more like a flower (^_^)

Or should I just stay with croissant shaping?

Soft and fluffy inside, not too sweet too.  I like :-)
 
Sweet Potato Mantou Recipe
Ingredients
250g steamed sweet potato
150ml water (if using purple sweet potato, use 200ml water)
500g Pau/Hong Kong/Super Lite flour
1 tsp baking powder
100g sugar
50g shortening/Crisco (I used butter instead)
1/4 tsp salt
11g instant yeast (I used 3 tsp)

Method
  1. Mash sweet potato, or blitz sweet potato with 120ml water to get a fine paste.
  2. With balance of water, mix with yeast.
  3. Combine everything except shortening and mix to form a dough.
  4. Put in shortening and knead until dough is smooth. Add slightly more flour is dough is way too sticky to handle. If the dough is sticky but can retain its form, like not slacking down, just continue to knead, the gluten just hasn’t form, there’s no need to add extra flour.
  5. Cover and let dough proof until double, about 45 mins.
  6. Punch down dough and knead for 1-2 minutes.
  7. Divide dough into 50gm portions and shape accordingly.
  8. Cover and let the formed dough proof until doubled for another 45 minutes.
  9. Steam on high heat for 12 minutes.  

Monday, September 10, 2012

Simple Bitter gourd with Egg Soup 苦瓜蛋汤

My sister is very active in the RC (Residents' Committee) and she gets to meet the MP (Member of Parliament) whenever there's an event in their neighbourhood.  She learns this soup dish from her MP, Mr Baey Yam Keng and I've been cooking it whenever I need a quick fix.  I have another recipe of cooking bitter gourd with carrot but for that recipe, I need to simmer the soup for an hour.

No hard and fast rules, no exact recipe.  Feel free to adjust the ingredients to suit your family's need.

Bitter gourd Soup
Ingredients
1 bitter gourd, sliced
3-4 eggs, beaten
some shallots (sometimes I use ginger or dried shrimps, depending on what I have)
1000ml - 1200ml dried anchovies stock
Salt and pepper to taste

Method

In a pot, heat up some oil and add shallots/ginger/dried shrimps.  Fry till fragrant.

Add sliced bitter gourd

Stir fry till soft

Pour in beaten eggs

Scramble....

Pour in dried anchovies stock and bring to boil.  Season with salt and pepper, serve hot.

Thursday, September 6, 2012

Mooncake piglets 豬仔餅

I'm early this year :-)  I've learnt my lesson for the past few years, never make baked mooncakes last minute.


My dear friend, SL, will be helping me to get the lotus paste again this year.  She prefers to buy the ingredients closer to the actual day, to ensure that the ingredients are the freshest.  So while waiting for my low sugar lotus paste to arrive, I made 豬仔餅 to ease my itchy hands.

Using the regular recipe, I tweaked the method a little as I was rushing to leave the house.  I skipped the glazing as I personally find the piglets too sweet when I made them last year.  Without the glaze, the mooncakes' appearance are matte but still, I think they look alright.

I'm not sure if the resting of baked mooncakes was required to cool the moonies down first before glazing.  I did it anyway but only for 10 mins instead of recommended 30 mins.  In my next attempt, I think I'm just going to bake them for 20-25 mins straight.


The piggies before baking

After 1st bake, resting for 10 mins before returning to the oven

Nicely brown 豬仔餅.  My kids are happy, so am I :-)  I hope my recipients are happy to receive them too.

Traditional Baked Mooncakes
Yield 11 pieces weighing 34g each

Ingredients
(A)
200g Hong Kong Flour

(B)
120g Golden syrup/Sugar syrup
60g Peanut oil (I used soy bean oil)
1/4 tsp Alkaline water
* mix together

Method

  1. Sift hong kong flour into a mixing bowl.
  2. Pour in (B), combine well to get a smooth dough in one direction.
  3. Cover with cloth, let it stand for 20 minutes.
  4. Divide dough to portions of 34g each.
  5. Roll into a ball,
  6. Lightly flour the mould. Place mooncake in mould, flatten, dislodge the mooncake (I used a cookie cutter with stamper).
  7. Bake in a preheated oven at 180°C for 15 mins, remove and let it cool for 10 mins.  Continue to bake for another 10 mins at 180°C.
  8. Remove mooncakes from oven and leave to cool.
  9. Store for 3 days before serving

Wednesday, September 5, 2012

Baking with Tecno 3400 Oven

Many people ask me how do I bake using Tecno 3400 oven since there are only 2 racks.  The lower rack is too low and the higher rack is too high.

This is how I do it

I elevate my cake pan by placing another cake pan at the base, so the cake batter is baked in the middle "rack" ;-)

Tuesday, August 28, 2012

Ginseng Konnyaku Jelly

My sis gave me a bottle of ginseng powder tablet she bought from Korea but no one in my family appreciates it.  I mean, how many children would actually enjoy eating ginseng??

I remember Baking Mum made some jellies with Korean ginseng tea.  Hoping to clear some of it before they expire, I turned them into jellies too.

The girls took it quite well except for my son.  He still prefer normal jelly.


Ginseng Konnyaku Jelly
Recipe adapted from here with slight modifications

Ingredients
1 packet of konnakyu jelly powder
170g - 200g sugar
1100 ml of water (we prefer a softer texture)
12g ginseng tablets
some wolfberries
 
Method
  1. In a small bowl, mix konnayku powder and caster sugar together.  Set aside.
  2. Dissolve 12g ginseng tablets with 200ml of hot water.
  3. In a medium pot, add the remaining 900ml of water and ginseng mixture together.  Bring to boil over medium fire.
  4. Sprinkle the konnyaku mixture into water gradually and stir till sugar dissolved.
  5. Add the wolfberries into konnyaku mixture and mix well (you may steep the wolberries with ginseng water first)
  6. Pour into prepared jelly moulds. Refrigerate for a few hours before serving.

Tuesday, August 14, 2012

Swiss Roll Ice Cream Cake

26 July 2011
I've not done justice to this Swiss Roll Ice Cream Cake I made for DD1 on her 9th birthday.  The cake doesn't look appetising, not at all.  With some balance swiss roll and ice  cream, I made it again a few days later.

The cross-section shows the various layers

And check out the one I rushed through... The former definitely looks better.

Swiss Roll Ice Cream Cake

Swiss Roll Recipe
Ingredients

(A)
6 egg yolks
20g sugar
60g fresh milk
45g corn oil
100g plain flour/cake flour
15g corn flour

(B)
6 egg whites
70g sugar

(C)
Ice cream of your choice, 2 flavours

Method
  1. Lightly whisk the egg yolks together with 20g sugar.
  2. Add in fresh milk and corn oil, mix well.
  3. Sift in plain/cake flour and corn flour and stir well. Set aside.
  4. In another bowl, using an electric mixer, beat till egg whites are frothy. Add in sugar gradually and beat till stiff peak.
  5. Fold in 1/3 of the whites into the yolk mixture using a rubber spatula till incorporated.
  6. Pour the mixture to the remaining egg whites and fold in gently till incorporated.
  7. Pour batter into lined 11" x 14" pan.
  8. Using a spatula, level the top evenly.
  9. Bake @ preheated oven of 180C for 12 - 13 mins.
  10. When the cake is cooked, remove from oven and leave to cool completely.
  11. Spread a layer of whipped cream/butter cream/jam onto the sponge cake. Roll it up and chill in fridge.
Chocolate Fudge
Ingredients
200g caster sugar (I used 150g)
3 tbsp of natural unsweetened cocoa powder
2 tbsp cornstarch
1 ½ cup water
1 tbsp butter
1 tsp vanilla extract (I omit)
Method
  1. In a small saucepan, whisk together the sugar, cocoa powder, cornflour and water.
  2. Place the pan over heat, and stir constantly, till it begins to thicken and is smooth (for about 2 minutes).
  3. Remove from heat and mix in the butter and vanilla. Keep aside to cool .
Assembly
  1. Cut the Swiss rolls into equal slices.
  2. Cover the bottom and sides of the bowl (I used a loaf pan instead) in which you are going to set the dessert with cling film/plastic wrap.
  3. Arrange swiss roll slices at the bottom and sides of the pan, with their seam sides facing away from the pan.
  4. Cover the bowl with plastic wrap and freeze till the slices are firm. (I missed out this step)
  5. Soften the first flavoured ice cream (for my case, it's raspberry ripple). Take the bowl out of the freezer, remove the cling film cover and add the ice cream on top of the cake slices. Spread it out to cover the bottom and sides of the bowl. Cover the bowl with plastic wrap and freeze till firm.
  6. Add the fudge sauce over the first layer of ice cream (chocolate chip ice cream for me), cover and freeze till firm (I left it overnight).
  7. Soften the second flavoured ice cream and spread it over the fudge sauce. Cover with plastic wrap and freeze for at least 4-5 hours till completely set .
  8. Remove the plastic cover, and place the serving plate on top of the bowl. Turn it upside down and remove the bowl and the plastic lining. If the bowl does not come away easily, wipe the outsides of the bowl with a kitchen towel dampened with hot water. The bowl will come away easily.
  9. Keep the cake out of the freezer for at least 10 minutes.

Thursday, August 2, 2012

DIY Cake Ring

In my previous post, I shared that I made a mousse cake without a cake ring.  I'm going to share how I did it here.  Unfortunately I did not take pics of the first few steps as the cake was assembled at around 1am and lighting was no good.

Step 1
Tear a big sheet of aluminium foil and place it in a cake pan, making sure the ends are outside the pan (see pic below).  I used the same cake pan for baking the cake.

Step 2
Using double layer baking paper, wrap it around the inner side of cake and tape it down to secure the loose ends.

Step 3
Place 1 layer of cake into the cake pan

Step 4
Pour some mousse onto cake

Step 5
Place another layer of cake on top of mousse.  Repeat the steps until you run out of cake, ending with a mousse layer on top.

Step 6
I hope this pic gives a better idea of what I'm trying to explain.  I used a plastic sheet to cover the cake before leaving it in the fridge to chill.  I left it overnight.

Step 7

When the mousse has set, remove plastic sheet and carefully remove cake from pan by lifting up the ends of the aluminium foil.  Place cake on top of a cake board.

Step 8

Wrap the ends of aluminium foil to the cake board to secure it. Remove baking paper with care.  Definitely not the best looking cake but who cares when this method works?

Step 9
Decorate as desire

Finally, the sliced cake!  Not too bad, if you were to ask me ;-)

Tuesday, July 24, 2012

Matcha Mousse Cake

10 years today, I became a mother.  The night before, we were watching a movie on TV back home, in a very relaxed environment.  I thought I felt some contractions, but the pain wasn't too intense so I brushed it off as a false alarm.  We went to bed after the show and I found myself awaken by the pain in my belly and lower back.  Took a shower and got all my things ready, I woke DH up.  As it was in the wee hours, traffic was smooth and we got to the hospital within 25 mins.  The nurse asked if I needed a wheelchair which I gladly declined.  However, the walk from the lobby to the lift seemed to take ages.  I walked and paused to catch a breather when the contractions came.  Nevertheless, I made it to the labour ward without much effort.  After a check, I was only dilated 3cm so the nurse gave me a pethidine jab and I went to sleep.  I woke up a few hours later and found myself in intense pain.  The nurses offered me Entonox but I found it to be useless (I later found out it was because I didn't inhale the gas correctly).  The doc was called and she arrived within 10mins (we always grumble gynaes earn big bucks but they work odd hours too.  So let's not be too hard on them).  I was in too much labour pain that I didn't even know my doc performed an episiotomy on me.  I only found out about it when she was stitching me up hahaha

The baby was out in 4 pushes and I'm thankful my labour pain was a mere 4 hours from the time I woke up to the time I delivered.  I delivered without any epidurals too.  My doc praised me for being such a brave girl and I felt proud of myself.  I think the words of encouragement do help a new mother feel good about herself.

Now back to the cake.  I've not maked a layered cake for a long time.  My plan was to make a non-baked marshmallow cake to ease my job.  But DD1 specifically asked for a gummy bear with matcha/green tea cake.  I spent some time on the internet, trying to get ideas.  Honestly, my thought of a gummy + matcha cake sounds weird.  Nevertheless, I tried my best to fulfil and came out with this cake.

First, I did the gummy candy, recipe can be found here.  Then I went on to bake 2 cakes, one matcha flavour and one chocolate, just so I could have the contrast colour when the cake is cut.  I was debating between a matcha mousse or a chocolate mousse.  Birthday girl wanted a matcha flavour, so the answer is obvious.

I don't own a cake ring and I don't intend to get one as I'm running out of shelf space.  I made do with DIY cake ring and I'm glad with the final result.

This is the first time I made such a tall cake with 8 layers!  It was a challenge but I'm glad the cake turned out well.

I'm happy because my child is happy :-)

Recipe later....

Monday, July 23, 2012

Homemade Gummy

I've seen this recipe in Kitchen Capers, by Gina back in 2006.  I didn't get a chance to make it as I don't have any proper molds.  With a new Daiso around my neighbourhood, I finally bought some chocolate molds.  DD1 specially asked for a gummy bear cake.  We recently bought a big pack of Yummy Earth Organic Gummy but I thought it is a good opportunity for me to DIY instead of using store-bought.

Look how cute these bears are.  But they are slightly too big for gummies.

The mold comes in 6-in-1.  I bought 2 moulds and there were some extras.

So the balance went into my egg mold and some flower mold.

The final product went onto DD1's birthday cake which I'll blog about another day.

If you were to ask me, they don't taste anything like the commercial gummies.  But it is a quick and easy treat that you can whip up anytime at home without running to the stores.

Homemade Gummy
Ingredients

85g flavoured Gelatin powder
2 tbsp unflavoured/plain Gelatin powder
125ml water

Method
  1. Pour water into a small pot.  Sprinkle both gelatin over the water and let it sit for 10 mins.
  2. Place pot over medium low heat and cook till all gelatin dissolve.  Do not boil.
  3. Remove from heat and leave to cool slightly.
  4. Lightly oiled plastic molds with vegetable oil
  5. Pour melted gelatin into it.
  6. Leave it in the freezer for 5 mins only
  7. Remove from freezer and pull out the gummy bear from the mold.
Notes
  • I use a packet of Tortally brand which comes in 90g, Gina uses Jello brand
  • I use fish based gelatin from Phoon Huat
  • Boiled cool water was used instead of tap water
  • I didn't oil the molds but after the gummy has set, I kept them in the fridge overnight.

Friday, July 20, 2012

DIY Vanilla Sugar

Back in March 2010, my sis got me some vanilla beans from Indonesia.  Then, DH's ex-collg gave me some from NZ.  I googled for ways to make vanilla extract but had been procrastinating and no action was made.  After more than a year, I finally dump some beans into my sugar jar to make vanilla sugar.  How silly, I should have done that much earlier.  Now, how difficult is it to throw in 2 beans into a sugar jar?

If you are like me, either too lazy or no time to sterilize bottles to make your own extract, try making your own vanilla sugar first.  At least you've taken the first baby step ;-)

Wednesday, July 18, 2012

How to grow basil from cuttings

Some years back, I've tried growing rosemary, thyme and dill but they didn't survive.  I didn't read up on how to take care of these herbs, thus overwatering and causing the roots to rot.  I concluded I do not have green fingers and never attempted herbs growing again.

Until a few weeks ago, my lovely neighbour gave me some of her herbs cuttings (actually, they came with roots).  Unfortunately, the thyme didn't make it :-(

A few days later, she bought me a pot of dill.  I repotted but look what happened after 3 days :-(


I trimmed off the wilted portion, hoping to salvage the situation.  Another unsuccessful effort.  Probably too much water as one morning, when I was about to water my plants, I saw some of my pots were wet.  Apparently, neighbour's maid been watering my plants too, with her excess water from watering their own.

Early this month, I saw some herbs being sold in the local supermarket near home.  There were sage, rosemary, thyme and sweet basil.  I've not read up on sage so I decided not to buy that.  The thyme on sale doesn't look fresh and I reckon it probably won't survive repotting.  It's now between rosemary or basil.  Prior to this, I've googled and read up on growing herbs from cuttings.  Although it looks easy with rosemary, I didn't have much luck in my previous attempt.  Basil seems easier as you can soak the stem in water for 1-2 weeks and roots will grow.


It took only 5 days for the roots to grow.  I transferred them to a pot of soil and diligently bring them into the house every morning to get more sunlight.  So if you do see some fresh basil on sale in your supermarket, you might want to consider growing some yourself :-)