Tuesday, March 13, 2012

Bread Pudding

Today marks the 2nd day of a one week school break.  Term 1 is officially over now but with no Continual Assessment (CA1) for DD1 and DS2, I do not know how to gauge their performance.  For DD1, I'm not overly concern as her school results are fairly consistent.  But for DS2, I'm starting to worry especially on Mother Tongue.  I attempted to converse in Mandarin at home but he will request for me to speak in English as he doesn't understand.  I foresee he will struggle when exam comes.

Since it's school holiday, I invited my nephews over for lunch yesterday and we brought the kids to the neighbourhood park.  DS2 is a fast learner, despite not taking any lessons, he's able to skate fairly well now. Maybe that's the thing about boys, simply fearless?  However, he's not picking up waveboarding too well.  Nevertheless, we're taking it easy, just want him to enjoy and have fun.


With so many backlogs, I'm just going to show another quick and easy recipe - Bread Pudding.  I saw the beautiful pictures of this bread pudding in myresipi  and Zu helped me with the translation (thanks Zu!).

Whenever someone mention bread pudding, the first thing that comes to my mind is, it's baked stale bread soaked in milk, egg, sugar and dried fruits.  But this recipe is a non-baked version and best of all, it uses agar agar powder which I believe will be better appreciated by my family.

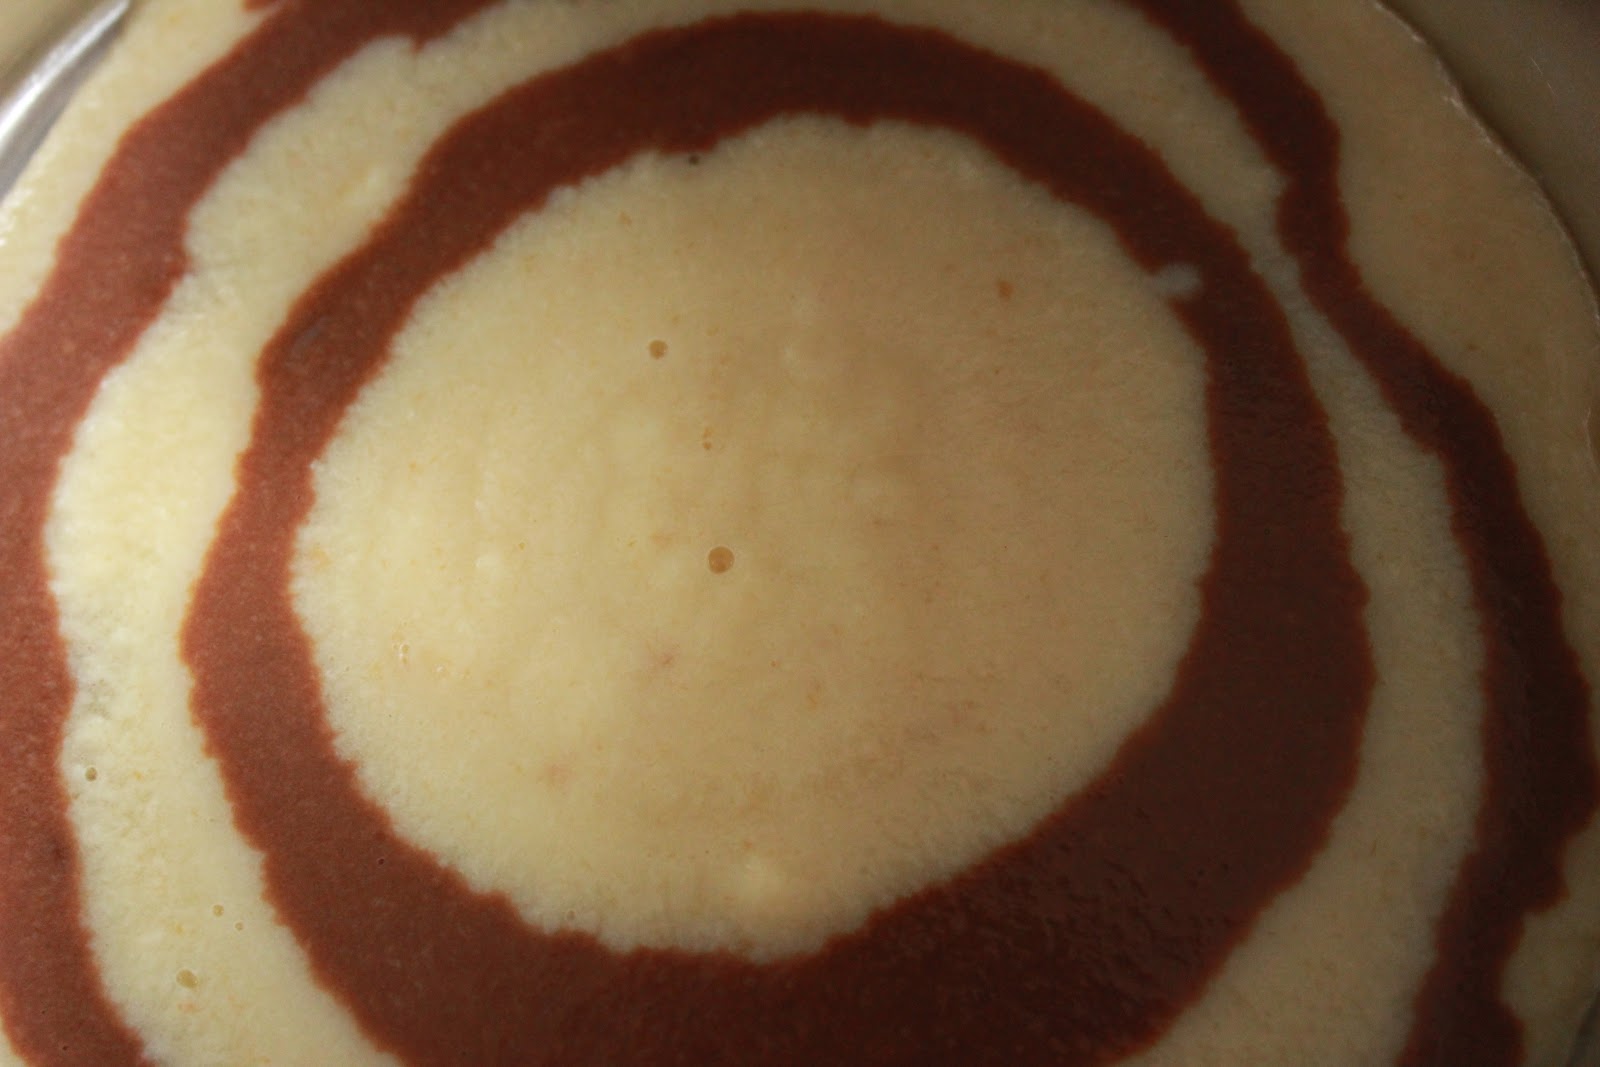
This is what you do to get a zebra effect, one tablespoon plain followed by one tablespoon chocolate mixture, till you finished up all the mixture.


Bread Pudding
Recipe adapted from Myresipi

Ingredients
(A)
4 slices bread
2 eggs
1/2 cup condensed milk
170ml evaporated milk
1/2 cup water

(B)
3 cups water
8g agar agar powder
1/2 cup sugar (can reduce if you don't like it too sweet, I used 1/4 cup)

(C)
2 T butter, melted
2 T cocoa powder

Method
  1. Boil 3 cups water, agar agar powder and sugar in a pot.
  2. Blend bread, egg, condensed milk, evaporated milk and 1/2 cup water till smooth.  Add the blended mixture into the pot in step 1.
  3. Add butter and stir till the mixture boils then turn off heat (I turned off the fire before adding butter and stir till butter dissolve)
  4. Remove 1/2 portion mixture and add cocoa powder till the cocoa powder dissolves into the mixture.
  5. Pour the 2 mixture alternately till all are used. You have to work quick as the mixture sets quite fast.
  6. Once done, refrigerate.

Thursday, March 8, 2012

Pandan Kaya Cake III


I made this for my birthday last April and drafted this on Valentine's Day, wanting to wish all my readers a very happy valentine's day.  But if was left in my draft until now :p


Having tried a few pandan chiffon recipes, I personally prefer the taste and texture of this.

Pandan Chiffon Cake
Adapted from Baking Mum (recipe taken from Prima's website)

Ingredients
(A)
4 Egg Yolks
40 g Castor Sugar
1 tbsp Pandan Juice
100 ml Coconut Milk
50 ml Corn Oil
Pinch of salt

(B)
100 g PrimaFlour Top Flour (I used plain flour)
1 tsp Baking Powder

(C)
5 Egg Whites
40 g Castor Sugar
1/3 tsp Cream of Tartar (I omit)

Method
  1. In a bowl, using hand whisk, whisk yolks and sugar till sugar dissolves.
  2. Add salt, pandan juice, coconut milk and oil to the yolk mixture.  Mix well.
  3. Fold in sifted flour and baking powder. Mix until smooth and set aside.
  4. In another bowl, using an electric mixer, beat till the whites are frothy. Add in Cream of Tartar and beat till soft peaks.
  5. Add in sugar gradually and beat till stiff peaks.
  6. Fold in 1/3 of the whites into the yolk mixture using a rubber spatula till incorporated
  7. Pour the mixture to the remaining egg whites and fold in gently till incorporated.
  8. Pour the batter into 8" round pan. Bang the pan on the table to get rid of bubbles.
  9. Bake at pre-heated oven of 170C for 10 - 15 mins.
  10. Turn down the temperature to 160C and bake for another 35 - 40 mins.
  11. Reduce temperature further to 150C and bake for another 10 - 15 mins to brown the surface.
  12. Remove from the oven and invert the pan to cool.

 For kaya layer, refer to recipe here


Tuesday, February 28, 2012

A short break...

I've accidentally deleted most of my food pictures in my SD card.  I still have many more pictures in my HDD but they were prepared so long ago. For some pictures, I can't remember what ingredients go into the dish.  So, pls bear with me for now while I tidy up my hdd.

In the mean time, here's sharing a trial princess cake I made for DD3's birthday. I made a total of 3 such cakes.  Stay tune while I get myself organised.


Monday, February 13, 2012

Chocolate Bottom Banana Squares

This is for you, CT.  I hope you will enjoy it as much as my family did :-)


An overdose on chocolate chips.  My kids reminded me not to use so much chocolate chips next time.


This recipe yields a very soft and moist cake.  Too moist if you ask me but it taste perfect when the cake is chilled.

Chocolate-Bottom Banana Squares
Adapted from Hearty Bakes

Ingredients
113g butter, unsalted
80g sugar, depending on banana used (sugar reduced)
1 egg, lightly beaten
1 tsp vanilla extract (I omit)
3 bananas, mashed (mine was about 220g)
180g plain/cake flour
1 tsp baking powder
1 tsp baking soda
1/2 tsp salt
25g-30g cocoa powder
Chocolate chips, optional


Method
  1. Cream butter and sugar until light and fluffy.
  2. Drizzle in the egg, vanilla extract and mashed bananas. Beat till creamy.
  3. Sift flour, baking powder and baking soda together and fold in 3 separate batches. Mix well with a spatula.
  4. Divide the batter into half. Add the cocoa powder to one portion of the batter.
  5. Pour the chocolate batter into a greased/lined 7 inch square baking.  Using a spatula, spread the layer evenly.
  6. Spread the remaining plain batter on top the cocoa batter and sprinkle with chocolate chips.
  7. Bake in pre-heated oven at 180 deg C for 25-30mins (I baked mine @ 180C for 20 mins, reduce temperature to 150C and bake for another 5 mins).

Wednesday, February 1, 2012

Hong Zao Mian Xian (红槽面线)

Prior to knowing DH, I've never eaten any food cooked with red glutinuous wine (红槽). My first encounter with 红槽 was at my inlaws' place. It is a tradition for his family to eat 红槽面线 during birthdays. And being new in the family, although I do not like the taste of it, I was obliged to finish up the food. I could still recall that moment, it took me ages to finish up a small bowl of mee suah. Over the years, I grew accustomed to the taste and in fact, I'm loving it (only the wine, not the dregs though).

DH been bugging me to learn to cook this dish. I consulted MIL on recipe but as you know, most old folks cook without recipes. She merely taught me the steps and the rest is my own estimation.

Presently to you my very first 红槽面线


Still incomparable to MIL's cooking but DH and kids commented it is nice. Yes, now I can finally cook a Hockchew/Foochow dish ;-)

Hong Zao Mian Xian (红槽面线)
Serves 2A+3C

Ingredients (A)
17 - 20 drumlets (can use chicken thigh, drumsticks, wings or whole chicken)
3 tbsp red glutinous wine dregs (红槽) - I used wine instead of dregs
1 tbsp light soy sauce
1 tsp sesame oil
* Marinate together for at least 1 hour (my MIL did not marinate her chicken)

Ingredients (B)
2-3 shallots, peeled and roughly chopped (I double this as I like the flavor of shallots)
4 slices ginger, cut to thin strips
3-4 dried mushrooms, washed and soaked till soft (my MIL didn't add mushrooms)
500 - 750ml red glutinuous wine (红槽酒)
2 tbsp sesame oil
1.5 - 2 litre water


Method
  1. Marinate chicken and set aside for at least an hour.
  2. Slice mushroom into thin strips.
  3. Heat up a pot with sesame oil. Add shallot and ginger, fry till soft and fragrant.
  4. Add in chicken and mushrooms, fry till the chicken are slightly cooked.
  5. Pour in 2 cups (approx. 500ml) red glutinuous wine and remaining marinade, if any. Mix till all parts of chicken are evenly coated.
  6. Pour in sufficient water and bring to a boil, cook for another 10 mins.
  7. Reduce heat and simmer for 1 hour. Add more wine if needed.
  8. Season to taste (read notes below).

Preparing Mee Suah

  1. Boil some water in a separate pot.
  2. Add mee suah and loosen the strands with a pair of chopsticks. Cook for approximately 1 minute.
  3. Drain mee suah and set in a bowl.
  4. Arrange the cooked chicken and mushrooms on top of mee suah and ladle some soup over it.
  5. You may also serve it with a poached egg.

Notes
If your mee suah is very salty, there is no need to add more seasonings into your soup.

Tuesday, January 31, 2012

Melt-in-mouth German Cookies

This is already the 5th week of school and the kids are adapting well, no one cried :-)

To keep my story short, here's just a quick update of what I've baked, German Cookies!  This is a very popular cookie in the cyberworld.  If you've been following me, you'll know I'm not a cookie person.  But since I've got a pack of near expiry potato starch, I didn't want to waste my ingredients so I made these.

Verdict: As per the title of this cookie, it truly melts in your mouth.  I made a few other versions but didn't have time to upload the pictures yet.


Melt-in-mouth German Cookies 德式酥饼
Adapted from Small Small Baker
Ingredients
(makes ~ 60 pieces)
125g butter
40g icing sugar, sifted (I used 30g)
125g potato starch
80g superfine flour (I use plain flour, tried out both 50g and 80g, both good)

Method
  1. Beat butter and icing sugar till fluffy and lighter in colour.
  2. Sift in potato starch and flour, mix to form a soft dough.
  3. Roll into small balls (about 2cm in diameter), arrange on lined baking pan and press lightly with a fork (dip the fork in water after each press to prevent cookie dough from sticking to the fork). 
  4. Bake in preheated oven at 170 deg C for 15 mins, upper rack (need not bake till cookies turn brown).

Tuesday, January 10, 2012

Fruit Cake II

Alright, I know I'm slapping my own face.  I mentioned in my earlier post I'm reluctant to try a recipe with eggs separation method.  But here I am, my 2nd fruit cake using this method :P

My initial plan was to try out Aunty A's recipe but her instruction wasn't too precise as it was via sms and everything was simplified.  She was away in Korea so I couldn't clarify my queries.  I remembered Zu sharing her recipe in a parents' forum and decided to give it a try.

Her recipe originally calls for caster sugar but I prefer dark cakes, not for taste but simply aesthetic.  I did some slight modification and replaced caster sugar with brown sugar and molasses.  I do not know how the replacement of sugars will affect the texture of the cake, thus I did not do a 100% replacement.  However, I'm not satisfied with the colour as I'll prefer it to be darker.  I'll probably use all brown sugar and molasses next time.

Glad to see that the fruits are "floating" all over the cake and not sunken at the base. However, I dislike slicing a fruit cake as the fruits tend to fall off despite having it chilled.

Can you see the cracked line in the middle of the cake?  The cake was too heavy (not the texture), definitely overloaded with fruits.

Again, another last min shopping for plastic wrappers and ribbons.  The plastic wrappers left at the shop are for cookies/cupcakes so I just double clingwrap the cakes.  There were also limited colours and sizes of ribbons.  Just make do with sky blue and pink, which can be used for any other occassions.

Fruit Cake
Recipe adapted from Zu of Quick & Easy Treats, with slight modifications

Ingredients
800g mixed fruit, wash and strain overnight (coat the fruits with some flour)**
310g self-raising flour (I used all purpose flour + baking powder + baking soda)
250g butter, softened
100g castor sugar (originally calls for 230g caster sugar but I replaced some with brown sugar and molasses)
100g brown sugar
30g molasses
6 eggs, separated
1tsp vanilla essence (I omit)
1/2 tsp salt

** I used 700g dried fruits
** I soaked the fruits in water to plump them up and strain for 2 hours instead of overnight.
** If you want to soak it with liquor, you can also do so over a few days.
** I used about 4 tbsp flour to coat the dried fruits.

Method
  1. Mix all sugar in a small bowl
  2. Cream butter and half of the sugar till creamy and fluffy
  3. Add egg yolks, one at a time till the mixture is well blended (the mixture will not curdled if it is sufficiently mixed)
  4. Add flour and salt, mix it well followed by the mixed fruits
  5. In another clean bowl, beat egg whites and the other half of the sugar till stiff (don't over beat it till dry).
  6. Add into the butter+fruit mixture till well mixed (you will need a very BIG mixing bowl)
  7. Pour batter into3- 4 mini loaf pans (3"X6"), bake in a preheated 140C oven for 1 hour 20 mins or until a skewer stuck in the middle comes out clean.