Wednesday, March 31, 2010

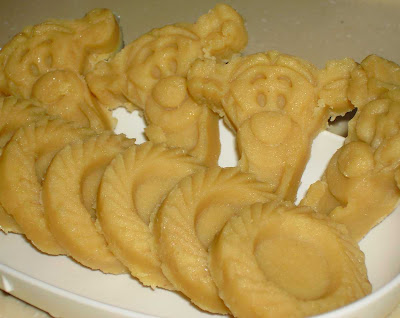
Polvoróns

Polvoróns for you?  Not from Goldilocks though ;-)

Aunty Yochana posted this recipe and it was on my To-Do list for the longest time.  I finally found time to make it last week.  The plus point about this recipe is, no baking needed and it is so simple!  All you need is a pan/wok to cook the flour (I cooked mine in the microwave though).

With no baking/cooking, I was skeptical if I could still taste the sugar in bits so I replaced it with icing sugar (reduced amount).  My children do not drink any formula milk and DD3 is still on the best milk in the world, thus I substituted milk powder with Horlicks.

I started off with my disney cookie cutter but I find it rather time consuming so I switched and use my pineapple tart mould instead.  I did this in a hurry as it was about time to fetch DS2 from school and that explains the rough edges :P

All the children in the family love this, including my niece and nephew, but not for me :P  Will I make this again?  Only if the kids ask for it.

Ingredients
1 cup Plain flour
1/2 cup Milk Powder (I used Horlicks)
85g butter, melted
25g icing sugar

Method
  1. Pour plain flour into a microwaveable plate/container.  Set to low heat (I used 30%) and cook for 5 - 6 minutes (stirring 2 - 3 times in between) till flour turns light brown and cooked.  Sieve flour into a mixing and let it cool.
  2. Mix in the rest of the ingredients and mix thoroughly.
  3. Press into a polvoron plunger and push it out.  If you do not have a plunger, a small cake ring/cookie cutter/tart mould work as well.
  4. Chill it till harden before wrapping.
  5. Leave at room temperature before serving.

Monday, March 29, 2010

Nian Gao (年糕) Puffs


What do you do with your leftover 年糕 (pronounced as nian gao which literally means Year Cake)?  I believe the norm is to sandwich with sliced yam and sweet potato, coated in a thin layer of flour and egg batter and fry them.

During the Chinese New Year period, I saw this Taiwanese program (女人我最大) on cable and they prepared this with puff pastry.  Sonia made them too and I thought they looked yummy.  I made mine with instant roti prata instead and they turned out well too.

Nian Gao Puffs
Ingredients
Nian Gao, cut lengthwise
Instant Roti Prata, slightly thawed
Black and White sesame seeds

Method
  1. Remove instant roti prata from freezer, thaw for 2 - 3 mins and cut into half.
  2. Place 年糕 on roti prata and roll it up, seal the edges.
  3. Sprinkle some sesame seeds on top and bake at preheated oven of 200C for 25 - 30 mins or till golden brown.

Thursday, March 25, 2010

Fa Gao (发糕) with fermented dough

Can someone tell me why my 发糕 doesn't bloom (ie crack on the surface)?  I've tried making 发糕 several times but always end up with unsatisfactory result.  I've posted 2 entries here and here, and these are the better looking ones.  They are nothing like those sold commercially, so beautifully bloomed.

Aunty A makes very delicious sweet potato 发糕.  Recently, I decided to try her fermented dough recipe.  Alright, I confess, I made these 3 times within 2 weeks, not that I love eating 发糕 but I get very annoyed when I just couldn't get it right!

This is my most recent attempt - today!  I made these with borrowed rattan baskets from Aunty A.  They didn't bloom as nicely as Aunty A's but good enough for me (scroll down to see my 1st and 2nd attempts and you'll understand why).

However the inside was very kuih like, not fluffy at all, very unlike my first 2 tries.

My first attempt, I used plastic bowls and steamed in 3 bowls.  They overflowed and domed like mushrooms.  Nevertheless, texture was soft and fluffy.

Made them again and used 4 bowls instead.  Perfect size but no perfect bloom.

For a person who doesn't like 发糕 to eat up half a piece, don't you think this is a good recipe?

I suspect it might be the way I mix/stir in the batter, or I might have overmixed the batter.  I'll not give up, will try to achieve a perfect 发糕 one day.  Wish me luck!

Stir Fry Potatoes


I'm not sure how many of you have tried this dish but I grew up eating this simple dish.  Nothing fanciful and only a few ingredients needed.  You can either cut the potatoes into wedges, diced into cubes or simply slice it.  I prefer to slice it for they cook faster this way ;-)

Stir Fry Potatoes
Ingredients
2 - 3 potatoes (I used granola), skinned and sliced thinly
2 - 3 cloves garlic, minced finely
some oil for frying
some dried shrimps, washed and soaked till soft
some water
salt to taste

Method
  1. Heat 1tbsp oil in frying pan. Add in minced garlic and dried shripms, fry till fragrant.
  2. Add in sliced potatoes and mix well in the pan.
  3. Add some water and simmer till potatoes are cooked (to test for doneness, you may use a toothpick to poke through).
  4. Add salt to taste.
Note
You may wish to pound the dried shrimps after soaking but we prefer to eat it on its own.

Chayote, Corn with Mushroom in Pork Broth (合掌瓜玉米茶樹菇豬骨湯)

Remember my post on Mushroom Chicken Soup?  I saw some fresh Agrocybe Aegerita (茶树菇) in our local supermarket so I bought a packet. I didn't realise this was 茶树菇 as it is labelled as "Willy Mushroom" until I took a closer look at the chinese words.  They are always on the shelves, just that I didn't pay much attention to unfamiliar things/objects around me.

I stumbled upon The Chinese Soup Lady.com and saw this recipe with 茶树菇 and since I've got all ingredients on hand, I decided to give it a try.  It has a mild sweet taste and the kids love it :-)

Chayotes, Corn with Mushrooms in Pork Broth (合掌瓜玉米茶樹菇豬骨湯)
Ingredients
500 pork ribs
200g agrocybe aegerita (茶树菇)
1 large chayotes (佛手瓜/合掌瓜)
2 fresh corns
1.5 - 2 litre of water
salt to taste (optional)

Method
  1. Wash and soak agrocybe aegerita in water.  Trim away the ends of the stalks.
  2. Wash and cut chayotes and corn into cubes.
  3. Blanch pork ribs/lean meat.
  4. Bring water to boil and add all ingredients in a pot. Using medium fire, bring water to boil again and cook for 30 minutes, reduce to small flame and simmer for 2 hours.
  5. Add salt to taste (optional) before serve.

Tuesday, March 23, 2010

Roast Chicken with Olives and Lemon

This is something I've tried several years ago but never get a chance to cook it at home.  I'm not sure how it was done but I only know black olives were used so I decided to just try it out with whatever I can find in my fridge.  The chicken turned out tasty and my family enjoyed their dinner :-)

Do you see the 2 dark patches on the breast?  I lined 2 slices of lemon on it and it got charred :P

The leftover chicken breast was shredded and we had chicken porridge the next day ;-)

Roast Chicken with Olives and Lemon
Ingredients
1 kg chicken
3 - 4 granola potatoes, washed clean and cut into wedges (I pre-cooked them in the microwave for 4 - 5 mins with olive oil and salt)
1 tbsp sea salt
1/2 tsp dried mixed herbs
8 - 10 black pitted olives, finely chopped
1 lemon, thinly sliced
3 - 4 bulbs garlic

Method
  1. Wash, clean and pat the chicken dry with paper towels all over, including the cavity.
  2. Rub sea salt all over the chicken and inside the cavity.
  3. In a separate bowl, combine dried mixed herbs and olives.
  4. Spread the contents of the bowl onto the chicken including the cavity.  Gently separate the skin and rub the leftover mixture on your fingers onto the chicken breast.
  5. Stuff as many cloves of garlic and lemon slices into the cavity of the chicken.  Let the chicken marinate for 10 minutes.
  6. Line the roasting pan with aluminium foil (this is for easier clean up later).
  7. Arrange the potatoes and balance garlic in a single layer on the prepared pan.
  8. Place the chicken (breast side up) on the prepared pan.
  9. Bake in preheated oven of 250C for around 40 mins.
  10. Remove from oven and pour out drippings collected from the pan.  Turn the chicken over and roast for another 15 - 20 mins.  Remove drippings collected again. 
  11. Reduce temperature to 220C.  Turn the chicken over again, breast side up, and roast for another 10 - 15 mins, or till chicken is cooked.
  12. Allow to cool for at least 10 mins before serving.
Note
To check if the chicken is cook thoroughly, pierce a satay stick/skewer between the drumstick and the thigh. It is cooked if the juice runs clear. If there are still streaks of blood (pink liquid), cook the chicken longer.

Monday, March 22, 2010

Tomato and Egg Soup

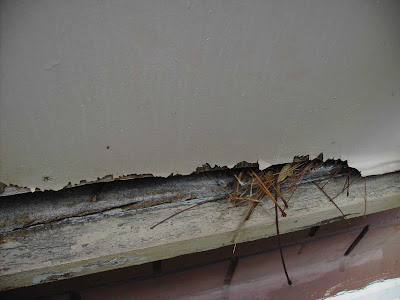
Remember my tenants?  They moved out 2 days before my new air conditioners arrived!  And I managed to take a few pictures of their "belongings".

This picture was taken outside my flat.


And these from my bedroom.

DH spent a lot of time cleaning up the house after the installation team left but we are glad the birds have left prior to that :-)

I saw this dish in Wendy's blog and was reminded I've not cooked this for the longest time.  For soup, I like to add some silken tofu as my kids love them.  If I cook the "dry" version, it will be just tomatoes and eggs.


Tomato and Egg Soup
Ingredients
2-3 cloves garlic, roughly chopped
3 tomatoes, cut into chunks
2 large eggs
1/2 box silken tofu, cut into cubes
1 litre water
2 stalks spring onions, chopped
some vegetable oil
salt and pepper to taste

Method
  1. Break eggs in a small bowl and beat lightly.  Set aside for further use.
  2. Heat wok/pot and add in oil.
  3. Toss in garlic and stir-fry till fragrant and a light golden brown on the garlic.
  4. Add tomatoes and stir fry until slightly soft.  Pour in eggs and scramble till the eggs are cook.
  5. Pour in water and bring to a boil. Add tofu and season with salt and pepper.
  6. Add in spring onion, mix well, dish out and serve hot.

Stir Fry Chinese Wild Yam (淮山)

Chinese wild yam (淮山) appears regularly in my soup but never in stir-fry dishes.  When I saw this recipe in tigerfish's blog, I decided to give it a try.  However I was concern if the family will take to the taste so I cooked this only when I had 3 dishes + 1 soup + 1 extra chinese wild yam dish, just in case.

This is definitely a healthy dish but unfortunately I won't be attempting it again as the taste was slightly overwhelming for the kids and DH.  As for myself, I finished half the portion ;-)

I may give this another try when the kids are much older, but definitely not within the near future.

Stir Fry Chinese Wild Yam (淮山)
Ingredients
1 Chinese wild yam, sliced thinly at cross sections
2 stalks spring onions
1 ginger sliced thinly
3 cloves garlic minced finely
1 tbsp oyster sauce
some water
salt to taste

Method
  1. Heat 1tbsp oil in frying pan. Add in minced garlic, ginger and spring onion and fry till fragrant.
  2. Add in sliced wild yam and mix well in the pan.
  3. Add the oyster sauce and some water, then allow entire mixture to simmer till wild yam is cooked (it should turn from white to slightly translucent).

Friday, March 19, 2010

Earl Grey Tea Cookies


I didn't realise I've got 3 boxes of earl grey tea sitting in my cupboard and since I have Martha Stewart's recipe for the longest time, I made these for tea.

It tasted more like shortbread than cookies and has this melt-in-your-mouth texture.   I used Emborg butter and it came in 200g.  Recipe calls for 220g and I was lazy to measure and cut out more butter so I just left it as it is.  Also, I used only 3 tea bags instead of 2 tablespoons (approximately 6 - 8 tea bags) as I was worried the cookies may end up too bitter as I've reduced sugar slightly too.  It has a nice mild earl grey taste but if I were to make them again, I'll probably use 4 - 5 tea bags.

Due to my camera setting, I get 2 different colours of these cookies.  The actual cookies actually look more like the first 2 pictures posted.

(adapted from Martha Steward)
Makes about 8 dozen (I cut them into triangles and had 60+ cookies)

Ingredients
2 cups (250g) plain flour
3 tea bags finely ground Earl Grey tea leaves
1/2 teaspoon salt
220g butter, softened
45g icing sugar
1 tablespoon finely grated orange zest

Method
  1. Whisk together flour, tea, and salt in a small bowl; set aside.
  2. Put butter, sugar, and zest in the bowl of an electric mixer. Mix on medium speed until pale and fluffy, about 3 minutes. Reduce speed to low; slowly mix in flour mixture until just combined.
  3. Divide dough in half. Transfer each half to a piece of parchment paper; shape into logs. Roll in parchment to 1 1/4 inches in diameter, pressing a ruler along edge of parchment at each turn to narrow log and force out air. Transfer in parchment to paper-towel tubes; freeze 1 hour.
  4. Preheat oven to 180C. Cut logs into 1/4-inch-thick slices. Space 1 inch apart on parchment-lined baking sheets.
  5. Bake until edges turn golden, 13 to 15 minutes. Let cool on sheets on wire racks.

Tuesday, March 16, 2010

Corn Tonic Soup (玉米滋补汤)

This recipe was originally from our local DJ, Fenying's blog but due to some reconstruction of her blog, the old link is not working and all her recipes are gone.  Thank goodness Irene has tried a few of her soup recipes and this is one I've shortlisted.

Corn tonic soup (玉米滋补汤)
材料1 (洗净, 切段)
玉米 : 3 – 4条 Corn
红萝卜 : 2条 Carrots

材料2
枸杞子 : 15 – 30g Wolfberries
玉竹 : 30g P. odoratum

材料3
鸡肉/排骨 : 200 – 300g (川烫过) chkn meat/pork ribs (washed and scalded)

方法

1) 枸杞子, 玉竹洗净, 用水浸泡30分钟
Wash ingredients (2), then soak in water for abt 30mins

2) 加入玉米, 红萝卜和鸡肉, 大火煮开后, 转小火煮2 – 3 小时, 加入少许盐即可
Add rest of d ingredients, bring to boil be4 switching to low heat for 2-3hrs. Add salt if desired.

功能
有滋补强壮, 健脾开胃的功效
There has strengthening and nourishing effect on the spleen, efficacy in whetting/increase one’s appetite.

可日常饮用, 不燥不滞
Can be taken daily, it’s not dry/parched or sluggish

Papaya Tong Shui Encore

I cooked papaya soup again but added dried figs and chinese almonds.  I prefer this version as I love chinese almonds but DH grimaced at the taste of it.  On the other hand, my kids love to chew on the chinese almonds.  It is so difficult to please all.

**Papaya with compliments from Aunty A **

Papaya Tong Shui
Ingredients
2 litres water
1 medium size half ripe papaya/paw paw (木瓜)
25g white fungus (白木耳)
10 dried figs (无花果)
20 - 25 red dates (红枣)
1 - 2 tbsp apricot kernels/chinese almonds ((南北杏)
rock sugar to taste

Method
  1. Wash and soak white fungus till soft. Remove the stalk and separate into petals.
  2. Cook white fungus, red dates, chinese almonds and dried figs, bring to boil and simmer for 30 mins.
  3. In the mean time, remove papaya skin and remove the seeds. Cut into small cubes/bite sizes.
  4. Bring the soup to boil again.  Add the papaya and rock sugar, cook until rock sugar dissolve.  Turn off the stove and let it sit for 10 mins (covered) before serving.

Friday, March 12, 2010

Sweet Potato Tong Shui


This is one of my favourite dessert, something light and refreshing :-) 

Sweet Potato Tong Shui
Ingredients
1 - 1.5 litre water
1 (approx 300g) sweet potato
20 - 25 red dates
1/2 cup dried longans
1- 2 tbsp rock sugar
some sliced ginger
some pandan leaves

Method
  1. Peel the sweet potatoes and cut into cubes.
  2. Boil water with some pandan leaves.  When water boils, remove pandan leaves. Add red dates, sweet potato and ginger.  Let it boil again, then reduce heat and simmer for around 30 mins.
  3. Add in dried logan and rock sugar, cook for another 5 mins or till rock sugar dissolves.
  4. Serve hot or cold.

Matcha Tiramisu

With my balance mascarpone cheese from DD3's tiramisu, I made a matcha (green tea) version to celebrate my dog's 10th birthday last week :-)

I followed HHB's version but reduced the matcha powder accordingly as my kids aint fans of matcha (this new matcha I've got is very strong).

This was what I came up with, dusted with very little matcha as I didn't want the cake to be too overwhelming.

I'm no fan of tiramisu but if I really have to choose, it'll be the alcoholic version (my kids too) over the matcha tiramisu :P

Made a small one for my great pal SL.

Matcha Tiramisu
(makes a 8" cake)

Ingredients
16 - 18 sponge fingers (I used Vicenzi)

Syrup
2 tsp matcha
1/2 tablespoon sugar
125ml boiling water

Cream
250g mascarpone cheese
2 tbsp icing sugar
2 tbsp matcha syrup
200 ml non-dairy whipping cream

matcha, to dust

Method
Roast the sponge fingers in the oven at 150°C for about 5 minutes (optional). Set aside for later use.

To make the cream
  1. Dissolve matcha and sugar in boiling water. Leave to cool and set aside.
  2. In a mixing bowl, with a manual whisk, whisk mascarpone cheese with icing sugar. Add in 2 tablespoon matcha syrup from step 1, whisk until blended.
  3. With an electric mixer whisk the whipping cream until medium peak. With a spatula, fold in 1/4 of the whipped cream to the mascarpone mixture. Pour the mascarpone mixture into the whipped cream and beat it with an electric mixer to get the peak again. Leave the cream in the fridge.
To assemble
  1. With a removable base (I used a springform pan), line the base with sponge fingers.
  2. Using a teaspoon, pour the syrup over the layered sponge fingers, making sure you don't put too much in one side.
  3. Pour half portion of cream on top and spread evenly on the sponge layer, all the way to the edges.  Tap the cake pan lightly on the table to ensure there are no trapped air pockets.
  4. Place next layer of sponge fingers over the cream, sprinkle with syrup, and place the balance cream on top. Spread and smooth the top.
  5. Leave the cake (covered) to chill in the fridge overnight.
  6. Just before serving, dust the top with matcha and unmold. Decorate as desired. Keep the cake in the fridge before serving.

Monday, March 8, 2010

Mixed Herbs Pizza

Sometime last month, the family was out to run some errands and we had pizza for dinner at a local restaurant.  It was the worst pizza I've ever had, crust was ultra thick (more like eating bread), pathetic ingredients and I thought the pizzas had taken a dip in a pool of oil.  I decided to make my own since we have not had homemade pizzas for more than 2 months.

With some leftover bakkwa from CNY sitting in the fridge, I decided to try HHB's mixed herbs pizza.  Added some sauted button mushrooms and tomatoes but I forgot my olives :-(

Instead of hand kneading, I let my breadmachine do the job.  It was a breeze and my time saver as I could spend some good quality time with my kids where the machine did the work.

DH had been complaining I've been too generous with my cheese and that contributed to his waistline expansion so I went easy with the cheese now.

HHB mentioned that the centre of her pizza crust was less crispy as compared to the edge.  I thought the problem could be easily resolved since I always pre-bake my pizza crust.  However, even with pre-baking, the centre of the pizza crusts remained soft :-(

Hawaiian pizza again.  This is a "must have" whenever we have homemade pizza.  With the balance bakkwa, mushrooms and tomatoes, I laid the balance ingredients at the side of the pan.

A slightly over-baked pizza as I was bathing DD3 :P

Mixed Herbs Pizza
(Adapted from Baking with Kids by Linda Collister)

Ingredients
300g bread flour
3/4 teaspoon salt
1.5 teaspoon instant yeast
3/4 teaspoon dried mixed herbs
185ml lukewarm water (I used room temperature)
1.5 tablespoon olive oil

Method
  1. Place flour, salt, yeast and dried mixed herbs in a mixing bowl. Mix well with hand. Make a well in the centre and add the water and olive oil. Using your hand, gradually work the ingredients together to form a soft dough.
  2. Turn dough out onto a lightly floured work surface and knead for 10mins until the dough becomes smooth and elastic. Shape dough into a round ball and place in a lightly oiled mixing bowl. Cover with cling wrap and leave to rise for 1 hr or until double in size.
  3. Turn out the risen dough onto a lightly floured work surface and knock it down to release the air. Give it a few gentle kneading. Divide dough into 2 equal portions. Shape into two balls, cover loosely with cling wrap and let the doughs rest for about 10mins.
  4. Roll or press out each portion to a round, about 12" in size. Place dough on baking tray lined with parchment paper or on a greased pan.
  5. Dock with a fork all around the crust.
  6. Bake in preheated oven at 180C for 8 - 10 mins. Set aside till further use.
  7. Spread some pizza sauce over the dough to within 1 cm (0.5 inch) of the edge. Arrange a layer of grated cheese (I used grated mozzarella), followed by preferred toppings. Sprinkle the top all over with grated cheese.
  8. Bake in a preheat oven at 200 degC for 10 - 12 mins or until the crust has turned golden and the cheese has melted. Serve warm.

Saturday, March 6, 2010

Sweet Tempeh

I've got a few new tenants in my house!  I don't know how many as they are currently living outside my flat, beside my air conditioner compressor.  The birds built a nest and I heard some chirping from the nestlings a couple of days ago.  The chirping sound gets louder each day, implying the nestlings are growing bigger and stronger.  But I have a little problem as we've just ordered a new air conditioner unit and the installation team will be here next week with the installation.  I do hope these young birds will be ready to fly by then, else I really do not know what to do with them.  Keeping them in the house till they are independant is beyond the question as I've got a  hunting dog who may just gobble them down in seconds.  Fingers crossed.

I love tempeh!  When I was young, my mom used to fry it coated with curry powder and flour mixture, yummy!  I don't mind eating them plain too :P  Tempeh stir-fry with french beans is a must have whenever I eat out at a malay stall :)

Saw Ju's tempeh here and decided to give it a try but I've reduced sugar and water accordingly for I prefer something less sticky and sweet especially when I'm serving young children.  Also, as I've ran out of shallots, I just made do with some ginger oil.  I didn't bother with the kicap manis but replaced it with dark soy sauce since it's just needed for the colour only.

My girls ate a few pieces but my son refused a second bite.  This is a girls' dish in my family *eyes rolling*

Sweet Tempeh
(serves 2 to 3)

Ingredients
2 packets tempeh (ie 4 pieces in total), sliced cross-wise, about 1cm thick
1 tbsp ginger oil
1 clove garlic
3/4 tbsp sugar
Pinch of salt
1/3 cup water
1/2 tbsp dark soy sauce

Method
  1. Fry tempeh slices in oil till crispy (I cook them in my microwave instead of frying). Set aside.
  2. In a skillet, over a small flame, fry garlic in ginger oil.  Add water, sugar and salt, continue frying till you get a caramelised syrup.
  3. Throw in fried tempeh pieces into the skillet and toss to coat them evenly. Add black soy sauce and continue tossing. Once all the tempeh have been coated in the sauce, dish up and serve.

Friday, March 5, 2010

Mushroom Chicken Soup (茶树菇鸡汤)

MIL gave me some dried Agrocybe Aegerita (茶树菇) 2 days ago and was told that this ingredient helps to strengthen the stomach and kidneys.  It is also believed to have anti inflammatory, anti cancer and anti tumour properties.  Her way of cooking is simple, just meat, 茶树菇, red dates, wolfberries and salt to taste.

I cooked this for lunch yesterday and my kids enjoyed the soup (no one likes the 茶树菇 though).

Mushroom Chicken Soup (茶树菇鸡汤)
Ingredients
500g pork ribs/lean meat/chicken meat
50g dried agrocybe aegerita (茶树菇)
2 litres water
15 - 20 red dates (红枣)
a handful of wolfberries (枸杞)
salt to taste (optional)

Method
  1. Soak agrocybe aegerita in water till soften.  Trim away the ends of the stalks.
  2. Blanch meat.
  3. Bring 2 litres of water to boil and add all ingredients (except wolfberries) in a pot. Using medium fire, bring water to boil again, reduce to small flame and simmer for 2 hours.
  4. Add in the wolfberries and let it brew in low fire for another 10 mins.
  5. Season with salt (optional) before serve.

Tuesday, March 2, 2010

Tiramisu

DD3 turned 2 yesterday :)  She is a leap year baby and since I was supposed to be on bed rest over the weekend, I made her this simple tiramisu cake yesterday.  It was just a simple cake cutting session for our family.

Alright, I know this is not an age appropriate cake for a 2 year old toddler since liquer was used.  I've always wanted to make a tiramisu and had plans to make a non-alcoholic version by replacing liquer with orange juice but DS2 is still having a slight cough so I had to scrape the idea.  Decided to just go ahead but will reduce the liquer used.

I have a recipe from a forum (by a Romania lady) and many who tried gave thumbs up.  However, her recipe requires 100ml of liquer for 24 sponge fingers and I thought it may be too strong to my liking.  After googling, I found HHB's tiramisu recipe here (45ml for 24 sponge fingers) and decided to give it a try.  However, I further reduced the liquer slightly as I do not favour liquer.

Generally, the way to assemble a tiramisu goes like this, sponge fingers -> syrup -> cocoa powder -> cream, continue and end with cream as final layer.  Chill cake in fridge and dust with cocoa powder just before serving.  I reckon spreading the cream on top of the cocoa powder will create a mess so I cheated by adding coffee and cocoa powder into the cream instead.  That explains my chocolate cream :P

Whipping up the cheese and whipping cream was relatively easy, just ensure that the cheese is thawed to room temperature (I set the microwave on the lowest setting and zap it for 1 minute) before whipping.  When mixing in the cheese mixture to the whipped cream, I used my electric mixer to beat to get the peak again.

Dusting cocoa powder on top was a challenge as I've laid the sponge fingers at the sides and was trying to avoid getting them stained.

Added some strawberries to cover up the flaws :P

My cake was in the fridge for 4 hours before slicing and it was quite messy when I tried to cut it.  Best to chill the cake overnight before slicing.

Tiramisu is not my cup of tea as I'm neither a fan of liquer nor coffee, but my 2 older children enjoyed themselves and kept asking for more.  As for the birthday girl, she ate only the strawberries and the sponge biscuits ;-)

I may attempt the green tea version next, definitely a much healthier option.

Tiramisu
(makes a 8" heartshape cake)

Ingredients
24 sponge fingers (I used Vicenzi)

Syrup
1 tbsp instant espresso/ strong coffee powder (I used Nescafe Gold)
1/2 tablespoon sugar
125ml boiling water
2 tsp Baileys Irish Cream (I used Mint Chocolate)

Cream
250g mascarpone cheese
2 1/2 tbsp icing sugar
1 1/2 tbsp Baileys Irish Cream
1/2 tbsp instant espresso/ strong coffee powder
1/2 tbsp cocoa powder
200 ml non-dairy whipping cream

cocoa powder, to dust
strawberroes for decoration (optional)

Method
  1. Roast the sponge fingers in the oven at 150°C for about 5 minutes (optional).  Set aside for later use.
To make the cream
  1. Dissolve instant coffee powder and sugar in boiling water. Leave to cool before stirring in 2 teaspoons Baileys Irish Cream. Set aside.
  2. In a mixing bowl, with a manual whisk, whisk mascarpone cheese with icing sugar. Add in Baileys Irish Cream mixture (from step 1), whisk until blended.
  3. With an electric mixer whisk the whipping cream until medium peak. With a spatula, fold in 1/4 of the whipped cream to the mascarpone mixture. Pour the mascarpone mixture into the whipped cream and beat it with an electric mixer to get the peak again.  Leave the cream in the fridge.
To assemble
  1. Cut off one end of the sponge fingers so that each one is about 3" in length. Line the sides of a 8" heart shape pan* (with a removable base or use a springform pan) with the sponge fingers (do not get them soaked in syrup). You will need about 20 sponge fingers (depending on the type/brand). Save the leftover small pieces.
  2. Place a layer of sponge fingers on the bottom of the cake pan (use the leftover to fill the gaps).
  3. Using a teaspoon, pour the syrup over the layered sponge fingers, making sure you don't put too much in one side and avoid pouring syrup to the standing sponge fingers.
  4. Pour 1/2 portion of cream (I used 1/3 only though) and spread evenly on the sponge layer, ensure all the gaps at the sides are filled. Tap the cake pan lightly on the table to ensure there are no trapped air pockets.
  5. Place next layer of sponge fingers over the cream, sprinkle with syrup, and place the balance cream on top.  Spread and smooth the top.
  6. Leave the cake (covered) to chill in the fridge overnight.
  7. Just before serving, dust the top with cocoa powder and unmold.  Decorate as desired. Keep the cake in the fridge before serving.