Tuesday, March 29, 2011

Apple Cider Vinegar Chicken


In a mothers' forum I'm visiting, LC shared this and it was a hit with all who tried this recipe.  I decided to give it a try but decided to reduce vinegar for I do not know how my kids will response to vinegar cooking.  Seasoning was also reduced as I reckon it might be too salty for my family.

I've cooked this several times, with chicken quarters and mid-joint chicken wings.  My kids prefer the latter, maybe because the skin was intact.  DH on the other hand shuns away from vinegar so I never cook this whenever he comes home for dinner.

If you like pork trotters vinegar, I'm sure you will like this too.  And a plus point is, you don't even need to marinate the meat in advance!   Quick and easy!

Apple Cider Vinegar Chicken
Ingredients
300 - 400g chicken wing or baby pork rib (here I used chicken quarters, deskined)
1 1/4 tbsp dark soya sauce (originally 2 tbsp)
1 1/4 tbsp light soya sauce (originally 2 tbsp)
1 tbsp of sugar, or honey
2- 3 tbsp of apple cider (originally 7 tbsp)
Enough water to cover the meat

Method
  1. Wash and cut chicken quarters into cubes.
  2. Add chicken pieces and all seasonings in a pot.  Using medium fire, cook till sauce is boiling.  Reduce fire and simmer for 30 to 40 mins.

Friday, March 25, 2011

Malacca, March 2011 - Part I

I'm rushing this entry for SL who will be travelling to Malacca (Melaka) this Saturday.

I've shortlisted a few boutique hotels for our stay in Malacca but after reading a recommendation in a mothers' forum, I decided to stay at Courtyard @ Heeren.

The main entrance.  Not too prominent in the day as there are way too many cars parking along the roadside.  As you enter the hotel, you are welcomed with a very refreshing smell of lemongrass and a welcome drink.  Very friendly staff.

These 2 pictures are extracted from their website.  I booked the Deluxe Family Room which is what you see above.

The deluxe family comes with a King and a single bed.  I had initially wanted to book 2 deluxe rooms since MIL will be joining us.  Unfortunately, only 1 deluxe room was available for the dates we wanted.  After some discussion with MIL and DH, we decided to squeeze into 1 family room and get an extra bed (praying hard no 2 person need to use the toilet at the same time).

The view from our beds.  The extra bed was placed at the left of the LCD TV. 

The bathroom - we love the strong water pressure.  It was so relaxing that we didn't want to end our shower.  There were some not so positive reviews from tripadvisor on the noise from the water pump.  To me, I find the noise level relatively loud but bearable.  By the way, this is the only place you get natural lighting as there are no windows.


The entrance to the toilet is in front of the sink.

To the right, it brings you to the safe box and the shower area.  Limited storage space for clothes.  No air conditioner in this part of the room.

The car park is at the rear of the hotel, marked with orange cones as barricade.  To park, you have to uncoil the rope around the cones and coil them back when you are done parking.  Guarded at night.  Within walking distance, there is a wet market (the guard told us about the market).
Sorry SL, I don't know the street name.

There is a section for the butchers, away from this market but I forgot to take a picture of it.  This stall we patronised sells vegetables and dried anchovies.

This is a rare sight for my children as they are all urban kids and have never stepped into a wet market.  It was an eye opener for them and it also relinquished my old memories:-)

The guard told us many Singaporeans bought fish from this market.  The fishmongers will help to pack them into styrofoam box so it's easy for transportation back home.

This caught my attention as the stall owner was calling out "duck" aloud in cantonese, but I thought he sounded more like quacking :P  There are many other stalls at the car park area.

A stall selling hair accessories, wallets and bags.  Typically what you can find in a pasar malam (night market).

The same stall, with DD1 choosing a hair band and DS2 going through the wallets.  DD3 was just busying around.

Just before we left the market, at the corner of the car park, we saw this fishmonger (?).  A rare sight indeed.

A few other stalls I've missed taking pictures are  fruits and vegetables.  Another stall with all the breakfast yummies,  fried noodles, nasi lemak and nonya kuehs.  We spotted a motorist selling char kway teow, was so tempted to have it for breakfast but was afraid to start the day with oily food.  Very interesting place and a great experience for urban kids like mine.

Sorry SL, not enough time to update on the teochew restaurant.  Along Jonker Street, just ask the shop owners, they will be able to direct you there.  Have a good trip!

Thursday, March 24, 2011

Chocolate Banana Cupcakes

Pardon my disappearance.  We went away to Malacca on a short trip and prior to that, DH was on business trip.  During his absence, there were literally no time to think of him, until he sms-ed at night to tell me he won't be online for he has some other matters to attend to.  He was away for a week but we never spoke nor chat online.  Imagine how busy I was, to not remember my very own husband while he was away.

My kids love bananas especially DS2 and DD3.  The strange thing is, they will ask for bananas when they are at my inlaws but when I actually buy a bunch for them, no one eats them.  I always end up with several over-ripen bananas which I either freeze to make ice cream (I'll blog about that another day) or I turn them into cakes.
  
Using my regular banana cake recipe here (a very popular recipe by Yochana), I decided to give it a twist and added some cocoa powder and replaced whipping cream/evaporated milk/fresh milk with buttermilk.

On a side note, I simply cannot understand why some bloggers post recipes copied from somewhere, change the method slightly or reduce the recipe by 1/2 and call it theirs.  No one in particular for I've seen too many such cases.  I think the least they should do is to give credit to the originator and indicate the modifications made. Gorgeous looking pictures, great write-up but I think it is unethical, so nothing else matters.  I don't know how many people I'm going to offend here but I just need to say my piece.

Enough of my rantings, presenting to you a moist and fluffy chocolate banana cake :-)

I'm a no big fan of banana cake but I love how this turned out, moist and fluffy, minus the artificial flavours from store bought.  Sis E doesn't eat banana cakes for they are ladled with strong banana essence which is totally artificial.  I hope to get a chance to bake this for her.


Banana Cake
Ingredients
180g butter
100g fine sugar
2  large eggs - beaten lightly
240g cake flour (I used plain flour, removed 1 tablespoon and replaced with corn flour)
10g cocoa powder
1 tsp baking powder
1/2 tsp bicarbonate of soda
220g over-riped bananas - mashed
50g buttermilk (I used milk + 1/2 tsp lemon juice and let it stand for 15 mins)
chopped walnuts (optional)

Method
  1. Cream butter and sugar till light and creamy.
  2. Pour in eggs gradually and beat till creamy.
  3. Add in buttermilk, mashed bananas and banana essence and mix well.
  4. Add in cake flour, cocoa powder, baking powder and bicarbonate of soda and beat for a while only.
  5. Pour into cupcake casings/muffin cups, and arrange chopped walnuts on top.
  6. Bake at 170C for 20 - 30 mins or until cooked.


Sunday, March 6, 2011

Bunny Pineapple Tarts


I promised SM I'll bake her some pineapple tarts after CNY.  Decided to give this recipe a try again, praying that they won't puff up as much.  I remember reading somewhere that to prevent the cookie dough from spreading too much in the oven, the trick is to chill the dough first.  So when I did this batch, I chilled the dough (wrapped and shaped, ready to be baked) in the fridge and only took it out when the oven is ready.  They turned out well, slightly puffed but at least the imprint is still pretty obvious.  I'm contented :-)

For melt in the mouth recipes, the success factor is how you handle the dough. Be careful not to overwork the dough. I used a fork to mash the butter into the flour instead of using my fingers. And I mixed in all the wet ingredients together before pouring into the flour mixture so that I really minimise "kneading" the dough.

Decided to do away with egg wash since they always turned out patchy.  I guess I'm not using the correct pastry brush.

Can you see the flakey crust?  Oh, I just love this recipe!  But be warned, this recipe comes with a high percentage of butter over flour so watch out for those calories when you pop one into your mouth.

SM took one while she was in the car, took a quick bite when the traffic light turned red, and she loves it.  Her son NQ was so amazed as he has never seen pineapple tarts in this form.  He was showing off to his neighbours that his friend's (my son) mother made these.  I owe EO (my best pal's sister) some pineapple tarts so passed her a bottle and received positive feedback from her too :-)

I'm submitting this to Aspiring Bakers # 5: Fruity March (March 2011) hosted by jess of bakericious.

Ingredients
(A)
340g Plain Flour
1 tbsp Icing sugar
1/2 tsp salt (omit if using salted butter)

(B)
250g Cold butter, cut into cubes

(C)
1 Egg yolk
1/2 tsp vanilla essence/Martell
25ml ice cold water
*mix together

(D)
Pineapple fillings (I used store bought but improvised it)

Method
  1. Lightly beat egg yolk with brandy and ice water.
  2. Sieve flour and icing sugar into mixing bowl. Stir in salt and blend well.
  3. Using a fork, cut in butter until it resembles fine bread crumbs.
  4. Add egg yolk and ice water mixture into flour and roughly work it into a ball. Do not overwork the dough.
  5. Divide dough into 3 equal portions, place each portion in a plastic bag and flatten it slightly. Chill in fridge for at least 30 mins.
  6. Remove 1 portion of dough from fridge and divide dough into small balls.
  7. Wrap pineapple paste with dough and shape into rounds.
  8. Lightly flour the surface of the dough and press into a mould of your choice, flatten and dislodge the dough.
  9. Chill the dough while you preheat the oven. (I actually kept mine in the fridge for a few hours)
  10. Place tarts onto baking tray lined with baking sheet.
  11. Bake in preheated oven at 180°C for 15 minutes. Reduce the temperature to 170°C and continue to bake for another 5 minutes or until golden. Turn tarts out to cool on a wire rack before storing in air-tight containers.

Thursday, March 3, 2011

Swiss Meringue Buttercream


Who is in love with buttercream?  Not me, I never appreciate butter.  Give me any dairy products, I'll gladly reject.  It was only in recent years, when I started baking, that got me more exposed to dairy products and learn to be more appreciative.

There are many buttercream recipes, American, Italian, Swiss and French.  I've read and understand that to get a more stable buttercream, eggs (some using egg whites, some using whole eggs) are used.  I don't feel much comfortable using eggs in my buttercream (yes, I'm afraid of salmonella), especially when I don't have a thermometer.  However I did bookmark a few recipes, getting ready for that one day that I've convinced myself it's ok.

The first Swiss Meringue Buttercream (SMBC) I've bookmarked was from Tartelette.  I kept going back to her blog to admire her beautiful macarons.  I saw the same recipe in Wendy's blog last year but still, wasn't tempted to do it.  I just don't feel comfortable.

With no dairy cream on hand (I don't usually stock up on this one) and plenty of butter in my freezer, plus a last minute's decision to bake a cake for DD3's birthday, buttercream was my only option.  The debate then was between an IMBC (Italian) and SMBC.  Decided it might be safer to go along with SMBC since the eggs will be cooked in a water bath method.

This SMBC, no doubt taste better than bakeries buttercream, I'm still not a convert, yet.  Maybe because I'm a non cream lover.  Whatever cream I have on the cake, I scraped it away :P  My kids however love cream, and they licked up every single bit on the plate.  I suppose I'll be making this again since I don't have to buy a litre of whipping cream and try to finish up the cream for other purposes.  Dairy whipping cream has a lifespan of only 3 days when it's opened.  I usually keep the balance in my freezer and use it for cream pasta recipes.  But sometimes, I forgot about the frozen cream and it sits in my freezer for months, and I end up dumping it.  What a waste.

Swiss Meringue Buttercream
Recipe adapted here with some modifications.
Enough for a 7" round, 2 layers with some leftovers, see here.

Ingredients
60gm egg white (about 2 large whites)
100gm sugar
170gm unsalted butter (taken out from fridge and cut into 10-12 small pieces just before you start to heat the egg whites)

Method

Put the sugar and egg whites in a large heatproof bowl over a saucepan of simmering water and whisk constantly, keeping the mixture over the heat, until it feels hot to the touch, about 3 minutes.
I did mine for about 5 minutes as I left it alone on a few occassions to attend to my squabbling kids.

Tip: Do not attempt to make this if you are home alone with young children.  You need all the attention on this, no distractions welcomed.

The sugar should be dissolved, and the mixture will look like marshmallow cream.
Mine was nothing like marshmallow cream as I didn't whisk the egg/sugar mixture constantly.  That explains why the batter was flat.  The trick is to do the mojo workout here and beat the hell out of it .

Pour the mixture into a bowl. Put the bowl into a basin of water. The water should feel cold, like tap water on a rainy day. Do not use very cold water. Beat the meringue on medium speed until it cools and forms a thick shiny meringue, about 5 minutes.
I didn't bother to transfer the mixture into a bowl but placed it over a bigger mixing bowl filled with water and some ice cubes.  My mixture was thick but not fluffy (my egg whites were flat in the water bath). 

Add in butter, one tablespoon at a time, beating until smooth.
It curdled at one point but I continued to beat and after a few minutes, they combined again.  That night, I googled and found out that it is normal to curdle/separate/lumpy, they will come together again.  So don't worry, you are still on the right track.

Once all the butter is in, beat in the buttercream on medium-high speed until it is thick and very smooth, 6-10 minutes.
I only beat for another 3 - 4 minutes to get this consistency as I was planning to add in Nutella to beat somemore.  Yes, I beat with the mixer, didn't fold.

You may add in some melted chocolate, coffee or lemon curd for flavours.  I added 2 tablespoons of Nutella.  I thought the SMBC tasted slightly too sweet due to the Nutella but my kids love it.  My best pal, SL, on the other hand claimed it's not sweet enough.  So, this is really subjective and if you do not  have a sweet tooth like me, 2 tablespoon is the maximum you should add (too little will give you a pale chocolate colour).
 
I only saw this video by Dyann Bakes after I was done with my SMBC.  She calls it "1, 2, 3 SMBC" because it's easy and it goes with the proportion of ingredients, eg 1oz egg white, 2oz sugar, 3oz butter.

Sharing some of her tips here:
Tip 1
Add some salt to break up the protein in the egg whites.

Tip 2
Keep whipping to prevent the egg whites to turn flat.

Tip 3
You don't need a thermometer to do this, just rub the mixture between your fingers and if it is still grainy, it means the sugar has not melted. For the sugar to melt, it needs a higher temperature than the eggs. So, your eggs are pasteurized and it's safe for consumption.

Tuesday, March 1, 2011

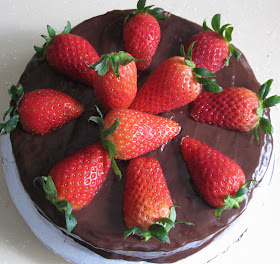
Strawberry Chocolate Cake

There was a minor accident back home and I've not been in my best state of mind (you'll find out why at the end of this entry).  My initial plan was to make a cake with chocolate transfer for DD3's 3rd birthday but due to the accident, I was too preoccupied with my children and didn't bother to go hunting for the necessary ingredients.  I was more than prepared to get a store bought cake for her.

The wound seem to heal fast so I'm finally able to breathe a sign of relief.  It was only decided on Sunday to bake her a cake.  However, I haven't got much ingredients in my pantry and I have no plans to lug the whole troop to the nearest bakeware shop.  Remembering that Wendy has a Swiss Meringue Buttercream recipe, I turned on my computer, praying that she'll be online.  Bingo!  As usual, she is really patient to answer all my queries.

I baked a chocolate chiffon cake layered with Nutella buttercream (I'll blog about this in my next post), and did a ganache to cover the flaws.  Unfortunately, my ganache didn't turn out well.  First, I left it to cool for a bit too long, thus the ganache was slightly thick when I poured over the cake.  The ganache didn't cover the sides completely so I had to pour another layer over.  But  as I was attending to DD3, I left the ganache over simmering fire and that caused the ganache to be overheated. I read that you can salvage an overmelt/heat chocolate by adding a few drops of vegetable oil, little by little, stir till the chocolate is soft again.  Anyway, I didn't bother.

Wondering why I have so many strawberries on the cake?  It's because one strawberry dropped right in the middle of the cake and I had to cover up the blob :P

About the accident... I was cutting DD3's hair and she moved.  I cut her skin and it was so near her eye.  She cried for almost half an hour.  It's just so unlike her as her pain tolerance level is usually quite high.  Freak the hell out of me and I've been applying aloe vera gel on her constantly (easily 10 times that day).

On the 2nd day, her wound seemed more obvious and my heart hurts even more.

The wound dries up to form scab and it is common for the wound to itch.  This was the most tiring period  as I was so afraid she might scratch it off accidentally during the healing process and we'll have to start all over again.  She did scratch but I managed to stop her in time.  Half the scab was dangling on the wound and it took a day to peel off by itself.  Phew!

Some folks felt that I've over-reacted, some thought I've exaggerated.  And there are some who told me it's ok, take it as a lesson learnt since it's not too serious.  Many told me kids recover very fast. I know that too but still, I'm worried that it might leave a scar behind and I'll feel terribly guilty. 

I watched Life Reconstructed, a local TV program about why plastic surgery is important to some people, not for aesthetic reasons but for medical reasons.  The episode featuring burnt casualties made me feel better.  Yes, I've been reminded that life is not just about physical beauty and you don't need to be beautiful to be a great person.

Coincidentally, bakericious is hosting Aspiring Bakers # 5: Fruity March (March 2011) so I'm sending in my submission.

Chocolate Chiffon Cake
Ingredients
(A)
3 egg yolks
20g castor sugar
45ml corn oil
pinch of salt

(B)
60ml warm water
2 tsp cocoa powder
* mix together

(C)
75g cake flour
1 tsp baking powder
1/8 tsp baking soda
* sifted

(D)
3 egg whites
1/3 tsp cream of tartar
30g castor sugar

Method
  1. In a bowl, using hand whisk, whisk yolks and sugar till sugar dissolves.
  2. Add oil and salt, whisk and add cocoa mixture. Stir well.
  3. Fold in sifted flour, baking powder and baking soda, mix well.
  4. In another bowl, using an electric mixer, beat till the whites are frothy. Add in Cream of Tartar and beat till soft peaks.
  5. Add in sugar gradually and beat till stiff peaks.
  6. Fold in 1/3 of the whites into the yolk mixture using a rubber spatula till incorporated.
  7. Pour the mixture to the remaining egg whites and fold in gently till incorporated.
  8. Pour the batter into 7" round pan. Bang the pan on the table to get rid of bubbles.
  9. Bake at pre-heated oven of 165 deg.C for 10 mins.
  10. Turn down the temperature to 150 deg.C and bake for another 35 - 40 mins.
  11. Remove from the oven and invert the pan. Remove the cake from pan when it's completely cooled.
  12. Layer into 2 layers and set aside for further use.