Thursday, April 30, 2009

Dorayaki


I finally made my very own red bean paste! I've always love red bean paste but commercially bought ones are way too sweet for me. Just one bite and I feel as if my teeth could fall off anytime!

I soaked the red beans overnight till it plumped up in size and cook them in my AMC pots for a mere 30 mins. Drain, add sugar and a pinch of salt, continue to cook. Cook till mixture dries up and become paste-like. Unfortunately the paste got too dry as I was multi-tasking (feeding medicine to my children) and couldn't watch over the fire. I couldn't be bother to add more water and watch over the fire again so I just left it as it is. The original recipe calls for the usage of a blender but I skipped that and mashed it with a big spatula instead as I prefer my paste with a slightly coarse texture.

Dorayaki is one of DH's favourite snack. Not just the father alone, the 2 elder kiddos like sweet snacks too. When I saw this recipe here, I told myself I must make it one day. Commercially bought ones are just too sweet, I can always reduce sugar accordingly for homemade ones :)


We had these for breakfast today but the paste kept falling apart. There are some leftover red bean paste so I stored them in the freezer. I'm thinking if I could salvage them by adding more water to it and zap it in the microwave. Planning to make Min Jiang Kueh for breakfast tomorrow, will update again if I do make it.

Red Bean Paste
Ingredients
150g Red beans
110g Sugar (I use 60g)
A dash of Salt

Method
  1. Wash the beans, cover the cold water, and soak overnight. Drain beans and discard water. Place beans in a saucepan, add cold water, and bring to a boil over high heat. Cover, reduce heat to medium-low, and simmer 1 hour, or until very soft. Monitor the pan to make sure water doesn't dry up.
  2. Place the beans in a food processor and process until smooth (or if you like you can process only to break it up). In a medium saucepan (preferably non-stick) add the bean paste, add the sugar. Cook, stirring until the mixture is dry.


Dorayaki
Ingredients
120 g Cake flour (sifted)
2 Eggs
100 g Sugar (I use 60g)
1 tbsp Honey
50 ml Water
Oil for frying (I omit since I'm using a non-stick pan)
360 g Sweetened red bean paste

Method
  1. Beat the egg and sugar until thick and light in color and add the honey, beat to combine.
  2. Mix the water, whisk to combine follow by the flour and whisk to combine.
  3. Tap the bowl to release some air from the batter, cover with cloth and let the batter rest for 30 minutes.
  4. Stir the batter lightly to loosen it.
  5. Fry the pancake over low heat, when the pancake has bubble all over, flip the pancake. And fry the other side until golden.
  6. Place the pancake on the wire rack until finish with all the batter.
  7. Spread the red bean paste on one pancake cover it with another to make a sandwich.
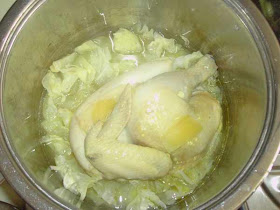
AMC Steamed Chicken Rice

Another hectic day for me. Just brought DD3 to the doctor today as her fever has not subsided. I've been self medicating for the past 2 days but I just have an uneasy feeling so decide to bring her the doctor, just to ease my mind. Doc diagnosed as common cold and cough, and I just have to make sure she drinks enough fluid.

Looking after 3 kids is no easy feat. Having them all fall sick at the same time and I have to administer medicine together is yet another headache. I have to record down who took what medicine at what time. Each child has 2 medicine, 1 for runny nose and 1 for cough. I need to constantly take temp of all 3 and if fever arises, I need to give Paracetamol. So many things to do! How on earth am I going to remember all these?

Oh well... with such an "eventful" day, I need to cook simple food (when do I ever cook complicated dishes? Hahaha!)

I decided to cook chicken rice after going through my fridge. I always try to remove as much fats and skin before cooking so as to minimise eating all those fats. My gfs always say I'm such a health freak. But honestly speaking, I don't think I'm such a freak. I just reduce consumption for my family as much as I could.


I will ususally give the chicken drumstick and thigh to the kids. Instead of cooking fragrant rice, I just cook plain white rice.


I'm not sure if anyone have heard of this but there is this saying that a person should not consume chicken if he is having a cough. I do not know if there is any truth in it or it is just a myth. Let's hope their cough don't get worst after eating chicken :P

Wednesday, April 29, 2009

Carbonara


Another simple dinner when Mom gets lazy. I'll love to pack or order in dinner last night but I'm so constrained by the 3 children at home, I just have to whip up something simple.

This recipe is just right for my family of 2A + 2C + 1 toddler stealing a few mouthful away. Don't ask me where I got this recipe from, I can't remember.


Carbonara
Ingredients
260g pasta (I use Penne)
Some Olive Oil/Extra Virgin Olive Oil
6 - 8 slices bacon, cut into strips
6 -7 cloves garlic, chopped
2 egg yolks
60ml milk
40g cheese (I use parmesan, cheddar or mozzie, depending on what's available in the freezer)
Some black pepper

Method

  1. Cook pasta in boiling water till al dente.
  2. Combine egg yolks, milk, cheese and black pepper in a mixing bowl.
  3. In a large saucepan, put a little oil to fry the garlic and bacon.
  4. Add the pasta to the bacon in the saucepan, and give it a stir. Lower the heat and add in the cheese mixture. Stir until the pasta is well coated with the cheese mixture.

Fruit Cocktail Sponge Cake


This is the cake we made for my birthday. As you can see, I couldn't be bothered to give the cake a good frosting (not that I'm good in that hahaha). I just make sure that the cream suffice to cover the cake and let the kids decorate my cake. This looks more like crumb coating but who cares? Like I say, what's the point of doing up a nicely frosted cake with thick layers of cream and when people eat the cake, they scrape the cream away?

I prefer to do 3 layers cake but I guess I'm just too tired and did a 2 layers instead. Filled it with fruit cocktail and gave the kids some Fruit Loops and sugar biscuit (my childhood snack) for decoration.


I attempted this in 8" round. When I first baked this for DH's bday, I overbaked it and the cake was too dry.

I'm posting my modified recipe using 5 eggs (HBB's recipe uses 3 eggs) for my own reference.

Ingredients
165g cake flour
5 eggs, room temperature
80g sugar (sugar already reduced, if you have sweet tooth, you may use up to 150g)
30g unsalted butter, melted
50ml fresh milk

Method

  1. Sift cake flour, set aside. Line bottom and sides of an 18cm (7 inch) round pan with parchment paper, set aside. Pre-heat oven to 170degC. Position rack at the lower bottom of the oven.
  2. With an electric mixer, whisk eggs and sugar on HIGH speed for about 5 to 7 mins, until the batter double in volume and is ribbon-like (the beater should leave a ribbon-like texture when the batter is lifted up). Turn to LOW speed and whisk for another 1 to 2 mins. Whisking at low speed helps to stabilise the air bubbles in the batter.
  3. Add sifted cake flour into the batter. With a spatula, gently fold in the flour until well blended. Take care not to deflate the batter. (To ensure proper folding in of the flour, you can add the flour in three separate additions.)
  4. Add the melted butter, fold with spatula until well blended.
  5. Add in fresh milk, vanilla extract and fold in gently with spatula.
  6. Pour the batter into the pan and bake for 30~35 mins, or until a skewer inserted in the centre comes out clean. Unmold and invert onto cooling rack, cool completely.

Own Notes:
Tecno TEO 3400: Bake at 155C for 25 mins, lower temp to 150C and bake for another 5 - 10 mins.

Tuesday, April 28, 2009

Parenthood

It is a tiring day for me. I have no intention to cook nor bake, I just want to rest, for a few reasons:
  1. DS2 had a high fever last Tue night and DH was working late so I had to lug all 3 children to the clinic. It was a mad rush! I have not been sleeping well as I need to wake up regularly in the middle of the night to check on his temperature. He threw up one night and we had to clean him and change the bedsheets in the middle of the night. His fever finally subsided on Friday, phew.
  2. Both DD1 & DD3 started coughing and have slight runny nose on Fri. OMG! I was praying hard that they will be okay but when a child in the family falls sick, his siblings will most likely catch the virus too. DD3 started her fever last night and because her temp wasn't too high (between 37.5 - 38C), I didn't administer any medicine except for the runny nose and cough medicine. So I woke up almost every hourly to check her temp. At midnight, her temp shot up to 39.5C and after giving her paracetamol, I had to constantly sponge her.
While I'm typing this, my eyelids are closing on me but I can't go to bed yet. I need to check DD3's temp at 12.30am. Oh well, this is part and parcel of parenthood and it's only through such events that I've learnt to appreciate my mother more.

Though I've mentioned earlier I have no intention to cook nor bake, I still have to whip up some meals. Also, I baked a sponge cake for my birthday with the children's help to decorate it. It's not a glamourous cake but the children felt proud in their participation. Will update this later when I don't feel so zombie.

Sunday, April 26, 2009

Orange Chiffon Cake


Honestly speaking, I do not know if the kiddos really enjoy eating chiffons or I'm addicted to baking it. Ever since I've conquered my fear of baking chiffon cakes, I've been baking them at least once a week. Hahaha!

Florence posted this in Kitchen Capers and there are so much rave about it. I was very tempted to try but at that moment, I've no courage to try any chiffon cake making yet. Ever since my chiffon cake making is a success, I finally baked this.

The first time I baked this, I used store bought orange juice instead of freshly squeezed ones and I find that it not very fragrant. I can hardly taste any orange in this. This time round, I use freshly squeezed orange juice and it definitely smell and taste better!


As I've disfigured the cake while trying to unmould it, I didn't bother to take a pic of the whole cake.


Recipe for ORANGE CHIFFON CAKE
(for 20cm chiffon cake pan)

Ingredients
(A)
5 egg yolk
30g castor sugar
Salt 1/4 tsp
115g Cake Flour
3/4 tsp Baking powder
85ml Warm orange juice
Grated zest of 1 large orange
60ml Corn oil
1/2 tsp Vanilla essence or 2 tsp Rum (I omit)

(B)
5 egg white
50g castor sugar
1/2 tsp cream of tartar (I replace with 1 TBSP lemon juice)

Method


  1. Sieve flour and baking powder.
  2. Use hand whisk to whisk egg yolk until creamy and light in colour. Add in corn oil then warm orange juice and rum.
  3. Add in flour mixture into yolk mixture lightly. Add in orange zest.
  4. Beat egg white with electric beater until big bubbles formed. Sprinkle in cream of tartar and beat until it is white in colour. Add in 50g sugar 3 times (a little at a time) and beat until stiff perks formed. About 8 - 10 minutes for 150w egg beater.
  5. Pour 1/2 egg white into flour mixture in (3) and blend well.
  6. Pour flour mixture into the rest of the egg white and blend well.
  7. Bake at 175C for 45 minutes or until cooked.
  8. Invert the cooked cake during cooling process.

Own Notes using Tecno TEO 3400 oven:

  1. Cover the pan loosely with a piece of oiled aluminium foil. Bake at 170C for 15 mins.
  2. Reduce heat to 160C and continue to bake for another 15 mins.
  3. Remove aluminium foil and check for doneness. Reduce heat to 150C and bake for another 10 - 15 mins to brown the surface.

Friday, April 24, 2009

Fun Shaped Pancakes

Using the same buttermilk pancake recipe, I attempted something fun. I really enjoy seeing my children devouring my cooks/bakes. All time and efforts spent are definitely worth it.

DS2 asked for a tree and DD1 asked for a heart shape pancake. These are my best efforts though they aint perfect.


Wanted to give DS2 a surprise by making the shape of Mickey Mouse but one of the ear went out of shape :P

Another Mickey Mouse attempt but end up it looks more like a bear, so bear it shall be hahaha.


Here's another failed Mickey Mouse attempt. To salvage it, I managed to change it into a pear :)

Hamburger - basic bread recipe


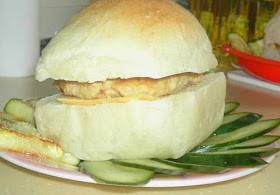
Using the basic bread recipe, I made some hamburgers for dinner. Made 4 regular sizes for DH and myself and 2 mini sizes for kiddos.


Grilled some zucchini and sprinkled parmesan cheese on top, only DS2 and myself like this.


I sandwiched with sliced cheese and minced meat pattie which I've seasoned and added breadcrumbs to it (I attempted the minced beef pattie method, usually I just add corn flour to minced pork meat). The family likes it better this way so I'm going to stick to this "recipe" the next time I make this again.


DD1 told me to bake the pattie instead of frying so that it's healthier. Ok dearie, I've noted your request ;-)

Cabbage Rice


This is another of my all-time-favourite dish as it's super quick and easy. Similar to the pumpkin rice, I just replace pumpkin with cabbage :)

Thursday, April 23, 2009

Basic Bread - for bread machines


When I was surfing for a basic white bread recipe using the breadmachine, I found one using plain flour and oats in allrecipes.com. There were so much rave about it so I decided to try it. However, I always get a sunken top. I like the bread as it's soft and most importantly, the ingredients used are very basic and I always have them in my kitchen cabinet. I have no idea what went wrong. Tried trouble-shooting to no avail.

A forum member, Laramie, shared her basic white loaf bread with us in M4M. I tried it and it has been my regular recipe if I'm lazy to do fanciful breads.


I do not know if you have the same problem as me but the crust of bread baked in a bread machine is too thick and I always end up slicing them away to feed the dog. Since DD3 is older now, I can put her on the highchair/exersaucer while I shape the bread dough and have the breads baked in the oven.

I've seek her permission to post her recipe in my blog (thanks Lara, if you're reading my blog).

Ingredients
1 cup cold water
3 cups bread flour (you can vary the ratio 1 cup plain: 2 cups bread flour if you wish)
1 tbsp sugar
1 tsp salt (salt and sugar at opposite sides of the pan)
2 tbsp olive oil
1 tsp yeast (make a hole in the centre & put in the middle of the flour)

Method
Place ingredients in the pan of the bread machine in the order recommended by the manufacturer. Select Basic Bread cycle; press Start.

Milo Chiffon Cake


I've got a pack of Milo in my fridge for the longest time. I'm such a lousy mother, always go for the convenient way out and get the kids to drink UHT packet milk instead of making Milo/Horlicks for them. Upon seeing this recipe, I decided to give it a try.


I didn't add any cocoa powder, thus the colour of the cake is quite plain. Also, it has a very subtle Milo taste, not too overwhelming. If you are a Milo fan, you'll probably like this cake. Not quite my kind of cake but the kids love it.
Recipe from All That Matters

Milo Chiffon Cake
Ingredients
(A)
4 egg yolks
30g castor sugar
1/4 tsp salt
40g corn oil
130g UHT milk
3 tbsp Milo
1/2 tbsp Cocoa powder

(B)
120g Cake flour
1/2 tbsp Baking powder
*Sift 2x

(C)
5 egg whites
40g castor sugar (I use 30g)
1/2 tsp Cream of Tartar (I substituted with 1 TBSP lemon juice instead)


Method
  1. In a bowl, using hand whisk, whisk yolks and sugar till sugar dissolves.
  2. Add oil and salt, whisk and add milk, Milo and Cocoa powder. Stir well.
  3. Fold in sifted flour and mix well
  4. In another bowl, using an electric mixer, beat till the whites are frothy. Add in Cream of Tartar and beat till soft peaks.
  5. Add in sugar gradually and beat till stiff peaks.
  6. Fold in 1/3 of the whites into the yolk mixture using a rubber spatula till incorporated.
  7. Pour the mixture to the remaining egg whites and fold in gently till incorporated.
  8. Pour the batter into a 21cm chiffon tube pan. Bang the pan on the table to get rid of bubbles.
  9. Oil a piece of aluminium foil and cover the pan loosely. Bake at 170 deg.C for 10mins.
  10. Turn down the temperature to 160 deg.C and bake for 10mins. Lift up the foil to check the surface of cake, bake for another 10mins.
  11. Insert a skewer to check if cake is done. Remove the foil and reduce the temperature to 150 deg.C and bake for a further 5 to 10mins to brown the surface.
  12. Remove from the oven and invert the pan. Remove the cake from pan when it's completely cooled.

Tuesday, April 21, 2009

Ham & Cheese Bread II


I've been baking loaves after loaves of bread, I think I should seriously consider buying the 25kg pack instead of 1kg pack bread flour. I've already used up almost 3kg of flour within 1.5 weeks!


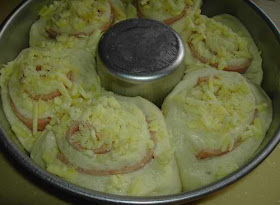
I finally found out where to buy Gruyère cheese but unfortunately the location is slightly out of the way. Have no other options but to make do with the easily available cheddar cheese. Again, I omit mayo and cheddar cheese as fillings. I also sprinkled some parmesan cheese on top, thank goodness the taste is not too overwhelmed.


To save time, electricity and effort, I doubled the recipe and baked pork floss buns too.


I had an extra bread dough that couldn't fit into my pan so I greased a muffin cup and put the dough inside. I like this as it looks very dainty, however the pic is overly exposed and I do not know how to correct it. What the heck, I'll just leave it as it is.


I guess my first attempt has deter me from adding cheese too generously to my bread dough. And now, the bread looks so pathetic :(


I still like this best, unfortunately I made a dent while removing it from the oven.


And here's a cross-section of the inside :)


I'm posting my modified recipe here for recording purposes.

Original recipe can be found here

Ingredients
Bread Dough

400 g Bread Flour
2 tsp Instant dried yeast
4 tbsp Sugar
1 tsp Salt
60 g Unsalted butter (soft)
270 ml whole milk

Fillings
(A) - this is good for 1/2 recipe as posted here
4 slices Ham (I use Shoulder/Leg Ham)
40 g Cheddar Cheese (grated)
Parmesan cheese - as desired

(B)
Pork floss - as desired


Method

  1. Put the flour and yeast in a bowl, whisk to combine, add the sugar and salt whisk again. Pour the milk mixture into the bowl, use large spoon to mix everything together. Put the butter in the bowl and rub until all butter is distributed, and knead briefly to bring all the ingredients together. Take the dough out of the bowl and knead, until the dough is soft, smooth and elastic about 10 minutes (I use my bread machine to knead the dough)
  2. Put the dough into a light buttered bowl. Let the dough rise in a warm place until double in size about 1 hour. Line a baking paper in the pan and set aside.
  3. Preheat the oven to 180°C (Tecno TEO 3400 - use 170°C). Take the dough out of the bowl. Gently press down the dough and a rolling pin to roll the dough to press the dough into a rectangle, about 25x25 cm. Brush the mayonnaise over the dough then scatter cheddar cheese all over and place the ham on top. (I omit mayo and cheddar cheese, just lay ham on top of bread dough)
  4. Roll the dough toward you starting at the top, gently pressing as you go to form a tight log. Cut the dough into 6 pieces, then place the dough, cut side down in the prepared pan.
  5. Scatter Gruyère cheese all over the top. Let the dough rise until almost double in size.
  6. Bake for 25 mins or until the bread is golden and the cheese is slightly brown.

Monday, April 20, 2009

AMC Char Siew


Sister E gave me 2 AMC pots together with this recipe years ago. I've cooked this on a few occassions but I just can't get it done correctly. It took me more than two hours to cook this and the meat is too tender. I've always wondered what could have gone wrong. When I was invited to Auntie A's house for the AMC cooking demo, the agent LY cooked this too. I remember she took less than an hour to complete this dish. However, I was too preoccupied and forgot to ask her about it.

It was only until recently when I consulted Auntie A on the method. Alas, I've been using small fire, no wonder it took ages to cook!

Saturday, April 18, 2009

Traditional Sponge Cake


This is a recipe from our local DJ Fenying's foodblog. I've tried a different recipe before but I find the cake too dry and crumbly. Auntie A made this and gave me some to try. I like the texture of this cake and have made this a few times.

Be sure to beat the eggs to ribbon stage. This means that if you use your whisk with batter to write the number "8" on the batter, it won't sink in but will appear visible for a while. I didn't manage to take a good pic as my right hand was holding the whisk and my left hand with the camera. I think my left hand wasn't stable and I moved when trying to snap a pic of it.


This is how my batter looks like after adding in the flour.


And here's the batter after adding in 7-up.


Traditional Sponge Cake
Ingredients
(A)
Egg : 200g (I use 4 eggs, 60g with shell)
Sugar : 230g (I use 180g)

(B)
Hong Kong flour : 230g (can replace using Cake Flour)

(C)
7-up : 75g (or any fizzy drinks)


Method
  1. Use high speed beat eggs till fluffy
  2. Add in sugar gradually and continue beating till well- blended, turn off the power
  3. Fold in the flour in 3 portions
  4. Add in Ingredients C and mix well
  5. Pour mixture into 20cm round bamboo basket lined with glass paper till 90% full
  6. Sprinkle a handful of sugar such that it forms a cross on the surface of mixture
  7. Steam over high heat for half an hour

Friday, April 17, 2009

Super Dark Chocolate Ice Cream

I'm not a chocolate fan but my kids are. Saw this recipe and decided to try it since I've got all the ingredients ready.

I was lazy to take out my blender from the cupboard so I skipped the part on blending the mixture. I think it's a mistake as I can taste the chocolate bits which makes the ice cream somewhat powdery. I love bittersweet chocolate but I think this ice cream is not suitable for children. And since my primary objective of making ice cream is for my kids, this ice cream definitely didn't pass the test.

As I'm not an expert in ice cream making, I thought really hard on how I could have salvaged the ice cream without ruining it. I scooped out 1/4 portion of the ice cream and added more whipping cream to it. Turned on the mixer and whipped it, return it to the freezer till semi-frozen, whipped it again and return to freezer. When the ice cream has solidified, I took a spoonful of it and was glad it turned out okay.


The colour of this ice cream was originally much darker and it tasted really rich in chocolate but after adding in more whipping cream, the ice cream seem to have loose something in it. I'll have to modify this recipe to suit my family's needs.


Super Dark Chocolate Ice Cream

Ingredients
Condensed milk ¼ C
Heavy Cream (43% fat content) 1¾ C
Unsweetened Dutch-process cocoa powder 3 Tbsp
Sugar ½ C
Salt ⅛ Tsp
Unsweetened chocolate, chopped 3 oz
Whole milk ½ C
Vanilla extract ½ Tsp

Method
  1. Whisk together the cream, cocoa powder, sugar, and salt in a large saucepan.
  2. Heat the mixture, whisking frequently, let it comes to full rolling boil (it will start to foam up).
  3. Remove from the heat, whisk in the unsweetened chocolate until it’s melted (it won’t melt completely, a small little bit will remain).
  4. Whisk in the milk, condensed milk and vanilla.
  5. Pour the mixture into a blender (this is a very good trick from David because all the mixture will be very smooth and unsweetened chocolate will completely melt), and blend for 30 seconds, until very smooth.
  6. Chill the mixture thoroughly in the refrigerator (but I suggest put the mixture in the ice bath first, it’s speed up the chilling time), then freeze it in your ice cream maker according to the manufacturer’s instructions.

Thursday, April 16, 2009

Baked Pasta

Whenever I run out of ideas on what to cook for dinner, baked pasta/rice will automatically come into the picture.

Remember last week when I was on a baking marathon and MIL called? Since DD1 & DS2 went over to BIL's place for lunch, I froze the chicken that I've steamed. Ransacked my supplies and yes, I've got all the necessary ingredients for baked pasta.

Similar to lasagna, I don't usually follow a recipe. I just cook whatever ingredients I have in my fridge. For tonight's dinner, I added onion, celery, shredded chicken and of course, loads of cheese. DH's not a fan of onion but in this dish, he can't tell that I've added onion to it. He's not a fussy eater but as far as onions are concern, he will make lots of noise.


I mixed some mozzarella cheese together with the pasta before covering it up with shredded cheddar cheese. The kids love it :)


This recipe is good for my family of 2A + 2C.


Ingredients
(A)
6 -7 cloves garlic, chopped
1 large onion, finely diced
4 leafstalks of celery, sliced
1/2 cup stock
Salt and pepper for seasoning

(B)
160g boiled penne pasta, boiled in salted water till al dente
2 cooked chicken thigh, shredded (approx 400g - 500g)

(C)
125g cheddar cheese
50g mozzarella cheese (optional)
Some parmesan cheese, to sprinkle (optional)

Method

  1. Heat olive oil in a saucepan.
  2. Add garlic and onion, cooked till soft.
  3. Stir in celery and chicken stock.
  4. Season with salt and pepper.
  5. Bring to boil and simmer for 10 mins. Set aside for later use.
  6. In a casserole, mix in pasta, shredded chicken, cooked vegetables and mozzarella cheese.
  7. Spread cheddar cheese to cover the top and sprinkle with parmesan cheese.
  8. Bake in preheat oven of 170C for 30 - 35 mins or till top is golden brown.

Wednesday, April 15, 2009

Strawberry Marshmallow Cake


Due to the long weekend, we were out the whole of Good Friday. I had wanted to bake DH's birthday cake on Sat but was overwhelmed with all the chores (when will it ever end??). Finally found time to bake the cake late at night when all are sleeping. Honestly speaking, I hate baking at night for one simple reason:- if DD3 wakes up for her night feed, whatever I'm doing has to come to a halt. Can you imagine whisking the egg whites half-way but I got interrupted and needs to be away for 10 - 15 mins? What's going to happen to my eggs then?

As I was whisking the eggs, I had to constantly turn off the mixer and listen for cries, if any. It's too stressful... I'm glad DD3 was cooperative while I was busy preparing the cake batter. When it finally went into the oven, I was relieved. But wait, the next stressful thing is, the baking time and temp. I usually bake this cake with 3 eggs but this time round, as I intend to celebrate his birthday at my inlaws, I decided to increase the portion and did 5 eggs instead. This is my 1st attempt in using 5 eggs for this recipe.

I started baking at 170C for 10 mins, lower the temp to 160C for another 20 mins. While the cake was in the oven, DD3 woke up for milk! When she finally went back to sleep, I checked for doneness of the cake. I knew instantly the moment I insert the satay stick into the cake to check for doneness, it's definitely overbaked! Damn! I couldn't be bothered to bake another cake, what's more I don't have any spare time to make a 2nd cake.

This is such a girly cake but what to do? I ran out of blue colourings and left with only red and yellow. I decided to combine 2 colours into the whipped cream and got this.


I still have lots of room for improvement as far as my decoration skill is concern. I just can't get a smooth surface. I attribute that to my lack of skills and another possibility is, my cream layer is thin thus unable to get the smooth effect (lame excuse :P)?

Besides the usual strawberries, I was thinking what else can I add to make it "unusual"? Ransacked my fridge and found a packet of marshmallows. Sliced each into half and placed them in between the strawberries. There we have it, a Strawberry Marshmallow Cake! Hehehe...

This is how the cake looks inside. See? I'm not a cream person so my cream layers are all very thin. I think it defeats the purpose to have a thick cream cake (just to look nice) and people starts scrapping it away when they eat it.


My nephew J usually eats a mouthful or so and will pass it to his mother to finish up the cake. But for this cake, he actually finished up the whole slice I gave him! I'm so happy :)


Tuesday, April 14, 2009

AMC Fried Fish

I must be crazy to be blogging about this but I must say this is the FIRST time my fish doesn't stick to the pan! This may be a boring post to some but to me, it's to mark THE DAY :)


I've tried frying fish several times but the fish's skin always get stucked to the pan, and my end result is always a messy fish. Although kids don't mind, I don't like it. See my fried fish now? Almost perfect :)

DIY Soft Butter


I'm a person who doesn't like to stick to a regular brand for long, especially food stuff (the same goes for toothpaste). The reason is simple. If product A has an excess XXX but a deficit in YYY, if you consume too much of product A, you'll have an excess in XXX and a deficit in YYY (isn't that obvious?). On the other hand, if product B has more YYY and less XXX, alternating between products A & B will give you a more "balanced" diet.

My family doesn't eat a lot of margarine but since I have this soft butter recipe on hand, there's no harm trying to DIY. This recipe is shared by S_ter in Kitchen Capers . You'll need to become a member in order to read the recipes there. However, I'll written to S_ter and she has agreed to let me publicise this recipe in my blog (thanks S_ter!).

I've made this twice, both using a small amount of butter to try out. First time I made it with Sunflower Oil, 2nd time with Olive Oil. I personally prefer the one with Olive Oil. However, I couldn't get the really soft consistency but it's spreadable if I were to thaw it for a few seconds. I suspect it's because I didn't zap the butter till really soft. I'll definitely try this again.


Homemade Soft Butter

Ingredients
200g butter
50g vegetable oil
(any oil of your preference but I prefer to use Olive Oil)


Method

  1. Microwave butter on medium for 20 seconds. Remove from microwave oven, cream the butter and return it to microwave for another 20 seconds. Repeat the process, if needed, till butter is really soft.
  2. Add 50g oil and stir to blend oil into creamed butter.
  3. Replace in fridge to "harden" into soft butter.

Monday, April 13, 2009

Doughnuts

A few years ago, I bought a Penguin Waffle Maker by Morries. I don't have any fool-proof recipe then but thought the waffle will be well-liked by my kids so I just bought it.

When I was surfing Aunty Yochana's blog, I chanced upon her mini doughnut recipe. She uses an electric doughnut maker. I don't own one and I don't intend to get one. I thought the waffle maker might come in handy and gave it a try.


I can't seem to be able to fill the waffle maker with the right amount of batter. It's either too much or too little. When it's too much, the batter overflows while cooking. When it's too little, I get deformed penguins (see those feet?).


I made another batch and this time round, I filled it up with a little bit more batter and got an almost perfect penguin. I'll say this is the first time ever I've gotten such beautiful penguins.


The inside is soft and fluffy :)


Ingredients
75 gm. Plain flour
50 gm. sugar (I use 35g sugar)
2 tsp. Baking Powder
1/4 tsp. salt
75 ml. fresh milk
1 large egg
30 gm. or 2 tbsp. melted butter or vegetable oil
100 gm. caster sugar for coating (I omit)


Method

Preheat doughnut maker for 5 mins.

  1. Mix all the dry ingredients in a mixing bowl.
  2. Add the milk, egg and oil and stir till well mixed and smooth.
  3. Fill each hole with 10 ml. (1 dsp.) of batter.
  4. Close the lid and lock the latch.
  5. Bake for 2 mins.
  6. Remove cooked doughnuts and toss quickly in the caster sugar.
  7. Serve.