Sunday, October 31, 2010

Chicken Butter Rice (Japanese Style)

During my working days, a few like-minded colleagues (turned friends) visit Japanese restaurants on a regular basis, tucking in on our favourite bento and sushi.  Oh.. those were the days I missed.

My kids love Japanese food too.  Whenever I declare the kitchen is closed for the day, their usual request is sushi for dinner.  I enjoy eating Japanese food but DH prefers Chinese food.  So if we're eating out as a family, we always end up in this Chinese restaurant at the airport.
  
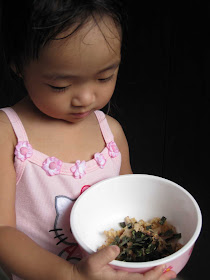
I chanced upon this Japanese style butter rice and made it for the kids (seasonings reduced). They love it, except for DD3. You should see how she grimaced at her first bite :P But then again, she will still finish her bowl of rice served.

DD3 requested to have a picture taken, with her bowl :-)
 
Chicken Butter Rice
(recipe adapted from here)
Serves 2

Ingredients
1 chicken breast, cut to bite size
8 shimeji mushrooms, sliced thinly/chucks
1 onion, cut into small pieces
1 tbsp of butter
1 tbsp of vegetable oil
2 cups cooked rice

Sauce

1/2 tsp grated ginger
1 tbsp of ketchup
2 tbsp of soy sauce
1 tbsp of homemade rice wine (Sake used originally)

Method
  1. Clean and wash chicken. Pat dry chicken with kitchen towel and cut to bite size pieces (I marinated the chicken with light soy sauce and pepper for 1 hour prior to cooking - optional)
  2. Wash and cut mushrooms into slices.
  3. Mix grated ginger, ketchup, soy sauce and rice wine in a small bowl and set aside.
  4. Heat pan and add oil, fry onion until soft.
  5. Add chicken and cook till chicken is slightly browned.
  6. Add shimeji mushrooms and cook till tender.
  7. Pour in mixed ketchup, soy sauce and rice wine to the pan and mix well. This should take about a minute or 2 to mix everything together. Remove from heat.
  8. Scoop cooked rice into a big mixing bowl while the rice is still hot.  Add in butter and mix till the butter has melted completely.
  9. Add cooked chicken and mushrooms from the frying pan into the mixing bowl. Mix everything together.
  10. Serve immediately.

Friday, October 29, 2010

Clear Water Cake (Sponge Cake) 清水蛋糕

I've not been baking for a long time and with an itching pair of hands, I decided to try Angel's Clear Water Cake which I have bookmarked a year ago. 

But why "clear water" when there is no water used in the first place? To quote the originator, "这个蛋糕就如名字一样,外形清清澈澈简简单单,可是里面却不简单哦,超细腻的组织,超柔软的口感,入口即化".

I didn't bother to level the top of the batter and ended up with uneven looking cakes.  Also, after baking for 12 mins, the top didn't brown although the cake was cooked so I gave it another 2 minutes, hoping to get a nice brown.  Not much luck here.

Instead of using muffin cups, I used mini cupcake cases as I wanted it to be popped into the mouth, just like that, no bites = no mess.

And it's just right for my son to pop the whole cake into his mouth :)

This has a light and fluffy texture, definitely a keeper!

Clear Water Cake 清水蛋糕
(Recipe originally from here and seen here)

Ingredients
(A)
3 egg yolks 蛋黄
1 whole egg 全蛋
50g corn oil 粟米油

(B)
50g low protein flour (I used plain flour as I ran out of cake flour)

(C)
3 egg whites 蛋白

(D)
40g castor sugar 细砂糖
1g salt 盐 (I didn't weigh, just added about 1/4 tsp)

Method 做法
  1. Beat (A) till well mixed with an egg beater. 用打蛋器打匀(A)。
  2. Sift in (B), mix well. 筛入(B)拌匀.
  3. Whisk (C) till frothy, add (D) and beat till stiff peak. 把(C)打至粗泡,加入(D)打至干性发泡。
  4. Fold in the egg white mixture to egg yolk mixture in 3 additions, mix till well combined. Scope the batter into paper cups till 60% full. 蛋白霜分3次和蛋黄糊拌匀,用小勺装进纸杯至6分满。
  5. Bake in preheated oven at 150C for about 18-20mins. 烤箱预热150度,烤18-20分钟左右。(I baked mine for 14 mins as my casings are really small)

Wednesday, October 27, 2010

Braised Chicken with Miso Paste

Many happenings at home and with DH overseas, I'm struggling alone so I'm just going to post another quick entry here, just to show my presence.

This is another recipe with miso paste and my kids love it.  Thanks Anncoo for sharing this great recipe!  I've reduced the seasonings slightly as my cooking is relatively bland.

Braised Chicken with Miso Paste
Ingredients
500g Chicken Thigh - cut to pieces
250g Potatoes - remove skin and cut to pieces
1/2 tbsp Dark soy sauce
1 tbsp Miso paste
1/2 tbsp Garlic - chopped
1/2 tsp Sugar
125 - 150ml Water (estimated)

Seasonings
1/4 tsp sesame oil
1/4 tsp salt
1/4 tsp pepper
1/2 tbsp Dark soy sauce

Method
  1. Clean and wash chicken (I like mine with skin removed). Pat dry chicken with kitchen towel and cut to pieces. Marinate chicken with seasonings for 1-2 hours.
  2. Heat enough oil in wok, add chopped garlic and miso paste and fry for a while till aromatic.
  3. Add in chicken pieces with another 1/2 tbsp dark soy sauce and sugar, continue to stir fry chicken well.
  4. Lastly add in cut potatoes, mix well with the chicken, add in just enough water to cover the chicken. Bring water to boil and cover with lid, lower heat and simmer for about 20 mins or potatoes soften.
  5. Add a little more water when the sauce dries up a little.
  6. Lastly add corn flour with water as thickening. (optional - I omit).
  7. Serve hot with rice.

Thursday, October 14, 2010

Papaya Popsicles


I've asked this question before, "What do you do with overripe papayas?"  I've made papaya milkshake with them and now I've converted them into popsicles, inspiration came from my watermelon popsicles ;-)
 
I was trying to snap a picture of the popsicles but DD3 just couldn't wait any longer.
 
Quick and easy, yet very healthy treat for the family!
 
And if you are plain lazy like me, just freeze the whole cut papaya into the freezer ;-)
 
Papaya Popsicles
Ingredients
1/2 large papaya/paw paw chucks
1 lime juice (I find it quite mild, can use up to 2 limes if you want)

Method
  1. Cut the papaya in chunks with skin and seeds removed.
  2. In a blender, combine the papaya chunks and lime juice. Blend the mixture till the mixture turns into liquid.
  3. Pour the mixture into popsicles mould and freeze for at least 8 hours or overnight.
  4. Run the molds under warm water for 30 seconds to release the pops. Enjoy!

Monday, October 11, 2010

Chayote and Fresh Chinese Yam Soup

Just a quick update on soup using chayote and chinese yam.

I have only 1 large chayote so I just make do with it but reduced water accordingly, else the soup will be too bland.  This is a milky soup as chinese yam is used, supposingly to relieve cough and colds.

Another mild sweet soup, we like it.

Chayote and Fresh Chinese Yam Soup
Ingredients
300g pork ribs/lean meat
1 - 2 chayotes (佛手瓜 fo shou gua /合掌瓜 hup jeung gwa)
1 fresh chinese yam (淮山 huai shan /山药 shan yao)
1200ml water
Salt to taste

Method
  1. Wash and cut chayotes and chinese yam into cubes.
  2. Blanch pork ribs/lean meat.
  3. Bring water to boil and add all ingredients in a pot. Using medium fire, bring water to boil again and cook for 30 minutes, reduce to small flame and simmer for 2 hours.
  4. Add salt to taste before serving.

Friday, October 8, 2010

Piano Cake

This is a jump queue post.

My son's birthday was back in August but I didn't have time to blog about it.  Decide to jump the queue before the next birthday arrives (my mom's in November).

DD1 and DS2 started taking piano lessons back in June this year.  I must say DS2 did not show as much interest as his sister since he hasn't been practising.  Probably because of his age?  Or he just doesn't have the passion?  But the interesting part is, he asked me to bake him a piano cake for his birthday.

I remember seeing 2 piano cakes, here and here, both very different styles.  I had wanted to adapt HHB's keyboard cake but I don't have a cake box big enough to accommodate a rectangle cake.  And with Wendy's, though I have a square cake pan, it has not been used to bake a chiffon cake (I only use chiffon cake base for my layer cakes) so I was worried the cake may get stuck to the bottom of the pan.  Googled for piano cake ideas and all of them are baked in squares or rectangles, mostly covered with fondant (which needs a dense cake to support).  I give up.  Decided to just bake a 8" round cake and decide on the decoration later as I've communicated with DS2 I can't commit but I'll try my best. He gave me a few other options, a ball cake, a gummy bear cake, or just a cake with his name on it and the words "Happy Birthday".

I did my sketch on a recycled paper, measuring out the black and white keys in a 8" cake pan.  I forgot 8" is too big for my family so I had to reduce to a 7" instead.  After this draft was done, DD3 decided to help me with some colouring.

I melted some chocolate for the black keys but when I was removing them from the parchment paper, they cracked.  I have contigency plan of course, Kit Kat!  That saved the cake :-)

I used dairy whipping cream and again, it's melting on me :'(

I left the cake on the table while I go get the knife.  DD3 couldn't wait and decided to poke her little finger into the cream.  If DS2 were to see this, a war is inevitable.

I first saw this rainbow cake at What's For Dessert Today, adapted from Rumah Manis, and then at Wendy's.  I thought the kids will be thrilled to see something colourful but I was wrong.  They didn't go "wow" after seeing the sliced cake.  To them, it was just another plain cake.

Basic Chiffon Cake
Ingredients
3 egg yolks
20g castor sugar

60ml corn oil
pinch of salt
100ml water

110g cake flour
1/3 baking powder

3 egg whites
1/3 tsp cream of tartar
30g castor sugar

Method
  1. In a bowl, using hand whisk, whisk yolks and sugar till sugar dissolves.
  2. Add oil and salt, whisk and add water. Stir well.
  3. Fold in sifted flour and baking powder, mix well.
  4. In another bowl, using an electric mixer, beat till the whites are frothy. Add in Cream of Tartar and beat till soft peaks.
  5. Add in sugar gradually and beat till stiff peaks.
  6. Fold in 1/3 of the whites into the yolk mixture using a rubber spatula till incorporated.
  7. Pour the mixture to the remaining egg whites and fold in gently till incorporated.
  8. Pour the batter into 7" round pan. Bang the pan on the table to get rid of bubbles.
  9. Bake at pre-heated oven of 170 deg.C for 20 mins.
  10. Turn down the temperature to 160 deg.C and bake for another 20 - 25 mins.
  11. Reduce the temperature to 140 deg.C and bake for a further 5 - 10 mins to brown the surface.
  12. Remove from the oven and invert the pan. Remove the cake from pan when it's completely cooled.

Friday, October 1, 2010

Piglets (豬仔餅)

I need to apologise to all my snow skin mooncake recipients.  SL shared that her mother will not give away snowskin moonies in white as it deem inauspicious.  My intention was good (all natural with no artificial flavours and colourings, remember?) but it didn't occur to me to think about it as ill boding.  I hope none of my recipients are offended.

I promise this will be my last post on moonies.  I know, Mid-Autumn Festival was like 1.5 weeks ago but here I am, still blogging about it.  In fact, what you read here are all cooked/baked several weeks or even months back.  Take for example my son's birthday (which falls in Aug), I've not posted his cake yet (and that is NOT the oldest backlog).

Back to the piglets (豬仔餅).  Anncoo has a similar recipe but the standing time was only 20 mins.  I decided to try her method and made a batch of Piglets but I find them too sweet, probably because I brushed them with a layer of sugar syrup instead of eggwash.  And the shape of these piggies, I thought they looked more like alligators :P

All the piglets were stuffed with some lotus paste as I was trying to clear off the balance in my fridge. 

In my opinion, I think the fishes look so much better.

Traditional Baked Mooncakes
Yield : 12 piglet mooncakes

Ingredients
(A)
200g Hong Kong Flour

(B)
120g Golden syrup/Sugar syrup
60g Peanut oil (I used sunflower oil)
1/4 tsp Alkaline water
* mix together

(C)
120g White Lotus Paste
Some melon seeds, toasted (optional)

(D)
1 tbsp sugar syrup
1 tsp water
** mix together

Method
  1. Toast melon seeds and leave to cool.
  2. Mix melon seeds with lotus paste and divide into portions of 10g each.
  3. Sift hong kong flour into a mixing bowl.
  4. Pour in (B), combine well to get a smooth dough in one direction.
  5. Cover with cloth, let it stand for 20 minutes.
  6. Divide dough to portions of 30g each portion.
  7. Lightly flour your hands, wrap lotus paste with dough, roll into a ball.
  8. Lightly flour the mould.
  9. Place mooncake in mould, flatten, dislodge the mooncake.
  10. Bake in a preheated oven at 180°C for 10 mins, remove and brush with diluted sugar syrup.  Continue to bake for another 15 mins at 180°C.
  11. Remove mooncakes from oven and leave to cool.
  12. Store for 3 days before serving.