Friday, July 30, 2010

Steamed Fish Paste with Tofu

My mom taught me this simple dish with only 2 main ingredients, fish paste and tofu.  You can also add in some spring onions and red chilli for colours.

This is a very versatile recipe, can throw in some vegetables like chopped spinach or grated carrots.

Sometimes, I will throw in an egg too.  My kids love this dish :-)

If you get bored eating them steamed, you can also cut the steamed fish paste tofu into smaller pieces and pan fry it (not suitable with chopped spinach/grated carrots though).

Steamed Fish Paste with Tofu
Ingredients
1/2 block silken tofu (can use egg tofu too)
100g fish paste

Optional
chopped spring onions
chopped red chilli
1 beaten egg
chopped spinach
grated carrot
salt and pepper to taste (I didn't add salt as the fish paste is already salted)
sesame oil

Method
  1. In a mixing bowl, mash tofu with fish paste.
  2. Add in some chopped spring onions, chilli, salt (optional) and pepper to taste.
  3. Spread the mixture evenly in a bowl.
  4. Steam for 10 minutes.

Wednesday, July 28, 2010

Hearty Oatmeals

I am looking forward to today as I have made arrangement to meet up with DO and TW.  DD3 was down with a chesty cough and a low grade fever for several days.  That fever made me a panda as I was up several times a night taking her temperature (no medication given since it's low grade fever).  After a 10 days course of antibiotic, she finally recovered.  Phew!  Just when I thought things were getting back on track, DS2 caught the same virus and is down too!  I've kept him away from school since Monday to prevent him from spreading the germs.  To make things worse, DD3 started running a fever again yesterday :-(  Though MIL has agreed to take care of the children while I go "partying", I felt irresponsible to leave my sick kids with her, as she has to cook and take care of FIL, niece and nephew.  After contemplating, I decided not to join my girlfriends (PS: DO, I'm sorry I couldn't make it today, owe you one.  HAPPY BIRTHDAY girl!).

With an unpredictable weather, it is tough to bring them to the supermarket.  I just make do with whatever ingredients I have in the fridge to cook something simple, and that is usually oatmeal.

When I was young, my mom fed me with oats on an almost daily basis and I hated it!  It was only when I started working, then I started to appreciate eating them.

This is a sweet version, cooked with brown sugar and served with cream cracker/soda biscuits and dried fruits.

Savoury version, cooked with frozen stock, leftover braised pork belly (I removed the fats) and some vegetables.  When cooking savoury oats, I like to crack in an egg.

I do not measure out the ingredients when I cook oatmeals.  Just put oats and water in a pot, cover and cook on medium low fire.  Bring to boil.  Add in sugar to taste.  Remove from heat and let it stand for 5 mins before serving.

PS: You may use more or less water, depending on what consistency you want.

Friday, July 23, 2010

Sliced Cheese Cheesecake

I'm so happy I found this recipe in Zu's blog as I don't usually have cream cheese in my fridge but sliced cheese, yes, always!

It was an impromptu decision to bake this. I started measuring the ingredients at 11am and by 11.15am, I was already washing up the utensils ;-)

The cheese batter was very watery and it was difficult to fold into the whisked egg whites.  After a few strokes with the spatula, I gave up and switched to mix with a hand whisk and it worked.  Such a breeze!

I baked them in 2 pans, hoping to shorten the baking time, so I could be on time to fetch DS2 from school. However, the baking time was still very much the same. It was my mistake because I used a 7" and a loaf pan, should have used a 8" pan plus a loaf pan. Also, instead of using baine marie/water bath method, I placed a bowl of hot water into the oven with the cake pans for the steam effect.
 
I thought my interval from my last cheesecake baking was good, at least 3 weeks, but I was wrong.  The kids didn't even want to eat this!  They gave me that "Huh?  Not cheesecake again!" look.  No prize for guessing who ultimately finished it up :-|

The texture of this cake is very much like the Japanese Cottony Cheesecakes I have made earlier. It yields a soft and moist cake but I thought it was abit too moist and had this mushy feeling when you bite into it. May need to reduce liquid or increase flour the next time I make this.

Sliced Cheese Cheesecake
Ingredients
(A)
5 sliced cheese (I used low fat)
200ml fresh milk (I used low fat UHT milk)
70g butter (I just cut out 3cm thick from the block)

(B)
4 egg yolks
70g cake flour (I used 1/2 cup plain flour)
1 tbsp lemon juice (optional)

(C)
65g sugar (I used 1/4 cup sugar)
4 egg whites

Method
  1. Combine sliced cheese and milk in a double boiler. Cook till cheese melts, stir mixture with a hand whisk to prevent lumps.  Add butter, let it melt and stir till well blended.
  2. In another clean bowl, beat the yolks till creamy and add it to the milk mixture.
  3. Slowly stir in lemon juice and fold in flour, mix well.
  4. Whisk egg white till foamy. Add in the sugar gradually and whisk until stiff peaks form.
  5. Fold in 1/3 of the whites into the yolk mixture using hand whisk till incorporated.
  6. Pour the mixture to the remaining egg whites and mix till incorporated.
  7. Pour 2/3 portion into a 7” round cake pan (line the bottom of the pan with greaseproof paper) and  the balance 1/3 to 9" X 5" baking pan.
  8. Fill a bowl with hot water and put in into the oven with the prepared cake pan, bake in preheated oven @ 170C for 20 mins.  Lower the temperature to 140C and bake it for further 40mins or until skewer inserted to centre of cake comes out clean.
  9. Leave to cool in oven wih door slightly ajar.
  10. Unmould and chill in fridge before slicing.

Wednesday, July 21, 2010

Fried Hokkien Prawn Noodles


We love Fried Hokkien Prawn Noodles but when we eat this outside, we always eat it on it's own and there are not much greens in it.  So I try to replicate this at home but incorporated more veggies.  Instead of using chives, I usually replaced it with spring onions/chye sim (cai xin/choysum). So it's not so authentic but I don't really care as long as my family gets to eat some greens ;-)


You may adjust the stock used according.  I prefer my noodle to be more "soupy" whereas DH likes it dry so I had to cook his portion separately.

Hokkien Prawns Noodles Recipe
(serves 2A + 3C)
Ingredients
(A)
200g prawns, heads and shells removed, keeping tail intact
100g streaky pork
2 squids
250g pork ribs
1.5 litre water

(B)
250g flat noodles
250g thick bee hoon (soaked in warm water for 10 - 15 minutes)
400g chye sim
200g bean sprouts
4 - 6 cloves garlic, chopped
2 eggs

(C)
1.5 tbsp fish sauce
1.5 tbsp light soya sauce
1/2 tsp sugar
* you may increase the sauce by another 1/2 tbsp

(D)
some calamansi/lime

Method
Cooking the soup base
  1. Blanch pork ribs and set aside.
  2. In a pot/wok, heat up some oil and fry prawn shells and heads till fragrant.  Set aside for later use.
  3. Bring 1.5 litre of water to boil, add in squid and prawns to scald (less than 1 minute).  Remove and add in streaky pork, cover and cook for 10 mins.  Put aside all ingredients to cool and cut into thin strips.
  4. Add pork ribs and fried prawn shells and heads into soup and cook for 10 mins, reduce to small flame and simmer for 1 hour.
Frying the noodles
  1. Heat up some oil in a wok/pot and add in garlic, cook till fragrant.
  2. Crack in 2 eggs, stir to break up the eggs.
  3. Add 1  - 1.5 cup of stock and add in soaked thick bee hoon to cook till the been hoon absorb the stock.
  4. Add in flat noodles and fry for a minute before adding in chye sim.  Pour in in another 1/2 cup of stock.  Cover and simmer for 2 - 3 mins.
  5. Add in cut ingredients and bean sprouts, season to taste.  Fry for another 1 minute and add in 1/2 cup of stock.  Mix evenly and dish up.
  6. Squeeze some calamansi juice over the noodles and serve immediately.

Saturday, July 17, 2010

Pretzels

I was able to churn out nice warm breads on alternate days but not anymore now. Come to think of it, the last time I had piping hot loaves of bread from my oven was in November 2009. And that explains why kids are playing with dough made with expired flour so often now.

As I've mentioned earlier, my weighing scale died. I do have another weighing scale at home but it's for a 5kg load and each marker is for 25g measurement. It is so difficult to gauge if I need a 15g ingredient. With DH's intensive travelling schedule, I do not want to spend too much time in shopping malls as I'll rather bring the kids outdoor.

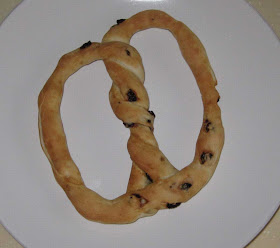
I remember I have a pretzel recipe in cup measurements and decided to make it again, for our afternoon tea.  I made 4 different flavours, parmesan cheese, salt, currants and cinnanon sugar.


These look more like pretzels but still, not too nicely shaped.


And the fat and ugly pretzels :P

When it's fresh from the oven, it tasted very much like Auntie Anne's pretzels.  I cannot remember where I got this recipe from so can't credit the originator.

Pretzels
Ingredients
2/3 cup water (use 1/2 cup first, add more if dough is too dry)
1/3 cup icing sugar
3/4 tsp salt
1 tsp corn oil
1 1/2 tsp yeast
1 3/4 cups plain flour

Bath solution
1 cup warm water
1 tbsp baking soda
*mix together and stir till dissolved

Method
  1. Place ingredients in the pan of the bread machine in the order recommended by the manufacturer. Let the machine knead for 15mins, stop the cycle and re-start the machine and let the dough knead for another cycle.
  2. Let it proof in machine for 45 - 60 mins or till double in size.
  3. Preheat oven to 220C.
  4. Divide the risen dough to 8-12 even portions.
  5. Form it into pretzels.
  6. Dip each pretzel into the bath solution and then let it dry on a tea towel to absorb the extra water.
  7. Sprinkle salt on the unbaked pretzels for a salted pretzel. If you want sweet pretzels, don't salt it.
  8. Bake the pretzels for 10 minutes or till golden brown.
  9. Remove from oven, brush with melted butter (I was lazy so I skipped this step).

Thursday, July 15, 2010

Simple Fried Rice

It had been a fairly bad week for me and I'm glad DH is finally home, to share and listen to my sorrows.

When I thought what I've gone through was bad, I received a call about DL and her family.  Her single income DH  took the rap for someone else's mistakes and is currently jobless.  They can hardly make ends meet now.  So what are my problems compared to hers?  My problems seem so insignificant and I appeared too petty for the way I behaved.  What I thought were problems no longer pose as issues now, in fact, they appear more like a blessing to me after listening to DL's story.  I don't wish to be reminded of my blessings through them, but unfortunately, that is usually the case.  I pray for their well-being and I hope her husband finds a job soon.

Whenever my brain goes into hibernation, I end up cooking fried rice, usually with long beans and ham (I always have them in my freezer, for "emergencies").  I dislike feeding my family with processed food but if I really have to, I always convince myself that it is still better than eating outside food, at least it is home-cooked.

 
Simple Fried Rice
Ingredients
3 pcs Honey Baked Ham, diced/julienned (can use luncheon meat too)
200g long beans, finely cut
1 small carrot, julienned
2 cloves garlic, chopped
5 cloves shallot, chopped
some corn/sunflower oil
1 tbsp dark soy sauce
some pepper
some salt to taste (optional)
3 cups cooked rice

Method
  1. Heat up some oil in a wok and add 1/2 portion garlic and shallot, cook till fragrant. Add in carrot, stir fry briefly and add in long beans. Lastly, add in ham to stir fry.  Dish out and set aside.
  2. In the same wok, heat up some oil and add balance garlic and shallot. Add in rice and let it sit for a minute without disturbing.  Using medium high heat, stir fry rice (you will hear the hissing sound), add dark soy sauce and pepper to taste. Stir well and finally add in the fried ham and long beans. Mix well and dish up. Serve hot.

Friday, July 9, 2010

Ginger Milk Curd/Custard/Pudding (姜汁撞奶)

The first time I had Ginger Milk Curd/Custard/Pudding (姜汁撞奶) was like 16 years ago when I visited Hong Kong.  I fell in love with it instantly as I love ginger and what's more, having it on a cold winter night.  That really warmed both my body and soul ;-)

Florence posted a recipe in Kitchen Capers back in 1995 and I've had that recipe for the longest time, making no attempt to try it until I saw Wendy's entry here.  She made it 8 times but failed and finally saw success in her 9th attempt.  Deep in my heart I heard a voice saying, "how difficult can it be?"

I used to give my kids fresh milk but being a lazy mom, I feed them UHT milk now.  It is in smaller packets and they just need to get a pack of it from the cupboard/fridge and drink it, no pouring/washing up cups :P 

 Attempt #1 - failed

Next, I made it with low-fat UHT milk.

Attempt #2 - failed again
Wendy mentioned it has to be made with fresh/raw milk so I bought a pack of fresh milk from the supermarket today. 

Oops.. abit blur but I was too lazy to snap another pic :P  Will do so when I have more time.

And since I've grated quite a bit of ginger juice in my 2 earlier attempts, I froze the balance 1 tbsp and used it today.  I wasn't sure if frozen juice will hinder the process but since I've already failed twice, so why worry if this attempt fails?  Anyway, it tasted great in liquid too ;-)

Attempt #3 - successful!!! ^-^

I wasn't expecting any success but it set!

Soft and silky!

And guess what?  DD3 enjoyed eating this too!

Ingredients
115ml - 125ml fresh milk
1 tsp sugar
2 tsp - 3 tsp ginger juice

Method
  1. Put ginger juice into a bowl.
  2. Heat up the milk and sugar in a saucepan over low heat until tiny bubbles appear around the edge of the pan.
  3. Remove from heat and stir about 15 times with a spoon.
  4. Pour mixture into prepared ginger juice and stir it once. Leave it to set for 10 mins.
  5. Enjoy.

Sunday, July 4, 2010

Matcha Konnyaku Jelly

I was trying to finish up my expiring matcha and made this.  Another no-brainer recipe :P

DH doesn't like the "hard" and chewy texture of Konnyaku Jelly but if I add in more water, he will eat them ;-)

Matcha Konnyaku Jelly
Ingredients
(A)
1 packet Konnyaku Jelly Powder (10g)
3/4 cup Sugar
950ml Water

(B)
1 tbsp Matcha/green tea powder
100ml Warm Water
* mix together

Method
  1. In a small bowl, dissolve matcha in warm water.
  2. In another bowl, mix konnyaku powder and caster sugar together.
  3. In a medium pot, bring water to boil. Pour the konnyaku mixture into water gradually and stir till sugar dissolved.
  4. Turn off flame and keep stirring for about 5 mins, till the bubbles dissipates and the mixture becomes clear.
  5. When the mixture is slightly cooled, sieve in matcha mixture and stir well.
  6. Pour the Konnyaku solution into the moulds.
  7. Leave to cool and chill in fridge before serving.

Friday, July 2, 2010

Baileys Japanese Cotton Cheesecake (Alex Goh)

This is yet another overdue post.

As I wasn't satisfied with my Japanese Cheesecake texture, I made it again since I've got the balance 1/2 block of cheese sitting in my fridge from my previous attempt

I'm pretty sure I've got more accurate measurements this time round as the texture was moist and soft.  Yes, I did it! :-)  But instead of making just a regular cheesecake, I added some Baileys Irish Cream into it for extra flavour.  Taste good but kids got sick of eating so much cheesecakes and decided they've had enough.  I end up eating the whole cake.  Sinful...  Lesson learnt, do not attempt the same recipe within a short period of time.

Baileys Japanese Cotton Cheesecake
(adapted from Alex Goh's Fantastic Cheesecake, from here)

Ingredients
(A)
1/2 block (125g) cream cheese
90ml milk
1 cm thick (15g) butter

(B) * sifted
1/4 cup (30g) plain flour
3 tbsp (24g) cornstarch

(C)
3 egg yolks
pinch of salt
1 tbsp baileys irish cream

(D)
3 egg whites
1/8 tsp cream of tartar
1/4 cup (60g) sugar

Method
  1. In a heavy saucepan, cook cream cheese, milk and butter until thick and smooth. Set aside to cool.
  2. Fold in (B) and mix well with a whisk.
  3. Put egg yolks into the cheese mixture and stir until well combined. Add Baileys Irish Cream and mix well.
  4. In another clean bowl, beat egg whites until frothy. Put in cream of tartar and beat until soft peaks, add in sugar gradually and beat until stiff (soft droopy peak that will hold its form).
  5. Fold in 1/3 of egg whites into cheese mixture with a spatula till incorporated.
  6. Pour the cheese mixture into the remaining egg whites and fold in gently till incorporated.
  7. Pour batter into a lined 8" pan (I was lazy so I just greased and flour the base on the pan only).
  8. Oil a piece of aluminium foil and cover the pan loosely.
  9. Fill a bowl with hot water and put in into the oven with the prepared cake pan, bake in preheated oven @ 160C for 20 mins.
  10. Turn down the temperature to 150C and bake for 20mins.
  11. Remove the foil and reduce the temperature to 140C and bake for another 20 mins and until skewer inserted to centre of cake comes out clean.
  12. Leave to cool in oven wih door slightly ajar.
  13. Unmould and chill in fridge before slicing.